
Virtual TapeServer 6.04.04 for NonStop Servers Quick Start Guide

2 | Virtual TapeServer Quick Start Guide
1 Prepare for installation
To ensure that you are ready for deployment, complete the following tasks.
Choose a location
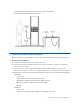
VTS can be mounted in a 19-inch rack near the host server. Allow the following unit spacing:
• VTS server — Allow 2U for the VTS server
• SCSI converter — Allow 1U for the SCSI converter, if necessary
• External storage — Allow 2U each for the VT5930 and VT5931, if purchased
When considering the installation location, note the following guidelines:
• Place the server and its components near 110 or 220/240 volt power outlets. VTS uses
redundant power supplies, so consider independent power sources for high-availability
operation. Additional power outlets might be required for external tape drives or RAID
storage devices.
• Place the VTS server near the host server, within the limits of the cable specifications.
• Identify ports on the host server(s) to which you can connect VTS.
• Make sure the location is a clean, dust-free area that is well ventilated.
• Avoid areas where heat, electrical noise, and electromagnetic fields are generated.
Gather network information
After you mount and cable the hardware, you must configure a fully qualified domain name if
using DHCP.
Note
You must use a static IP address if GFS is configured in your environment. DHCP is not
supported with GFS.
You will need the following if you do not plan to use DHCP:
• Fully qualified domain name
• IP address
• Subnet mask
• Default router (gateway)
• DNS or DHCP addresses with VTS name entered
A second set of IP settings may be required if configuring Instant DR or AutoCopy. It is
recommended that you segregate Instant DR and AutoCopy traffic from network and EMS traffic
to ensure adequate response times.
Finally, in order to log in to configure network settings, you must obtain the serial number of the
VTS server. Note the serial number that is provided on a label on the back of the server.
Obtain tools and supplies for installation
You may need the following items to complete the installation instructions:
• #2 Phillips screwdriver
• Level
• Pliers