
Virtual TapeServer 6.04.04 for NonStop Servers Supplemental Installation Guide

8 | Installing GFS
c. Select GFS.
d. For the name, enter the vault name (for example, VAULT10).
e. For the mount point, enter the location where you want the vault to appear (for
example, /VAULT10).
f. For the device, enter the name of the device specified in step 11 (for example, /dev/
gfsvg1/lv1).
g. Leave the options and filesystem ID blank.
h. Click Submit.
Because the LUN-to-device mapping can be different on each system, clvm logical volume
names are globally unique. You cannot create duplicates.
Repeat these steps for each GFS file system.
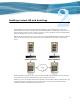
15. Complete the following steps on each cluster node to verify that all cluster nodes can
access the GFS volumes, mount them, and access files written by other nodes. In the
following steps, VAULT10 is used as the name of the vault.
a. Configure the /etc/fstab file to automatically mount the file system when VTS
restarts. Add a line to the file that is similar to the following:
/dev/gfsvg1/lv1 /VAULT10 gfs defaults 0 0
b. Enter the following commands on the console of the node:
mkdir /VAULT10
mount -a -t gfs
chown bill.root /VAULT10
chmod 755 /VAULT10
ls -al /VAULT10
The following is an example of output for the ls command:
total 12
drwxr-xr-x 2 root root 3864 May 15 15:24 .
drwxr-xr-x 4 root root 4096 May 15 17:59 ..
c. Enter the following command to verify that there is free space on the mounted GFS
file system.
df -h /VAULT10
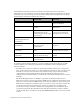
Here is an example of the output:
Filesystem Size Used Avail Use% Mounted on
/dev/mapper/gfsvg1-lv1
17G 36K 17G 1% /VAULT10
d. Enter the following command to verify that you can write to the mounted GFS file
system.
touch /VAULT10/`hostname`