
Virtual TapeServer 8.0 Configuration Guide


Creating and Managing Virtual Media | 75
Requires the Virtual Tape Mounts and Locks access right
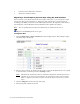
To view mounts
1. Click Configuration→Tapes and Pools on the navigation pane.
2. Select mounts and locks from the window menu at the top of the Configure Tapes and
Pools page.
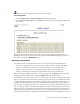
The top of the page shows the recent mount requests. Only mount requests that can be
handled by the server are displayed. You can also restart the EMS messaging service from
this page by clicking the RESTART button.
Exporting virtual tapes
If a capacity license is enabled on the server, you can export data in the following ways:
• Export to a physical library using a tape-to-tape export job to an external tape library
• Export to a physical tape drive using a tape-to-tape export to a standalone drive
• Export a virtual tape to one or more physical tapes using a stacked export job
• Export a virtual tape to a remote host (replication target) using a replicate job
Refer to the online help for procedures. To view the help, click the Help button at the top of
the Manage External Data page or click the Help Set link on the About page.
If a VTD license is enabled on the server, you can export a virtual tape to physical tape. This
feature was designed for occasional low-volume use and requires that a standalone tape drive
or simple cartridge autoloader is connected to VTS. You must ensure that the tape drive is
available and that appropriate tape media is installed before beginning an export operation.
You can export a single virtual tape or an entire pool. If you export a single virtual tape, you
can use that tape outside of the VTS environment, just as you would any other physical tape.
When you export a virtual tape, VTS transfers the data to the attached drive or autoloader as
if the data was being transferred by the host server. All metadata, files, and file marks are
transferred to physical tape, though not in the VTS format. The format of the physical tape is