
Virtual TapeServer 8.2 Configuration Guide


Table Of Contents
- Virtual TapeServer for NonStop Servers Configuration Guide
- Preface
- Introduction
- Overview of Tasks
- Reconfiguring Vaults
- Enabling Licensed Features
- Configuring Ports
- Creating and Managing VTLs and VTDs
- Enabling and Performing Tape-to-tape Exports
- Enabling and Performing Stacked Exports
- Enabling and Configuring Data Replication
- Enabling and Configuring Role Swapping
- Configuring EMS Communication
- Enabling and Configuring Data Encryption
- Creating and Managing Virtual Media
- Enabling and Configuring Scan/Cleanup
- Configuring User Accounts
- Configuring Web Interface Preferences
- Managing the VTS Server
- Troubleshooting
- Maintaining GFS for VTS
- Reinstalling and Restoring VTS
- Attaching External Devices after Initial Deployment
- TCP/IP Ports and Protocols
- Index
120 | Managing the VTS Server
3. If Data Encryption is enabled, back up the most current backup of the key database by
completing these steps:
a. Log in to the VTS server.
b. Use the su command to change to the bill user:
su - bill
c. Determine the location of the most recent backup file by entering the following
command:
psql -d database -c "SELECT last_local_backup FROM
ks_backup_config"
Here is an example of the output from this command:
last_local_backup
-------------------------------------------
/VAULT00/.ks_backups/LocalKSBackup.tar.gz
(1 row)
d. Copy the .gz file to a location in the root file system or to a remote system, for safe
keeping.
e. Enter exit.
f. Log out of the server.
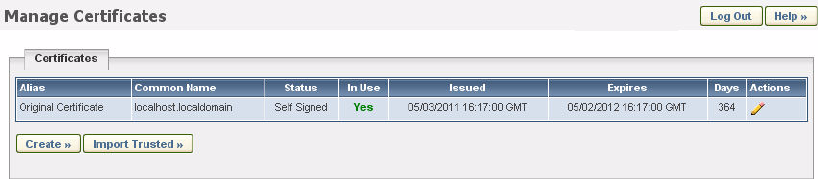
Managing certificates
VTS uses X.509 certificate-based Secure Sockets Layer (SSL) communication between the
user’s browser and the VTS web server. When VTS initially starts up, it automatically
generates a self-signed certificate. If you decide not to use a certificate approved by a
Certificate Authority, no further action is required.
If you use a self-signed certificate for SSL, your browser may display a certificate warning
when you access VTS. To prevent this warning, use a certificate signed by a Certificate
Authority (CA).
To create and manage certificates
1. Click Security→Certificates. The following page is displayed:
2. Create a certificate as described in the online help. To view help, click Help at the top of
the page.