
Virtual TapeServer 8.2 Configuration Guide


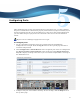

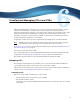
Table Of Contents
- Virtual TapeServer for NonStop Servers Configuration Guide
- Preface
- Introduction
- Overview of Tasks
- Reconfiguring Vaults
- Enabling Licensed Features
- Configuring Ports
- Creating and Managing VTLs and VTDs
- Enabling and Performing Tape-to-tape Exports
- Enabling and Performing Stacked Exports
- Enabling and Configuring Data Replication
- Enabling and Configuring Role Swapping
- Configuring EMS Communication
- Enabling and Configuring Data Encryption
- Creating and Managing Virtual Media
- Enabling and Configuring Scan/Cleanup
- Configuring User Accounts
- Configuring Web Interface Preferences
- Managing the VTS Server
- Troubleshooting
- Maintaining GFS for VTS
- Reinstalling and Restoring VTS
- Attaching External Devices after Initial Deployment
- TCP/IP Ports and Protocols
- Index

15
Enabling Licensed Features
Before you can use Virtual TapeServer (VTS), you must enable licensing. You can enable
licensing for the following:
• Managed capacity, which includes licensing for virtual tape libraries (VTLs)
• Standalone virtual tape drives (VTDs) and compression, if included
• Data Encryption Suite
• Data Replication Suite, which is implemented as replicate jobs
• 300Mb, 1Gb, 2.4Gb, and 5Gb WAN Acceleration (for use with Data Replication only)
To request license keys, contact the HP VTS Program Manager, Glenn Garrahan, at
glenn.garrahan@hp.com. VTS software license keys are associated with the serial number of
the VTS server, so any server hardware replacement or upgrade will requires new license
keys. Obtain a set of license keys for each VTS server in your environment.
The full procedures are documented in the online help, which is accessed by clicking the Help
button on the Manage System Licenses page of the VTS web interface.
Adding a license key
Requires Administration group membership
To enter a license key
1. Log in to the VTS web interface using an account that is a member of the Administration
group. Click the Log In button at the top of the page and enter a username and password.
2. Click Configuration→System on the navigation pane.