
Virtual TapeServer 8.2 Configuration Guide
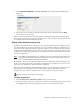
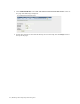
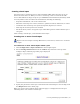
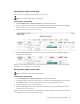

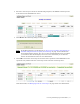
Table Of Contents
- Virtual TapeServer for NonStop Servers Configuration Guide
- Preface
- Introduction
- Overview of Tasks
- Reconfiguring Vaults
- Enabling Licensed Features
- Configuring Ports
- Creating and Managing VTLs and VTDs
- Enabling and Performing Tape-to-tape Exports
- Enabling and Performing Stacked Exports
- Enabling and Configuring Data Replication
- Enabling and Configuring Role Swapping
- Configuring EMS Communication
- Enabling and Configuring Data Encryption
- Creating and Managing Virtual Media
- Enabling and Configuring Scan/Cleanup
- Configuring User Accounts
- Configuring Web Interface Preferences
- Managing the VTS Server
- Troubleshooting
- Maintaining GFS for VTS
- Reinstalling and Restoring VTS
- Attaching External Devices after Initial Deployment
- TCP/IP Ports and Protocols
- Index

Creating and Managing Virtual Media | 71
3. Select the virtual tape to mount. In the following snapshot, the DF0000 virtual tape will
be mounted on the VF40500 host device:
4. Click Mount. The following dialog box is displayed.
Note If the Mount button is not displayed, see You can set a number of parameters in
the VTS configuration file to specify the following: on page 115 for information
about displaying this button. Also, if you cannot click the Mount button, maximize
your browser; this should display an arrow cursor and enable you to click the
button. See the Release Notes for more information.
5. Click OK to mount the virtual tape for read and write operations. Click Cancel for read
operations only. VTS mounts the virtual tape on the selected virtual tape drive.
If the mount fails, see Managing locks on virtual tapes on page 89 for more information.