
Virtual TapeServer 8.2 Configuration Guide
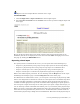
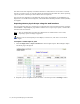
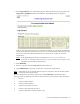
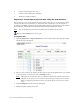
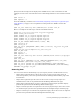
Table Of Contents
- Virtual TapeServer for NonStop Servers Configuration Guide
- Preface
- Introduction
- Overview of Tasks
- Reconfiguring Vaults
- Enabling Licensed Features
- Configuring Ports
- Creating and Managing VTLs and VTDs
- Enabling and Performing Tape-to-tape Exports
- Enabling and Performing Stacked Exports
- Enabling and Configuring Data Replication
- Enabling and Configuring Role Swapping
- Configuring EMS Communication
- Enabling and Configuring Data Encryption
- Creating and Managing Virtual Media
- Enabling and Configuring Scan/Cleanup
- Configuring User Accounts
- Configuring Web Interface Preferences
- Managing the VTS Server
- Troubleshooting
- Maintaining GFS for VTS
- Reinstalling and Restoring VTS
- Attaching External Devices after Initial Deployment
- TCP/IP Ports and Protocols
- Index
Creating and Managing Virtual Media | 75
3. Click Import/Export. Or, if Data Encryption is enabled and the tape is encrypted, click
Import/Decrypt&Export. The Virtual Media - Import/Export page is displayed.
If one or more physical tape drives are connected to VTS, they are detected automatically.
(If a physical tape drive is not listed, such as if it was connected after VTS was booted, you
may need to rescan the SCSI controllers. See
Common issues on page 127 for more
information.)
Note If the Import/Export button is not displayed, see You can set a number of
parameters in the VTS configuration file to specify the following: on page 115 for
information about displaying this button.
4. Click EXPORT.
5. Select a tape drive from the Tape Devices drop-down list.
6. Click DISPATCH to export the virtual tape or pool to the selected drive.
Note If the VTS server is rebooted while an export is in progress, the job will fail and the
virtual tape will remain locked.
Status is displayed in the Activity Log text box. Click REFRESH to update the status
messages. Note the following exit return codes used in the Activity log for export operations:
0 Success
1 Could not malloc buffer
2 Could not mlock memory
3 Could not open data source file
4 Could not open physical tape drive
5 Could not load and rewind tape before copy