Virtual TapeServer 8.2 Configuration Guide
Table Of Contents
- Virtual TapeServer for NonStop Servers Configuration Guide
- Preface
- Introduction
- Overview of Tasks
- Reconfiguring Vaults
- Enabling Licensed Features
- Configuring Ports
- Creating and Managing VTLs and VTDs
- Enabling and Performing Tape-to-tape Exports
- Enabling and Performing Stacked Exports
- Enabling and Configuring Data Replication
- Enabling and Configuring Role Swapping
- Configuring EMS Communication
- Enabling and Configuring Data Encryption
- Creating and Managing Virtual Media
- Enabling and Configuring Scan/Cleanup
- Configuring User Accounts
- Configuring Web Interface Preferences
- Managing the VTS Server
- Troubleshooting
- Maintaining GFS for VTS
- Reinstalling and Restoring VTS
- Attaching External Devices after Initial Deployment
- TCP/IP Ports and Protocols
- Index

84 | Creating and Managing Virtual Media
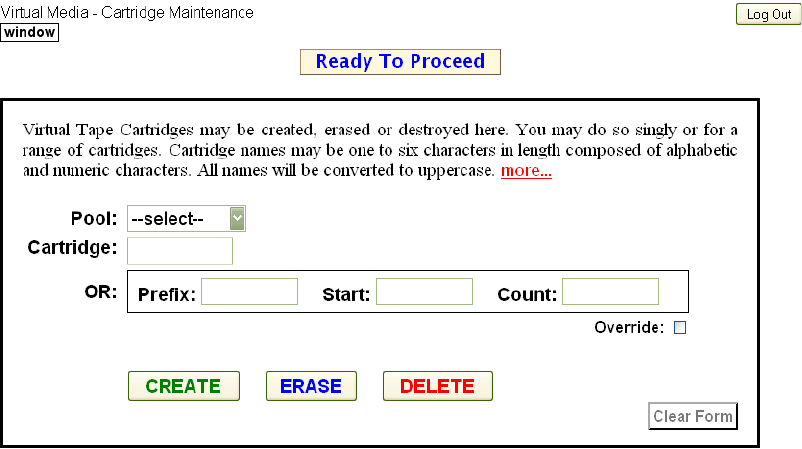
To erase or delete a virtual tape from the Cartridge Maintenance page
1. Click Configuration→Tapes and Pools on the navigation pane.
2. Select cartridge maintenance from the window drop-down list at the top of the
Configure Tapes and Pools page. The Virtual Media - Cartridge Maintenance page is
displayed.
3. Select a pool where the virtual tape(s) reside from the Pool drop-down list.
4. If erasing or deleting a single virtual tape, enter the name of the virtual tape in the
Cartridge field. Or, select a virtual tape from the drop-down list.
5. If erasing or deleting multiple tapes:
a. Select the Multiple Select checkbox.
b. Select multiple virtual tapes from the drop-down list by holding the SHIFT or CTRL
key and clicking the virtual tape names.
6. If erasing or deleting a range of virtual tapes, select the Override checkbox to perform
the operation for the specified range of virtual tapes even if some virtual tapes do not exist
in that range.
7. Click ERASE to erase the contents of the virtual tape(s), or click DELETE to remove the
virtual tape(s) entirely.
8. When prompted, click OK to confirm the operation.


