
Virtual TapeServer 8.4 Configuration Guide

Creating and Managing Virtual Media | 93
6. If you want to set a limit to how long the virtual tapes in the pool are stored, type a value in
the Retention field and then select a unit of time from the drop-down list. This retention
period governs when the virtual tape can be erased to reclaim space in a vault (using the
Scan/Cleanup feature).
7. Select the Autoloading checkbox to enable the pool to automatically load and unload virtual
tapes as they are used, from the first to the last virtual tape in the pool.
Note You may want to set this option before writing labels to the virtual tapes from the host
server. After writing the labels, edit the pool to disable this option.
8. If you select Autoloading, you can then select the Recycle checkbox, which enables the pool to
autoload indefinitely without user intervention. A pool can automatically cycle back to the first
virtual tape in the autoloader when the last virtual tape is unloaded. This feature provides
continuous and unattended operation for almost any application.
If this checkbox is not selected, the virtual tape drive is unmounted after it reaches the last
virtual tape in the pool.
9. If the Data Encryption feature is enabled, you can select the Encryption checkbox to encrypt
all cartridges that are added to the pool.
10. Click the Save button.
Now, you should create virtual tapes in the pool and define policies for the pool.
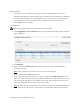
Configuring policy
Policies enable you to configure automation. For example, you can replicate and export a tape after it
is unmounted using policy. In this scenario, you would apply two policies to the pool that contains the
tape: one that performs a replication after the tape is successfully unmounted and one that performs
a stacked export after the tape is successfully replicated.
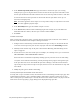
The Configure Policies page enables you to create, edit, and delete policies. After creating a policy,
you can edit it to change the pools to which it is applied and to enable or disable it as needed.