
Virtual TapeServer 8.4 Configuration Guide


Creating and Managing Virtual Media | 99
Inserting virtual tapes into a VTL
You can move virtual tapes from the shelf, where they are placed after creation, to a VTL. (The shelf
contains virtual tapes that are not associated with a VTL.)
Before beginning
l Make sure empty slots are available in the VTL.
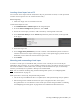
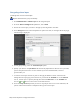
To add virtual tapes to a VTL
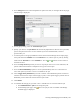
1. Click Administration > Virtual Tapes on the navigation pane.
2. From the Show Cartridges In drop-down list, select Shelf.
3. Choose the virtual tapes you want to add to the VTL by selecting them in the table.
4. Select Insert into library from the Actions drop-down list (above the table, on the right side
of the page).
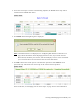
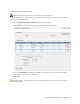
5. Select the target VTL.
6. Select Trigger Policy If Enabled if you want to initiate actions defined in policies associated
with the selected virtual tapes. Policies apply to pools, so this option triggers policies that are
defined for pools in which the selected virtual tapes reside.
7. Click submit.
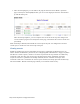
Mounting and unmounting virtual tapes
To mount a virtual tape in a standalone VTD, you must create a mount job. You can run the job
immediately after creating it, or you can schedule a mount job, such as if a VTD is currently reserved
but will be available at a future time. Then, to backup to the mounted virtual tape, use the backup
software you normally use to perform a backup to the mounted VTD.
Note You can automate mounting using the Event Management System; see "Configuring EMS
Communication" on page 75.
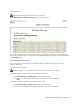
When you mount a virtual tape, keep the following in mind:
l The virtual tape's modification date is not updated; the ctime (inode change time) is updated.
l If Data Encryption is enabled and the virtual tape is encrypted, the data on the tape is
decrypted when it is read. The data on the virtual tape remains encrypted. Refer to "Enabling
and Configuring Data Encryption" on page 83 for more information about this feature.