
Virtual TapeServer 8.4 Configuration Guide


231
C
Attaching External Devices after Initial Deployment
You can attach an external tape device, such as a tape drive or robotic library, to VTS after initial
deployment. You can then export to physical tapes loaded in the device if migration, stacked export,
or tape-to-tape export is enabled.
To use an external disk drive for vault and pool storage, see "Adding vaults on external storage
devices" on page 15.
To add an external tape device to the VTS server
Requires the View/Manage Configuration and Halt and Reboot TapeServer access rights
1. If a virtual tape drive (VTD) is already defined on the port, complete the following steps to
remove the drive:
a. Delete the VTD that uses the target port. Click Configuration > Virtual Devices on the
navigation pane. If necessary, log in. Then, click next to the VTD you want to
remove. A dialog box is displayed indicating that VTD operations will be interrupted if
you modify the VTD. Click OK to confirm the deletion.
b. Change the system limits for the target port.
c. In the MANAGE PORT CONFIGURATION section of the Configure Virtual Devices page,
select physical from the drop-down list that corresponds to the target port and then
click Submit. Confirm that you want to reboot the server.
2. Power down the VTS server and then cable the physical tape device (through the SCSI
converter as necessary) to the VTS server. Then, power on the physical tape device and SCSI
converter. Refer to the VTS Quick Start Guide for hardware diagrams and information.
3. Power on the VTS server.
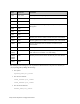
4. To confirm that the physical tape device was created and is communicating with the operating
system, go to the Linux text console and enter the following command:
sg_map –x
Here is an example of the output from this command:
/dev/sg0 0 0 3 0 1 /dev/nst0
/dev/sg1 6 0 0 0 5 /dev/scd0
/dev/sg2 6 0 0 1 5 /dev/scd1