
Virtual TapeServer 8.4 Configuration Guide


20 | Virtual TapeServer Configuration Guide
To rename a vault
1. Click Administration > System Tasks on the navigation pane and then click Stop TapeServer.
2. Log in to the server as root.
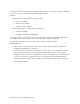
3. Review the existing vault layout and identify the device to rename. Use the df command to
view the current disk utilization:
df –h
Here is an example of the output:
Filesystem Size Used Avail Use% Mounted on
/dev/cciss/c0d0p2 19G 6.7G 12G 38% /
/dev/cciss/c0d0p4 112G 338M 106G 1% /VAULT00
/dev/cciss/c0d0p1 99M 24M 70M 26% /boot
tmpfs 502M 0 502M 0% /dev/shm
/dev/cciss/c0d1p1 4.9T 229M 4.7T 1% /VAULT01
/dev/cciss/c0d1p2 4.9T 868G 3.8T 19% /VAULT02
/dev/cciss/c0d1p3 7.9T 1.6T 5.9T 22% /VAULT03
...
4. Unmount the file system:
umount /VAULT03
5. Copy the /etc/fstab file to a backup file:
cp /etc/fstab /etc/fstab.backup
6. Relabel the device, using the file system name from step 3:
e2label /dev/sdc1 /VAULT05
7. Edit /etc/fstab and replace the old vault name with the new vault name.
8. Rename the mount point:
mv /VAULT03 /VAULT05
9. Mount the file system and set permissions:
mount /VAULT05
chown bill.root /VAULT05
chmod 750 /VAULT05
10. Verify that it mounted correctly by running the df command again.
11. Click Administration > System Tasks on the navigation pane and then click Start TapeServer.