
Virtual TapeServer 8.4 Configuration Guide


Enabling and Performing Tape-to-tape Exports | 45
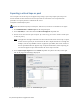
6. Specify a job name in the Job Name field. Include only alphanumeric characters in a job name;
spaces and special characters are not allowed.
7. Select a drive or library from the Destination drop-down list.
Note Disconnected tape drives or libraries can be selected, though the job will fail if the drive
or library remains disconnected when the job runs.
8. Select an Export Format option:
l If you choose Virtual Tape Format, the tape is exported as-is and cannot be read by the
host server. If the virtual tape is encrypted, VTS is enabled for drive-level encryption,
and all drives in the target library support encryption, the tape remains encrypted
when it is exported.
l If you choose Host-Native Format, the tape is exported in a format that can be used by
the host server. If the virtual tape is encrypted, the tape is decrypted before it is
exported in host-native format.
9. If Virtual Tape Format is selected and drive-level encryption is enabled, you can select the
Encrypt option to encrypt the virtual tape when it is written to physical tape.
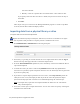
10. To choose virtual tapes or pools to export or replicate (in addition to those selected on the
Manage Virtual Tapes page), move tapes or pools from the Available list to the Selected list.
Or, remove tapes or pools by moving them from the Selected list to the Available list. Use the
and buttons to move items to and from the lists.
11. Select the Stop on Error option if you want to stop the job if an error occurs. Otherwise, the
job will continue until VTS has attempted to export all virtual tapes.
12. Select the Run Immediately option to run the job immediately after it is created. Do not
select this option if you want to create a schedule for the job.
13. Select Trigger Policy If Enabled if you want to initiate actions defined in policies associated
with the selected virtual tapes. Policies apply to pools, so this option triggers policies that are
defined for pools in which the selected virtual tapes reside.
14. Click submit.
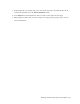
15. To schedule the tape-to-tape export job, create a schedule that is associated with the job.
a. Click Administration > Jobs on the navigation pane.
b.
On the Manage Jobs page, click next to the job you want to schedule. The Manage
Schedules page is displayed.
c. Click Add Schedule.
d. In the Create Schedule area, select how often you want the job to occur:
l One time — Runs the job once. You must select a start date and time.
l Weekly/Daily — Runs on the days you select. You must select the days and a