
Virtual TapeServer 8.4 Configuration Guide


46 | Virtual TapeServer Configuration Guide
start date and time.
l Monthly — Runs on a specific date each month. Select a date and start time.
If you specify a date that does not exist in a month, the job will run on the last day of
the month.
e. Click Save.
After the job runs, you can return to the Managed Schedules page for its status. If a problem
occurred, the Last Run column will display “Failed”.
Importing data from a physical library or drive
To import data from an external tape device
Requires the Virtual Tape Import and Export, Vault Access, and Access to all Vaults access rights
Note You can perform this procedure if a capacity license is enabled on the server.
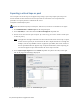
1. Click Administration > External Data on the navigation pane.
2. If necessary, log in using an account that has the access rights listed above. Click the Log In
button at the top of the page and enter a username and password.
3. From the Select Destination drop-down list, select the library or drive from which the data or
tape will be imported.
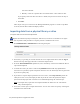
4. To name the restore job, enter a name in the Job Name field. Include only alphanumeric
characters in a job name; spaces and special characters are not allowed. (A name is generated
if you do not specify one.)
5. If you wish to stop the import operation if an error occurs, select Stop on Error (above the
table). If an error occurs, the import job fails. If you do not select this option, the import
operation will skip tapes that caused an error and finish importing the selected tapes.
Note If an import fails, tapes that were imported before the failure are not "rolled back".
They remain imported.
6. Select one or more tapes to import from the list. You can also select all tapes by selecting the
checkbox in the table header.