
Virtual TapeServer 8.4 Configuration Guide


Enabling and Configuring Data Replication | 63
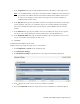
To restore replicated tapes
1. Click Administration > External Data on the navigation pane.
2. Select a remote host from the Select Destination drop-down list.
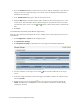
3. To name the restore job, enter a name in the Job Name field. Include only alphanumeric
characters in a job name; spaces and special characters are not allowed.
4. If you wish to stop the restore operation if an error occurs, select Stop on Error (above the
table). If an error occurs, the restore job fails. If you do not select this option, the restore
operation will skip tapes that caused an error and finish importing the selected tapes.
5. Select one or more tapes to restore from the list.
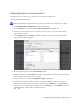
Note If the virtual tape has moved from its original location on the source (local) server,
is displayed next to the physical tape and the new location is displayed in the Source
Vault/Pool column. If you import a physical tape whose virtual tape has moved, the
contents of the virtual tape in the new location are overwritten. You can also choose
not to import the tape, move the source virtual tape to its original location, and then
attempt to import the physical tape again.
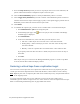
6. If the virtual tape is no longer on the source (local) server, select a location where the
imported tape will be created. You can select a vault and pool from the drop-down list that is
displayed in the Source Vault/Pool column.
7. Click Import. A restore job is created and run immediately.