
Virtual TapeServer SCSI-to-FC Adapter Quick Setup Guide
PN# DS41272, 608051-001
4
supported for additional management access. For more
information on VT5900-SA management, see the user manual
for this product.
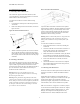
D. Connecting to the Serial Port
The RJ-11 connector on the back panel of the VT5900-SA
provides a serial port that is compatible with RS-232 signaling
levels. The VT5900-SA is designed to communicate with a
terminal or any operating system utilizing a terminal emulator.
The baud rate, data bits, stop bits, parity, and flow control of
both the VT5900-SA and the host system must use the same
settings. The Autobaud feature described below provides an
effective method to set the baud rate of the VT5900-SA and
host system.
The baud rate used by the terminal or terminal emulator must
be 9600, 19200, 38400, 57600, or 115200 for the autobaud
feature to recognize it. The VT5900-SA will not function
properly at any other baud rate. The Autobaud feature
described below provides an effective method to set the baud
rate of the VT5900-SA and host system.
Autobaud Feature
The autobaud feature automatically configures the baud rate
on the VT5900-SA. Once you set the baud rate in the terminal
emulator, wait until the VT5900-SA completes the Power-On
Self Test (POST) - described in Section V, Part E - and then the
Firmware Initialization process. This can take up to 90
seconds, during which time the POST and initialization
information may or may not be visible on the terminal or
terminal emulator. After this process has completed, you can
press the Enter key slowly 7 or 8 times (or just type shift-z)
and the VT5900-SA will automatically detect the baud rate
being used by the serial port. The baud rate is then saved in the
VT5900-SA’s configuration and will be retained through
future power cycles.
Note: Pressing the Enter key before the POST has completed
is of no benefit to the Autobaud feature. Wait until both the
POST and the Firmware Initialization processes have
completed before pressing the Enter key. This may take up to
90 seconds.
To set up serial communications with the VT5900-SA:
1. Leave power to the VT5900-SA turned off until you have
set up the serial port communications on your host termi
-
nal.
2. Plug the serial cable into one of the host computer’s serial
ports (COM1 or COM2), and then plug the other end of
the serial cable into the VT5900-SA’s serial port.
3. Start the terminal emulator.
4. Set the terminal emulator to use the appropriate COM
port.
Note: Auto Detect or VT100 are the recommended settings for
Windows HyperTerminal emulation type.
5. Specify the following settings for the port:
Note: Before initially powering on the VT5900-SA, make sure
all the FC and SCSI devices are powered on first and that they
have finished performing their self tests. This will help ensure
that device discovery works correctly.
6. Proceed to the following instructions on connecting the
power to the VT5900-SA.
E. Connecting to Power
The power supply used with the VT5900-SA supports 100 -
240 VAC (Auto Sensing), but the correct type of power cable
needed for your installation should still be verified. The power
cable shipped with the VT5900-SA is a 120 VAC 3-conductor
power cable for use in the United States and Canada. This is
the power cable that should be used with the VT5900-SA
unless your installation requires otherwise, in which case you
should supply the appropriate power cable as needed.
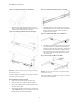
To connect the power cable to the VT5900-SA:
1. Connect the female end of the power cable to the power
connector on the back panel of the VT5900-SA.
2. Plug the male end of the power cable into the power
source.
3. Switch on power to the VT5900-SA using the Power
Switch located on the back panel of the VT5900-SA.
If using the Autobaud feature, this is the point where that
feature should be used. The VT5900-SA then performs
its POST and firmware initiation processes, which can be
viewed over a properly configured serial interface. These
processes can take up to 90 seconds. Once complete, the
main menu should be accessible.
VI. Quick Configuration
Option A: From the Serial Interface
1. In the main menu of the serial interface, there are a
number menu options. Select menu option 1, “Perform
Configuration” and then menu option 3, “Fibre Channel
Configuration”.
2. If you are using a switch, toggle menu option 3 to the
“N-Port” setting. When finished, enter X to exit this
menu.
Baud Rate: 9600, 19200, 38400, 57600, or 115200
(Autobaud only recognizes these baud rates)
Data Bits: 8
Stop Bits: 1
Parity: None
Flow Control: None or XON/XOFF