
Virtual TapeServer SCSI-to-FC Adapter User Manual


2-6
Chapter 2: Getting Started
Installation Procedure with Rails
1. Remove the VT5900-SA from the protective bag.
2. Determine where the VT5900-SA will be mounted.
3. Remove any blanking panels and other equipment from the chosen rack location.
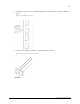
4. Select the rail pieces as shown in Figure 2-1 and adjust the lengths to the size of the rack.
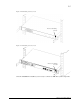
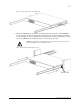
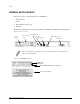
Attach extension brackets to both sides of rack using two of the #M6x12 Phillips screws to
mount the end of each bracket onto the rack, as shown in Figure 2-6 below.
Figure 2-6. Attaching rails to 19” Rack
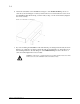
5. Attach the slide rails to the VT5900-SA, using two #6-32x.312 Phillips screws on each side of
the VT5900-SA. Position the front of each rail as shown in Figure 2-7. Tighten the screws
securely.
Note: Place the VT5900-SA so the front exhaust vents and the rear intake vents remain clear of
obstructions to ensure proper airflow.