
Visual Image Package Installation Instructions


Visual Image Package Installation Instructions
Visual Image Package Instructions Read Me—524411-001
3
Install the Side Panels
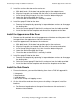
b. Insert 2 Phillips screws through the bottom screw holes on the bracket into the
bottom row of perforations.
c. Insert 2 more Phillips screws into the remaining bracket holes.
d. Install one small bracket near the bottom of the enclosure side, using the 2
existing M5 Torx screws already installed on the enclosure.
3. If you are installing side panels on both enclosures of a double-high enclosure
stack, repeat Step 2 to install brackets on the other enclosure of the stack.
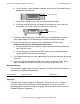
4. Install a side panel on the enclosure (for a double-high enclosure stack,
install the side panel on the bottom enclosure first):
a. Examine the back of the side panel to make sure the mounting brackets and
foam strip are secure.
b. Lift the side panel into position and slide it down until its mounting brackets
engage with the brackets on the enclosure.
5. For a double-high enclosure stack, repeat Step 4 to install the side panel on the top
enclosure.
6. If you are installing side panels on both sides of this enclosure or stack, repeat
Steps 2 through 5 to install the remaining side panels on the other side.
Document History
This document supports G06.16 and all subsequent G-series releases until otherwise
indicated by its replacement publication.
Copyright
Copyright © by Compaq Computer Corporation. Printed in the U.S.A. All rights
reserved. No part of this document may be reproduced in any form, including
photocopying or translation to another language, without the prior written consent of
Compaq Computer Corporation.
Part Number Product Version Published
524411-001 N.A. May 2002
Bottom Screw Hole
M5 Torx Screw