Web ViewPoint User Guide Version 5.
Part Number 528226-014 Abstract This manual describes the installation, configuration, and usage of HP Web ViewPoint Software Version H01ABI on a HP NonStop™ system. Supported Release Version Updates (RVUs) This publication supports J06.03 and all subsequent J-series RVUs, H06.10 and all subsequent H-series RVUs, until otherwise indicated by a replacement publication.
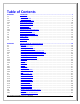
Table of Contents CHAPTER 1 OVERVIEW ......................................................................................................... 7 1.1 1.2 1.2.1 1.2.2 1.3 1.3.1 1.4 1.4.1 1.4.2 1.5 1.6 1.7 1.8 1.9 Introduction .......................................................................................................................... 7 Product Overview ................................................................................................................. 8 High Level Architecture ...
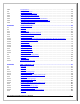
2.8.3 2.9 2.9.1 2.9.2 2.9.3 2.9.4 2.9.5 2.9.6 Setup Options ..................................................................................................................... 54 Configuration Notes ............................................................................................................ 56 New Params, Files & Objects .............................................................................................. 56 Deleted Params, Files & Objects.........................................
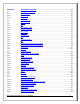
CHAPTER 5 USING WEB VIEWPOINT ................................................................................ 111 5.1 5.1.1 5.1.1.1 5.1.1.2 5.1.2 5.2 5.2.1 5.2.2 5.2.3 5.2.4 5.3 5.3.1 5.3.2 5.3.3 5.3.4 5.3.5 5.3.6 5.3.7 5.4 5.4.1 5.4.2 5.4.2.1 5.4.3 5.4.3.1 5.4.4 5.4.4.1 5.4.4.2 5.4.5 5.4.5.1 5.4.5.2 5.5 5.5.1 5.5.2 5.5.2.1 5.5.2.2 5.5.2.3 5.5.2.4 5.5.2.5 5.5.3 5.5.3.1 5.5.3.2 Starting Web Viewpoint ....................................................................................................
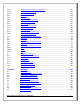
5.5.3.3 5.5.3.4 5.5.3.5 5.5.4 5.5.5 5.5.5.1 5.5.5.2 5.5.6 5.5.6.1 5.5.6.2 5.5.7 5.5.7.1 5.5.7.2 5.5.8 5.6 5.6.1 5.6.2 5.6.2.1 5.6.3 5.6.3.1 5.6.3.2 5.6.3.3 5.7 5.7.1 5.7.1.1 5.7.1.2 5.7.2 5.7.3 5.7.4 Displaying EMS Event Help & Token Dump...................................................................... 155 Accessing Token Analyzer ................................................................................................ 156 Compressing Log Files ..................................................
CHAPTER 1: OVERVIEW 1.1 INTRODUCTION Web ViewPoint is a powerful web-browser-based interface tool used to monitor performance and manage events &operations of HP NonStop Servers. Web ViewPoint provides configuration options for a single point command and control of a multi-node NonStop environment. Following are the major components of this on-line subsystem: PERFORMANCE MONITORING: Monitors major CPU, Disk, Process, TMF, and Netline entities. File entities are also monitored for the Integrity servers.
CCM greatly simplifies the user interface by replacing complicated command syntax with point and click actions. Current implementation covers disks & files (both Guardian and OSS), and the spooler subsystem. 1.2 PRODUCT OVERVIEW 1.2.1 HIGH LEVEL ARCHITECTURE Web ViewPoint is a powerful and extensible web-based application. It has several key components.
High Level Architecture OPERATIONS/UTILITY FUNCTIONS: Additional components are used within Web ViewPoint to provide various utility and operations support functions. WBATCH provides Event housekeeping functions. WCMX and OBJPLG provide services to the Object Manager functions. UTILS is the BAM administration module. In addition, there are other support components such as FINFO, FINFLIB and NSCOPY. FINFO and FINFLIB are used in Performance to drill down to file opens from a Process.
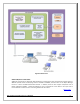
1.2.2 MULTI-NODE INTERFACE You may use Web ViewPoint to monitor one or multiple HP NonStop Servers. These Servers may be in an Expand network, or otherwise in a cluster of individual nodes. Web ViewPoint tracks these nodes directly, where it knows/remembers the IP address to every node under its control. A node where a copy of Web ViewPoint is running is called a Resident. A collection of Residents is called a Neighborhood. Information retrieved from each resident is then integrated into a single view.
Web ViewPoint Resident: A NonStop Server/Node, whether isolated or part of an Expand network), running Web ViewPoint (V5 AAH & after). Web ViewPoint Neighborhood: An Expand network of NonStop Servers/Nodes with two or more Residents running Web ViewPoint (V5 AAH & after). Web ViewPoint Community: A collection of one or more Web ViewPoint Neighborhoods.
1.3.2 UPGRADE The other option to a first time or from scratch install is to do an upgrade and have the install carry forward as much of your existing configuration as possible. This means during the install process the user will need to provide the details on where the existing configuration data files are located. The system will automatically gather this information and apply it to the new configuration data. The user must be on version AAF or above to be compatible with the new install feature set.
generate alerts based on threshold criteria that can provide an early warning system for changes in system or application behavior that may not be apparent with normal monitoring techniques. Coupled with existing Web ViewPoint functions and features, The Event Analyzer provides a powerful tool to leverage low-level EMS event details into a higher-level and more useful knowledge base to save time and improve system availability.
J6530: Block mode Terminal Emulator. Both ftp and J6530 sessions go through SSL ports, ensuring a secured and private mode of communication. Note: (available through comForte http://www.comforte.com) CAIL SECURITY PLUG-IN FOR WEB VIEWPOINT This plug-in is suited for NonStop users who wish to incorporate SSL level security on their ftp processing and Terminal Emulation. CAIL Secure FTP: ftp tool for NonStop. CAIL 6530 Session: Block mode Terminal Emulator.
1.8 GETTING STARTED Learn how to install, configure and more. Listed below is an overview of things you need to know to get up and running. Before starting the user must decide whether to do a first time install or an upgrade. Each NonStop node that you want to participate in your Web ViewPoint network (i.e. Residents and Neighborhoods) will require a copy of Web ViewPoint to be installed.
CHAPTER 2: INSTALLATION &CONFIGURATION 2.1 OVERVIEW This chapter provides the different types of installations that you can perform and the requirements you should consider before installing the software. Web ViewPoint offers users a flexible PC Wizard based tool to automate most of the install and upgrade process. Configuration data is collected either through user input or copied from an existing configuration on the PC then the particular configuration files are built and pushed to the NonStop server.
above.Please refer to the latest RTE Summary which can be found on the 'Downloads -> Documentation' page at http://www.hpWebViewPoint.com.
Navigate windows and frames across different domains Use Pop up Blocker Navigate sub frames across different domains Enable Disable Enable ---->Scripting Allow status bar updates via script Enable Note:Menu add-ons and toolbars i.e. the Bing Bar are superfluous to Web ViewPoint functionality and are not recommended. Please refer to the RTE charts for full details. RTE summary can be found on the 'Downloads -> Documentation' page at http://www.hpWebViewPoint.
Node Name IP address / Fully Qualified DNS name Installation subvolume name and location TCP process name TCP/IP program Name Prefix to use for Web ViewPoint process names The port numbers from where Web ViewPoint and the other modules are going to run. Apart from the above mandatory parameters certain other optional parameters are also requested by the installer before going ahead with installation.
2.3.1 WIZARD INSTALLATION (PC-BASED) OVERVIEW The Wizard builds all of the NonStop configuration files on the PC, optionally allowing you to import a single existing Web ViewPoint configuration, then automatically FTPs or SFTP the files to the NonStop and initiates WVP. Normally this should take less than 15 minutes, provided you have a few items of configuration data at your fingertips.
IP address / fully qualified DNS name:Corresponding IP address of the NonStop server in standard format. DNS names are also allowed. Installation subvolume: Specifies the target $volume.subvolume where Web ViewPoint will be installed. Volume name must start with '$' with a maximum length of 8 ASCII characters. The maximum length of a subvol is also 8 ASCII characters. Examples: $GUEST.SUBVOLS, $SYSTEM.WVP8500, etc. TCP process name: Name of the TCP/IP process on the NonStop server.
used for these pages and the 'Display configuration' page will be shown. If you want to fine-tune the standard default values, you may click 'Next' to go to the Port number configuration page. Port number configuration: This page defines port numbers for various Web ViewPoint processes. A process’ port number is a positive integer from 1001 to 65535. This page also contains a 'Finish' button.
Try to open a telnet session If there is any error, ask user to modify logon information, otherwise proceed Get system information of current resident and determine server series, serial number and FTP process name Check if server series is appropriate for current installation version If not, ask user to modify logon information, otherwise proceed Do the following tests on destination $volume.subvol (and if required, backup $volume.
After all the residents are tried, the Wizard will display a status report. If there is at least one successfully installed resident, 'Next' button will be activated. If there are some errors that can be fixed by going back, 'Prev' button will be activated. If the user clicks 'Abort FTP' at any point installation will stop for current resident and will not continue with any remaining residents and 'Prev' button will be activated. If 'Next' is active, then clicking it will show 'Upload snapshot' page.
Note: The Wizard uses telnet session, FTP session and possibly e-mail session in this page. Therefore following errors may occur and you will be notified: Telnet session error Telnet session timeout:Wizard is waiting for telnet response for last 60 seconds TACL command error: specific error message will be shown.
Password: Corresponding password for the specified user logon name. Maximum length of password is 64. Blank passwords are also supported FTP port number: FTP port number to open for the FTP connection. Default port number is 21 Telnet port number: Telnet port number to open for the telnet session to the NonStop server. Default telnet port is 23 TACL service name:TACL service name for the specified server. Default value is TACL Current installation:Name of the $volume.
2.3.2 MANUAL OR DSM/SCM INSTALLATION OVERVIEW Web ViewPoint can be installed using the DSM/SCM tool or can be installed manually. For DSM/SCM, use the IPSETUP.exe program to upload the files from the CD / PC to the NonStop server. Follow the screens on the Wizard and provide the necessary information as prompted. It is strongly recommended that the user have SUPER.SUPER credentials.
PSVRAPP SCR SECAPLT SMGR SSIDPOP STOPCHK STRTCHK SYNC TEAPLT TEXTEDIT TRILEADS UTILS WBATCH WCMX WEBVPT5 WMAPLT WVPEVTS WVPFTP WVPLITE WVPMC WVPSNMP WVPSPI WVPTMPAK XERCES The following files have to be transferred in 'ASCII' Mode (file code 101) CLNMEASM COLLCONF CPUMXLST EVTCSTM INSTWVP LITECONF MAKEALT MAKEEVMG MAKEEVTP MAKEIMDB MAKEIPLS MAKELIC MAKEMCS MAKESECU MAKESSID OMTELSER OMTMF OMTSCRIP PECONF STOPWVP STRT
Note: If FDIST is not copied, the current version of FDIST in the $system.SYSnn subvolume will be used, which may not provide all the features. Read the following instructions first for OBEY INSTWVP using TACL 1. Set your working volume to $system.zwvp (or to $volume.subvolume where you have transferred the files) 2. Issue ‘OBEY INSTWVP’ Note: Web ViewPoint Version 5 generates a limited set of EMS events under SubSystem ID ZWVP (SSID Number ‘257’ or SSID Name ‘WVP’).
K. Obeys MAKELIC. This creates the License files that store the activation keys for Web ViewPoint and other plug-ins L. Obeys MAKEMCS. This creates the Message Center configuration database file M. Obeys MAKESSID. This creates the SSID database file used to store the Tandem Subsystem Names and ID map N. Obeys STRTWVP to start Web ViewPoint shells by starting the following processes: Web ViewPoint Process Manager, Process Metrics Collector and CPU Metrics Collector O.
2.5 CONFIGURING WEB VIEWPOINT (POST INSTALLATION TASKS) When you run STRTWVP, the Web Server basically starts two instances of Web ViewPoint using the WVPCONF and LITECONF configuration files and their associated assigns. The WVPCONF configuration file has a Menu File (via the ASSIGN MENUFILE) for the menu definitions needed to build the menu in the Web ViewPoint IE browser screen. For WVPLITE, there is no corresponding menu file. The menu information is hard-coded.
[max. 35 chars] Name of the object file called to handle the initial request. ObjectID [max. 35 chars] An Object identifier, this is a unique ID for the object file and is used for internal purposes. This should not be changed by the end user. It is provided for Web ViewPoint objects by hp, and for each plug-in by the plug-in's author. Port [max 65535] This is the TCPIP port number to be used by this object file.
prefixed with one or more white spaces. All these lines will be concatenated to make one assign before processing. example: [BASEOBJECT] Title Web ViewPoint Version 5 Shell For BAM ObjectFile WEBVPT5 ObjectID OBJID_ZWVP5 Port 7510 MaxProcess 20 NumStatic 10 ASSIGN MENUFILE, MENUBAM [PLUG-INOBJECT] Title Web ViewPoint BAM Plug-in ObjectFile UTILS ObjectID OBJID_ZBAM Port 7511 MaxProcess 20 NumStatic 10 [Back to TOC] 2.5.
[max. 18 chars] This is the text that appears on the menu/item. FnID [max. 35 chars] This is the internal identifier of this menu item and is used for linking of menu items to parents as well as for other internal purposes. The FnID value shall be unique across each [FUNCTION] section. ParentFnID [max. 35 chars] This specifies the parent of this menu item in the menu hierarchy. For first level menus, ParentFnID is to be specified as "fnid_ZBaseRoot".
[max. 395 chars] URL of this function in case it is unable to find one in URLCookie or URLVariable (which is the case during first run). A URL can be spanned across successive lines. The successive lines have to be prefixed with one or more white spaces. All these lines will be concatenated to make the URL before processing. RemoteAllowed [Yes|No] This specifies whether this function is to be made visible for Web ViewPoint windows that belong to remote systems.
Example entries from STRTWVP RUN COLLATE /NAME $AZ108, NOWAIT, TERM $ZHOME, PRI 140/ RUN COLLMON /NAME $AZ109, NOWAIT, TERM $ZHOME, PRI 140/ Note: Measure is used to collect TMF, NETLINE, FILE and DISK entities.
2.6 FILE LIST The Web ViewPoint file list can be categorized into to four sections as described below: START/STOP CONFIGURATION OBJECTS/EXECUTABLES DATA 2.6.1 START/STOP File Name Code RWEP Description STRTWVP 101 NUNU Obey script file to start Web ViewPoint and Plug-ins (if any) STOPWVP 101 NUNU Obey script file to stop Web ViewPoint and Plug-ins (if any) 2.6.
DBCOPY 800 NUNU Tool to port older Web ViewPoint databases to current version. DIAGNOS 800 NUNU Tool to log configuration and other system information to aid in troubleshooting EMSLINK 800 NUNU EMS Reader alternative Program EVTCXIM 800 NUNU Tool to copy EVENTCX information into the BAM database FDIST 100 NUNU Fast Distributor Program FINFLIB 800 AAAA FINFO 800 NUNU Privileged code files required to display list of files opened by a process.
WCMX 800 NUNU Object Manager Environment Process WEBVPT5 800 NUNU Web ViewPoint Module WVPEVTS 800 NUNU PAK-ed program containing the BAM, BAMD files WVPLITE 800 NUNU Web ViewPoint Lite Module WVPSNMP 800 NUNU Web ViewPoint SNMP trap generator WVPTMPAK 800 NUNU PAK-ed program containing the WVP EMS template file. 2.6.
SECUREDB 0 NNUU User Port Access Control Database SHRSUBDB 0 NNNU Shared Subscriptions Database SSIDDB 0 NNUU SSID Name ID Map Database SUBDB 0 NNUU Subscriptions Database SUBDBA 0 NNUU Alternate Key Sequenced file for Subscriptions Database SUPRDB 0 NNUU Event Management Database containing master suppressions TMPLDTL 0 NNUU Display Template detail Database TMPLMST 0 NNUU Display Template master Database UPRFDB 0 NNUU User Profile Database WCMDB 0 NNUU Object Manager
2.7 PARAM & ASSIGN LIST This section describes the detailed PARAMs & ASSIGNs used to configure the Web ViewPoint objects. All the required & optional PARAMs & ASSIGNs are briefly defined below. 2.7.1 FOR PROCMAN OBJECT PROCMAN object is the process manager that creates and manages the listener process, Web ViewPoint and the related plug-in processes. The assigns and params that are to be passed to the PROCMAN object are specified in STRTWVP file.
PARAM IPADDRESS-WVP <123.123.123.123> [STRTWVP] This optional PARAM provides the user to specify their desired IP address from the list of available IP addresses from the IP stack. By specifying this PARAM, user can bind Web ViewPoint to a specified IP address. This PARAM should be placed before the ‘RUN PROCMAN’ line in the STRTWVP file. Example: PARAM LISTENER-PROCESS [STRTWVP] This specifies the name to be used for the listener process that is created by the process manager.
PARAM IM-REFRESH [YES|NO] [WVPCONF] This enables/disables the WEBVPT5 instant messaging feature. In the default configuration of Web ViewPoint, this param is present and defaults to NO. PARAM IM-REFRESH-INTERVAL interval [WVPCONF] This tells the WEBVPT5 shell the rate at which it should query the server for new message information. Intervalis specified in seconds. In the default configuration of Web ViewPoint, this param is present and defaults to 60000 seconds.
PARAM IM-ACCESS [YES|NO] [WVPCONF] This tells the WEBVPT5 shell whether to display the IM icon on the toolbar. If IM-ACCESS is set to NO, the IM functionality is disabled for all users within Web ViewPoint. If set to YES, then the access is controlled by the access control lists specified through the administration section of Web ViewPoint (if ENFORCE-SECURITY is set to YES). The default value is YES.
Minimum value 100 Maximum value 500 Also, irrespective of single node or multi node, MAXEVENTS determine the maximum number of events displayed on the events screen. (Note: In case of multimode, the parent node PARAM MAXEVENTS determine the maximum number of events to be displayed) PARAM FDISTTIMEOUT [WVPCONF] This allows the user to specify the amount of time after which FDIST should timeout when it does not receive a request from WEBVPT5.
PARAM COLLECTOR [WVPCONF] This optional param provides a way to route all events generated from a particular Web ViewPoint instance to a particular EMS Collector. Without this param all events generated by WVP are routed to the default $0 Collector. Important note; Clone this param in each Plug-in Object Section in wvpconf. (Note: Pathway and ASAP Plug-ins do not yet support this param. If using WVP Lite then the liteconf file needs to have this same param.
This tells the Object Manager Operations function the process name with which to start the alternate EMS collector to log commands. If not specified, commands are not logged. PARAM OCM-TIMEOUT [WVPCONF] The Object Manager Operations function times out after OCM-TIMEOUT minutes of inactivity on the Object Manager Screen. The user is asked to logon again after the session expires. If not specified, the default timeout value is 20 minutes. PARAM COLLECTOR
ASSIGN LICENSE-FILE, [WVPCONF] This provides the License Management feature with the location of license file that contains the activation key for the shell. PARAM COLLECTOR [WVPCONF] This optional param provides a way to route all events generated from a particular Web ViewPoint instance to a particular EMS Collector. Without this param all events generated by WVP are routed to the default $0 Collector.
2.7.8 FOR WVPLITE OBJECT The WVPLITE object allows an user to access the Events Live, Query and Token Analyzer features without having to logon to the main Web ViewPoint product. Starting from AAS-AAT release this feature will have an optional logon requirement. The administrator can set up the logon requirement by setting the LITEAUTH param to ON. PARAM LITEAUTH [ON|OFF] [LITECONF] This is used if the lite feature should enforce a logon requirement.
This allows the user to specify the maximum number of events to store in the browser for Events Live and Events Query actions. Use this param to control overhead of Events on the browser. In Events Live, the screen will refresh after MAXEVENTS have been shown and will retain the last n events and continue to show events.
PARAM SHOWENHANCED [YES/NO] [LITECONF] When the param is set to YES, the Token Analyzer menu item will be shown in the menu bar and if set to NO or not present, the Token Analyzer menu item will not be shown in the menu bar. However, if the parameter USEEMSLINK is used then it is not intended to show up. PARAM USEEMSLINK [YES/NO] [LITECONF] When the param USEEMSLINK in LITECONF is set to YES, the EMSLINK is used to read and filter EMS events as specified by the user input.
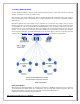
2.8 NEIGHBORHOODS &RESIDENTS SETUP/CONFIGURATION (Central Router) 2.8.1 OVERVIEW Web ViewPoint Central Router (WCR) is a connectivity subsystem that allows a user to connect to any hp NonStop Server with Web ViewPoint installed and under management from a Web ViewPoint Window active on any other NonStop Server.
Each Resident installed will include a synchronization program called Sync that will be used by the Resident to join/leave a Neighborhood as well as synchronize the entire Neighborhood that the Resident is part of. Also, during installation, the main Central Router database called IPLIST will be created in the Resident’s home volume.
The example reflects that as long as you have separate WVP instances on a single node, you can also have a Node name appear in more than one Neighborhood. The SYNC program will not allow you to define a particular instance of WVP to more than one Neighborhood. 2.8.3 SETUP OPTIONS Each Resident installed will include a synchronization program called Sync that will be used by the Resident to join/leave a Neighborhood as well as synchronize the entire Neighborhood that the Resident is part of.
To run the SYNC program, user should run the following command in their Web ViewPoint $volume.subvol: >run sync When the program will be run for the first time, the user will be shown a menu screen that looks like this: ********** WVP Central Router Options ********** * * * 1. Create Neighborhood * * 2. Join a Neighborhood * * 3. Exit * * * ********************************************* For creating a new Neighborhood, Option 1 (Create Neighborhood) is chosen which prompts the user for the Neighborhood name.
The example reflects the neighborhood list and its corresponding residents. [Back to TOC] 2.9 CONFIGURATION NOTES 2.9.1 NEW PARAMS, FILES AND OBJECTS The following is summary of the changes starting with SPR AAS/AAT onwards; For a detailed file list please refer to Section 2.6 of the User Manual. A detailed parameter list is available in Section 2.7 Starting SPR Type Value /Name IPADDRESS-WVP WVPSECUREHTTP ABI New Params WVPSECUREFTP EMSLINK-BUSY-MAX Web ViewPoint User Guide Version 5.
Starting SPR Type Value /Name EMSBGCOLOR ABG New Params WVPHEADER WVPHEADERCOLOR ABF New Files This is the pak file only which contains NTS Bridge host component TCP-TYPE EMSLINK Configure the use of IPV6, Set its value to ‘IPV6’ in WVPCONF and STRTWVP Configures the use of EMSLink in Web ViewPoint Lite Configures the interval value in the case of Lite Live being stopped before EMSLINK times-out. The default value of 5 minutes is used.
Starting SPR Type Value /Name Settings/Usage ABA/ABB New Params SHOWENHANCED Controls the menu items shown. FASTRESUME Lite – Event Live – option to control behavior of Pause/Resume feature Optional param to disable the change password feature.
Starting SPR Type Value /Name Settings/Usage AAW/AAX New Assigns CONSENT-BANNER Specifies the location of the file containing the contents for the consent banner text COLLMON WVP-Measure collector monitor (H01 Only) WVP-Measure data collator (H01 Only) Active Measure WebDash entities metrics collector (H01 only) AAT/AAS New Objects COLLATE MEASCOL EVT-CPU-BUSY-CAP Controls maximum CPU utilization allows for Event processing.
Type Name AUDITS-RETENTION-PERIOD Where Defined STRTWVP As-of SPR AAX G, H or B B PARAM PARAM Object WBATCH REMOVE-AUDITS STRTWVP AAX B WBATCH 2.9.3 ACTIVATING LOGON CONSENT BANNER (OPTIONAL) Web ViewPoint provides the capability to optionally display a Consent Banner at Logon. (Note: This option is not available for Web ViewPoint Lite users.) The Consent Banner option is enabled by including ‘PARAM SHOWCONSENT YES’ in the WVPCONF file.
2.9.4 ROUTING WVP GENERATED EVENTS TO A COLLECTOR (OPTIONAL) The user has an option of routing all WVP generated events from a particular instance of WVP to a particular EMS Collector. The default without this param setting is always $0. This option is useful if running more than 1 instance of WVP on a particular node and wanting to isolate the events (e.g. production versus test). The user can start a new collector by issuing the following statement in the NonStop. >emsacoll /name
Function Location in WVP SMS subscription delivery SNMP subscription delivery Events-Subscribe-Add Subscription: Delivery Method Events-Subscribe-Add Subscription: Delivery Method Voice Subscription Admin-Event Settings-Voice Subscriptions Dependency configured and running. Primary IP and Port information must be configured in System Settings Configuration settings are similar to Email delivery only the Support Resource must include a text message router e.g. a cell phone number.
CHAPTER 3: ADMINISTRATION 3.1 OVERVIEW This feature provides access to the Administrative functions of Web ViewPoint. Through the menu items of the Admin tab, the Administrator can setup user accounts and set various administrative controls. [Back to TOC] 3.2 FEATURES 3.2.1 ACCESS CONTROL ACCESS CONTROL AUTHORIZATIONS: This feature enables the System Administrator to limit the functionality of Web ViewPoint features by configuring access per user/ alias/ group.
Alias Entire Group (Group.* or Group, *) Add Authorization: To add a new setup for a user, click on “Add new User”. A new window will open up which will have two listbox areas; one with all the available administrative access functions and a 2nd one with all the functions the user can access. The following screenshot shows the Add User screen on the Access Control page, which allows you to grant a user access to Admin functions, User functions, or both.
Set configuration like: The dropdown is populated with all the existing users. On select a particular user will populate his current authorizations in the admin and user access list boxes. This feature allows replicating an existing user’s authorization. Once you finish selecting all the desired configurations, click on ‘Save & New’ button.This adds the User and clears the textbox so that you may enter another ‘Group.User’.
[Back to TOC] 3.2.2 BAM (BUSINESS APPLICATION MANUAL) Business Application Manual (BAM) is a repository of customizable information about EMS messages on HP NonStop Servers. BAM is the primary source of detailed descriptive information consulted by HP Web ViewPoint’s Event subsystem. BAM uses a file similar to, but totally independent of Eventtx, which is consulted first by Web ViewPoint. Messages need not be updated with new releases of Eventtx.
SETUP OPTIONS: Adding and Deleting Owners/Subsystems: To add a new owner, click on the plus (+) icon next to the Owner column header, this opens a pop-up with a text box to enter the name that you would like to give to the new owner. In case of adding a new subsystem, click the plus (+) icon, next to the Subsystem column header. This will open a pop-up with the current owner’s name and a textbox to enter the name that you would like to give to the new subsystem. Save: Adds the Owner to the database.
Through this popup you can add an Event for any Owner’s existing Subsystem. If an Owner does not have a Subsystem then you will be warned about it and Save, Save & New buttons will be disabled since you cannot add an event for those Owners. If you wish to delete an Event, click the delete icon next to the event that you wish to delete. Note: Though the BAM event details, cause, effect and recovery fields are supposed to contains informational text, you can also provide html in these fields.
BAMCOPY is a console utility to import BAM information from Version 4 SPR AAC and Version 4 AAD BAM database files (BAMO, BAMS, BAME) to the new BAM database (BAM and BAMD). To run this utility, set the following params and issue RUN BAMCOPY PARAM SOURCE-SUBVOL <$volume.subvolme> PARAM DESTINATION-SUBVOL <$volume.subvolme> The utility reports the result of the import operation at the end. Using the EVTCXIM tool EVTCXIM is a console utility to import EVENTCX information to BAM.
At the bottom you will find the date/time when the information was last updated and also the id of the person updating it. [Back to TOC] 3.2.4 MC SYSTEM SETTINGS This feature provides an interface to configure and maintain the various settings for the Message Center components and options on the NonStop server. It provides the users an interface to configure message delivery options and parameters. The IP Address and Port information of the Desktop Component of Message Center can be configured.
3.2.4.1 CONFIGURATION & SETUP FOR MESSAGE CENTER SUBSYSTEM “DIRECT FROM NONSTOP” MODE As the name suggests, this feature offers the users to configure the Message Center Subsytem for operating in “Direct from NonStop” mode through Admin-- >MC System Settings-- > Message Center Setup (Click on the ‘Edit’ button on right corner of ‘Message Subsytem’ pane). More details are presented below: The Message Center section shows whether the Message Center Subsystem is turned ON or OFF.
3.2.4.2 CONFIGURING INSTANT MESSAGING The Instant Messaging feature of Web ViewPoint needs the following files and processes to be present on the server: The Subscription manager process The Messaging manager process Instant Messaging Database files. The Instant Messaging database files are created by MAKEIMDB FUP Obey script that is executed when Web ViewPoint is installed. This script can be modified to change the size of the database.
The following functions can be performed: Add Phone Carrier: Click on the 'Add Carrier' button. Populate the Carrier, Country and Email Address fields and click on the 'Add' buttons. Please note that Email address is of the form '@mailserver.com' Update Phone Carrier: Click on the Phone Carrier to update. Update the email address and click on the 'Update' button. Delete Phone Carrier: Check the box corresponding to the Phone Carrier to be deleted. Click the Delete button to delete the phone carrier.
Delete Receiver: Check the box corresponding to the Receiver to be deleted. Click the Delete Icon or the Delete button to delete the receiver. Multiple receivers can be deleted at a time. 3.2.4.5 VOICE SUBSCRIPTIONS This screen lists the voice subscriptions and provides the menu to subscribe to events. Voice Subscriptions that have been previously specified are displayed in the lower panel. The fields are Collector, Owner, Subsystem, Event, Days, Time, Gap and Repetition frequency.
Delete Subscription: Check the check box corresponding to the subscription(s) to be deleted and click on the 'Delete' button. Multiple subscriptions can be deleted simultaneously. Test Speak: When the 'Test Speak' button is clicked, the Desktop Component plays (speaks out) the text entered in the 'Custom Message' textbox. Please note that the voice will be heard on the desktop on which the Message Center Setup is installed and running with a green indicator.
Delete Profile: Check the user to delete. Click on the 'Delete' button to delete the user profile. Multiple users can be deleted simultaneously. Note: When users’ logon to Web ViewPoint and access the Event Subscribe or Instant Messenger features, an entry is added to the UPRFDB with the user/alias information. The rest of the fields need to be added manually by the user. [Back to TOC] 3.2.
Subsystem feature of Admin. On selecting an owner, the subsystem box gets populated with the corresponding subsystems. The * in the subsystem/Events box indicates ‘all subsystems‘& ‘all events’. After choosing the owner and subsystem and entering an event number, the user needs to click submit to add it. The suppressed details get added to a key-sequenced file which is stored in the same subvolume as Web ViewPoint of the logged-in resident.
On clicking Add Tokens… a new window opens up. There are three more buttons: Event Setting, EMS Template and Existing display template. These functions are useful if the user wants a different set of tokens from those displayed on the left listbox. Event Setting: If you want tokens from a different list of events then click ‘Event Setting.’ Upon submitting criteria a new Events Window displays EMS messages similar to an Events Query Window.
To enter a new owner and subsystem, click ‘Add Owner-Subsystem’. Enter the owner name (max length is 10) and the subsystem name (max length is 8 and must be between -32767 and 32767). On clicking ‘Submit’ the entry gets stored in a key-sequenced file which is stored in the same subvolume as Web ViewPoint of the logged-in resident. The main screen lists all the application owner-subsystems defined. They can be deleted by selecting the particular entry and clicking the ‘Delete’ button.
Enable/ Disable a Group:If you wish to change the status of a Group from enabled to disabled or vice-versa, then select that group from the list, select Enable or Disable option and click on Apply. Delete Group:A group (its defined user(s)) can be deleted by clicking on the Delete Group button on the extreme right. Add User to a Group: Select the group to which you want to add user(s) from the Group list.
configuration of objects and user securities. During the usage of Object Manager, by default, Object Manager starts the $OCM environment. This is needed before any other environment is created. Additionally only the creator of $OCM is allowed to create an additional environment. The $OCM is a shared environment i.e. any user having a valid Guardian username and password is allowed to logon to Object Manager and use it.
Object Manager has three default objects for providing security. These are logon, tacl and users. Each object can be used to allow certain operations like: who all are allowed to logon to Object Manager, who is allowed to execute tacl commands, who is allowed to execute [WRITE] commands, etc. The followingexplains each object in detail and how to add commands to them: A.
If you have started Object Manager, then you do not have to include your name in the user List. Access to Object Manager is allowed to the creator by default B. TACL: This object is used to determine who is allowed to issue/ execute tacl commands from the Object Manager command window. By default, only the creator of OCM (Object Manager environment) is allowed to execute tacl commands. However, the OCM creator can allow a certain list of users to issue tacl commands.
Note:The shared environment poses no restrictions on retrieval of non-sensitive data from all objects in the tree. However, generic TACL commands and sensitive button commands can only be issued by the OCM owner or a super group user. The OCM shared environment can be converted into a non-shared environment by having the owner of the OCM specify a logon member list.
(mon) [READ] {STATUS} CUI SCF PAGESIZE -1;STATUS MON <$proc>, DETAIL (mon) [WRITE] {START} CUI SCF PAGESIZE -1;START MON <$proc> (mon) [WRITE] {STOP} CUI SCF PAGESIZE -1;STOP MON <$proc> (mon) [READ] {EVENTS} NEX SUBSYS MON (mon) [READ] {HELP} CUI SCF PAGESIZE -1;HELP STORAGE MON SCRIPT FILE SYNTAX AND EXPLANATION: In this above script, there are two things to be noted. A. Observe lines which read, “(storage) (root)”, “(adapter) (storage)”, “(disk) (storage)” and “(mon) (storage)”.
If the creator of OCM wants to grant access of sensitive commands to certain other users, then it can be done by adding a list of users to the “tacl” object. This is explained in the Section 3.3.2.1. COMMAND-ID This indicates the type of the command being specified: BIP This command identifier is typically used to retrieve instances for a particular object. Instances can be retrieved by following the command identifier BIP by either of: i.
Abbreviation Definition List Box Translation b i s p Binary Integer String Process or Volume name on or off integer string 2i f v g r Double Integer Filename Volume Group RWEP Security Settings <(integer1,integer2)> <(g,u) or group.user> Similar to the ALTER command, there is an ADD command which adds properties to an Object. The ADD command can be specified in the same way as the ALTER command.
The formatting statements start with the word “PCO” and end with “ENDPCO”. Any statement between “PCO” and “ENDPCO” is considered to be a formatting command. The formatting commands are: i. SKIPLINES { 1 | 2 |3 | … | 999 } This parameter is used to indicate how many lines of the output should be ignored. If this parameter is absent, then all lines in the output are scanned. ii. SKIP { 1 | 2 | 3 | … | 999 } This parameter indicates how many lines of the output should be skipped after a match is found.
FLUSH indicates, that after the first match is found, the entire line should be skipped – (PREPEND^MGR is not specified) Another example of formatting commands that is specified in the sample script provided above is: (mon) [READ] {INSTANCES} PCO SKIPLINES 4 FLUSH TAR^CHAR & "$" ENDPCO CUI SCF PAGESIZE -1; STATUS MON $* In this example, the command “SCF PAGESIZE -1; STATUS MON $*” gets executed.
The tree is redrawn and the new object TELSERV is displayed. Clicking on TELSERV produces TELSERV instances and subordinate objects: SERVICE and WINDOW. To verify that the edit file was correctly loaded, use the Get Command Info from the Configuration window and enter your object types one at a time. In this example, the object types are TELSERV, SERVICE, and WINDOW. [Back to TOC] Web ViewPoint User Guide Version 5.
CHAPTER 4: WEB VIEWPOINT LITE 4.1 OVERVIEW This is a standard plug-in included with the main Web ViewPoint product and allows a user to access the Events Live, Query and other features without having to logon to the main Web ViewPoint product. Users will be able to view events from the resident from which they are accessing Web ViewPoint only. This feature is also facilitated with an optional logon requirement, if the administrator chooses to restrict access only to certain users.
The LITECONF file is similar to the main Web ViewPoint Configuration file WVPCONF (Please refer to the Web ViewPoint User Manual - Section 5, provided with the Installer to learn more about how to make changes to the configuration). In order to access this feature the user will have to access the port present in the LITECONF file through Internet Explorer (e.g.: http://111.222.3.4:7520). There are 4 options: Live View: To view current EMS messages of a single resident only.
You may specify one or more Collector processes to retrieve messages from. Multiple entries need to be separated with commas (“,”). A list of Collectors on the current node (the NonStop Server to which Web ViewPoint directly communicates with) is displayed to the right side of this area. To select a Collector from this list, simply click on its name. This will add your selection to those already in the input box.
Criteria: This is where you specify the type of messages you should or should not receive, based on certain criteria outlined below: Subsystem: Select (click on their name) on one or more Subsystems. Selected names will be copied to the entry box above the list box. NonStop S & K series Servers vary slightly in the list of Subsystems they support. You may use a checkbox option associated with these two series.
Note:Please be aware that the‘Live view’ is mainly for recent events and is strongly recommended to go back in time for onlytwenty-four hours. To view the historical messages or to go back in time ‘Query View’ serves the best. For further details please use Query View. When you select a date by clicking on the calendar icon and enter the time in the text boxes provided, make sure to re-select the date after entering the time. This will display both the day & the time in the ‘From’ text box.
box. Each new message directed to the Sticky Window, opens a new Window, up to the number you’ve specified (5 or 10). If that many Sticky Windows are already open, new messages will only be recorded in the Base Window and will not open additional Windows. As you close one or more of the current sticky Windows, new ones may be opened again, up to the designated maximum. Note that new messages do not overwrite messages previously displayed on a Sticky Window.
controls and overrides this feature in that the PARAM will automatically change the number in the text box. Starting from ABI onwards, the Maximum events Note that all messages are maintained in the EMS log file(s) on the NonStop Server, and may be recalled and displayed via the Query feature. Information for each message occupies one row. Each row is organized as follows: Token Dump icon: The information icon here is a link to a Window which displays more detailed information about this Event.
The displayed information for all events may be sorted in either direction based on the value of any column. To do so, first click on to pause the events collection then simply click on the column heading of a selected column. Sort direction (ascending or descending) switches when you click on the same column twice. A summary bar at the bottom of the Window shows the total count of messages currently displayed for each of the three message type categories (Critical, Action, Others).
A. Source:In this section you can specify one or more Collector Processes (maximum of 10). User will be provided with an option to select the collectors from the list of collectors present in the text box or a can specify a single EMS log file which will be the source of data for this Query. Only one of the two options can be selected at once i.e. either the ‘collector’ or the ‘Log file’ as shown below: Web ViewPoint User Guide Version 5.
Collector: You may specify one or more Collector processes to retrieve messages from. These Collectors can be on one or more NonStop Servers of an Expand network. Multiple entries need to be separated with commas (“,”), and Collector process names on other nodes need to be fully qualified to include the node name (e.g. $0, \nodeb.$0). A list of Collectors on the current node (the NonStop Server to which Web ViewPoint directly communicates with) is displayed to the right side of this area.
Criteria:This is where you specify secondary conditions for the type of messages that should be displayed, based on certain criteria outlined below: Subsystem: Select one or more Subsystems (click on their name on the list). Selected names will be shown on the entry box above the list box. Note that you may also manually type in the name of any in-house application subsystems.
Pass and Fail options do not apply to Filter file and String settings. Consider the String setting as the top level test. Those that pass this test (if any), are then passed through the Filter file (if any). Given a Filter file setting, criteria settings are then applied against messages that fail the Filter file(s). Given no Filter file, then the criteria is applied to all messages that meet the String setting.
If you have already selected or entered the name of a volume & sub-volume (e.g. $data1.subvol1), a click on the same List button exposes a list of Template files (predetermined based on file code: 839), if any. Where available, click on a file of your choice to have its name transferred to the entry box and appended to the volume and subvolume name already in place. Save Events to Log:You may choose to save the Events meeting your criteria to a log file, in addition to displaying them on a live screen.
Acknowledgment icon: This is a quick method to acknowledge a single Event. Clicking on this icon causes the corresponding event to get acknowledged. The display is updated to change the event color to green (refer to Customizing Event Colors & Types). Event acknowledgements are managed centrally and displays of other users will get updated automatically. By specifying the PARAM HIDEACKS YES, the display update can be changed to hide the acknowledged event.
Switch (only with FDIST): Switches the order in which additional Event messages are retrieved when the Next button is clicked. By default, the order is to go backward in time. Clicking on this button switches the order to go forward in time. Subsequent clicks alternate the order again. Next: Displays the next set of Event messages based on the current order (see Switch above). Displayed message will continue to meet all pre-specified conditions.
[Back to TOC] 4.2.3.1 TOKEN ANALYZER SETTINGS PAGE This Window is used to define the content to be displayed on the Token Analyzer screen. If the USEEMSLINK parameter is enabled for WVP Lite then Token Analyzer function is not available, if needed use FDIST not EMSLINK. The setting Window is displayed in three separate areas as described below: A. Source: Here you can specify whether one or more Collector Processes (maximum of 10) or a single EMS log file should be the source of data for this Query.
Log File: Enter an EMS log file for Web ViewPoint to read Events from. Only one log file may be entered. You may type in (fully qualified) the name of the file, or use the Show Logs button. This is how this button works: Enter the name of a volume & sub-volume (e.g. $data1.subvol1), and click on Show Logs. This exposes a list of log files (predetermined based on file code: 843), if any.
application subsystems. Entry of a subsystem also requires entry of the designated EMS Owner in a designated input text box below the list of subsystems (‘TANDEM’ is placed automatically when you click on any of the displayed internal subsystems). Option(s): Select one or more from the list of available options. Some options require you to set a value for their parameter. These are self-explanatory, such as setting the CPU number, for option “CPU n”.
Click on the Submit button once your selections are made. A new Token Analyzer Analysis window will be displayed based on your defined settings. These settings are also kept in a cookie on your PC, and applied again the next time you open the Token Analyzer, Setting Window. [Back to TOC] 4.2.3.2 TOKEN ANALYZER ANALYSIS The Analysis Window displays a set of past EMS Event messages based on your settings in Token Analyzer Settings Window.
The expected interpretation of step 4 is [match (TANDEM.ASAP.512) = False OR match(‘BBB’ = False] But the actual interpretation is [match (TANDEM.EMS.512) = False AND match(‘BBB’) = True] 4.2.4 BAM LITE The BAM Lite feature allows read-only access to “Admin – BAM”. To authorize read-only access for a user, select the “Admin - BAM Lite” feature in the ‘Admin-Access Control’ tab. For regular access, select “Admin – BAM”. Access to both features cannot be provided.
CHAPTER 5: USING WEB VIEWPOINT 5.1 STARTING WEBVIEWPOINT Web ViewPoint has server and client (browser) components. The server services need to be started up before the Web ViewPoint features can be accessed via the browser. Please note that if Web ViewPoint is successfully installed using the PC based installer, the server services are automatically started and the browser is brought up after the installation. [Back to TOC] 5.1.
5.2 LOGON OVERVIEW Web ViewPoint shell provides the framework for various features. All features, including plug-ins, require a logon. The only exception is Web ViewPoint Lite, where the logon is an option. The Web ViewPoint interface is brought up by specifying the fully qualified DNS/IP and Port in the address bar of the browser (e.g.: http://192.168.1.1:7500). Password Note: For the password exchange between the browser and Web ViewPoint components on the NonStop, the password is DES encrypted.
To open a Web ViewPoint instance on any of the Residents the user can click on the system name next to the image of the NonStop server. Also, if the checkbox at the top is checked while clicking, the user will be automatically logged in to the new instance of Web ViewPoint (provided the credentials shared on both systems are same). [Back to TOC] 5.3 MAIN TOOLBAR The main toolbar provides a set of features that are common to all functions of Web ViewPoint.
Owner: Specify a Group name/id, with a specific user name/id, or * to look for all files of the group. Input should be either in group-name/user-name or group-id/user-id format. The two cannot be mixed (e.g. groupname/user-id is not allowed). Creation Date: Specify a date and condition (before/on/after) to be matched against the Creation date of files. Modification Date: Specify a date and condition (before/on/after) to be matched against the Modification date of files.
Click on the Search button, once all conditions are set. The search operation begins on the host, and matching entries are displayed on the Window’s right panel as they are found. You may stop the search operation at any time by clicking on the Stop button. Once the search completes, you can print the results or export them to Excel by using the icons in the upper right corner. Clicking on a process name on displayed list, displays a pop-up menu with a list of available Process Commands.
View File Properties: select file(s) from the NonStop server whose properties are to be viewed. Click on the Properties button on the NonStop server side or the Properties option from the pop up menu (when the selected file is right-clicked). The properties of the selected file(s) are shown in a new window. View Files by File Code: select the file code from the ‘Display File Codes’ dropdown list. Only files matching the selected file codes are shown in the NonStop server list.
View File Properties: Select file(s) from the PC whose properties are to be viewed. Click on the Properties option from the pop-up menu (when the selected file is right-clicked). The properties of the selected file(s) are shown in a new window. Other settings for upload/download of files Transfer Type: Specifies the mode of transfer (ASCII/Binary) of the files. Transfer Options: Overwrite Existing File: if this checkbox is checked, the existing files are overwritten without being prompted.
icons are the FTP and Search (Find File/Process) icons. These can be used to access FTP functions and to search for files/processes on the NonStop host. Settings:In the TE Settings screen, for Guardian logon, user is provided with a feature called “Prompt string”. This field comes in handy for services that don't come back with the same name (as the service) at the prompt. For example, consider a service “SAFE” that is configured with SAFEGUARD.
5.3.7 USERS, MY PROFILE & INSTANT MESSAGING The instant messaging and event notification feature provides: An event notification service by which users get notifications for selected EMS events. A messaging service between Web ViewPoint and Pocket ViewPoint users Within Web ViewPoint browser, messages are received in two ways: Ebox: A non-intrusive message holder. To access the messages in Ebox the user receiving the message is shown a new message icon .
To send a message to another user, move the mouse over the user icon and click on ‘Users’. This displays a list of online/offline users. To send a message to another user, click on the user. In addition to the other delivery methods, ‘Popup’ and ‘Ebox’ options are available for messages being sent to online users. However, only the popup option is not available for messages being sent to offline users.
5.4 PERFORMANCE The performance monitor provides an online subsystem that monitors continuously and that enables receiving and displaying current performance metrics. 5.4.1 OVERVIEW The performance monitor is divided into four categories Live: Select and monitor one or more (up to 14) processor performance attributes. Chosen attributes will be graphed at set intervals. You can display data simultaneously for multiple attributes and processors and select the order in which they are graphed.
Disk IO Rate Tuning Window: If selected at Performance Live Settings Page, a tuning Window is displayed over the graph. This window appears as a grey-bordered rectangle that runs the width of the graph. This area identifies the acceptable upper and lower range for CPU busy of all CPUs. For a CPU to be in tune with the rest of the CPUs, its CPU busy should fall somewhere in this area. A distinct line which runs horizontally at the half point of this area identifies the optimal CPU busy value.
C. High PIN PCB: The number of High PIN Process Control Blocks allocated at the time the Processor is polled. Memory Queue Length: The average number of Processes awaiting page fault servicing during the polling period as a percentage of the maximum depending on the CPU type. Memory Pressure: An indicator of the frequency of page faults during the polling period. Locked Memory: The number of pages of physical memory which are locked at the time the Processor is polled.
plot line. This plot maintains values for up to 60 intervals. Past this limit, old data will be discarded as new information arrives and is plotted at each interval. E. Show: This area is designated to settings for process level information. Two available options are: Process Count: Choose whether the Process count per CPU should be displayed on the CPU Graph. This sets a second y axis on the graph to keep track of this count.
Performance Trend Graph The only resolution for which displayed data is automatically refreshed is the “one minute” interval. Web ViewPoint retains data at this resolution for one hour. The current screen at all times shows the most recent 60 minutes worth of data. Every minute, the oldest data is discarded as values for the latest interval arrives and is displayed. To stop the refresh, click on the icon on the toolbar. The icon changes to . . You may click on this icon to resume the refresh operation.
A. CPU: Choose to display information for all CPUs, or a selected CPU. CPU selections are from 0 to 15. Web ViewPoint ignores CPU selections that are not present on your Server (e.g. selecting CPU 12 on a 4 CPU system). B. Attribute: Choose one or more attributes from 1 to 14 of the available attributes. They are: C. CPU Busy: The percentage of time a Processor is not idle during the polling period. (Processor busy + interrupt busy time.
Resolution: Choose from one of the following four resolutions. Web ViewPoint automatically aggregates data over time into these resolutions, and maintains this data for a predefined period of time, which is different for each resolution, as stated below: Interval Retention Period One Minute 60 minutes 15 Minutes 24 hours Hourly 1 month Daily 1 year Monthly 5 years Tuning Window – Choose whether a Tuning Window should be calculated and overlaid on the graph.
5.4.4.2 PROCESS TABLE Display Formats: Process information is displayed in a tabular structure. There are two formats in which they may be presented: A. Busy list: This format is used when displaying a list of busy processes (top 5 or 10). Some level of detail information is displayed per process, as stated below: Process: Name of the process. “??” is displayed for unnamed processes. P/B: Designates whether this process is the primary (P) or Backup (B) process of a NonStop process pair.
Performance Process Table Screen CPU, PIN: CPU and PIN of the Process. Program: The object file name of process. Pri: Priority at which the process is running at. P F R: Three flags designating the current state of the process: P – Process contains privileged code. F – Process is waiting for a page fault. R – Process is on the ready list. %WT:Is the process wait state (in octal). A value of 000 indicates the process is not waiting.
File Commands Menu, then you are already in a drill-form and possibly circular structure. This enables you to follow links from process to files to process, and continuing on to retrieve desired information. Process Commands Menu Children: This displays a list of all other processes spawned by this process, along with vital information for each process. Activate: Activate this process. This assumes that the process is in a suspended mode. Command is ignored, if it is otherwise.
5.4.5 WEBDASH This feature provides a dashboard view across multiple nodes to monitor, in real time, any combination of 5 performance entities in addition to live EMS messages from each of the nodes. This single screen is a complete window to the real time health of the neighborhood. The WebDash screen shows these performance entities, namely – CPU Busy (Live and Active Trend), Top 10 Busiest Processes, Disks, NetLine, File and a plot of the TMF Transactions.
A. Every (Refresh Interval): Controls the rate at which the information on the monitor screen is refreshed from the host. Each of the performance entities are refreshed at the interval specified. B. Monitor: Specifies the performance entities to be monitored. Checking an entity also enables that entity to be placed as specified in the Display Format. It also provides the option to view Live EMS messages. The source, selection criteria, and presentation options can be set by clicking on the “Settings” link.
5.4.5.2 WEBDASH MONITOR SCREEN The WebDash monitor screen displays the performance entities and live events. Depending on the settings information the presentation is for a single resident or multiple residents. Based on the screen size at the time of setting the options in WebDash, the panels are aligned within that screen size only. If the screen is then expanded the panels do not realign themselves according to the changed screen size. A.
H. Error messages: WebDash has a WebViewPoint Info Message Window. This is brought up by pressing the Red triangle button in the upper right of the screen. The history of Error messages can be viewed in a single Window. The Hide Icon button can be used once messages have been fullyreviewed. Its purpose is similar to an OK prompt for Windows error messages. [Back to TOC] 5.
is the first screen that is displayed when you access the ‘Live’ option of ‘Events’ menu. While on the Live Events Window, you may access its Settings Window, by clicking on the icon on the upper right side of the screen. [Back to TOC] 5.5.2.1 EVENTS LIVE SETTINGS PAGE This is where you define the content to be displayed on the Live Events Window. The selections Source, Selection and Presentation are located in the same window screen as shown below. A.
Note: The changes to Events Settings are saved to the profile only when “Save” is clicked. If a “Submit” is done, then events are displayed based on the current settings on the screen rather than those from the profile. These settings are “remembered” only for the current session. Delete: Select the profile to delete and press the “Delete” button. B. Source: The user can specify one or more collector(s) (up to 10 collectors) belonging to one or more residents in the neighborhood.
For more information on how to add application owner-subsystem refer to the section Owner-Subsystem Event Type, Filter File, Search Pattern and Save Events to Log are all considered Advanced Options. They are not displayed by default. Click on the “Show Advanced Option” to see them. If any of these options are set to non-default value, “Advanced Options are set” message is displayed. In order to hide these options click on ‘Hide Advanced options’ link.
Filter Files: PARAM FILTERFILE-LOCATION IS specified:If the PARAM FILTERFILE-LOCATION is specified in the WVPCONF file, then the filter file input is automatically populated as it is below: The filter file drop down is dynamically populated with the list of pre-compiled filters present in the subvolume specified with: PARAM FILTERFILE-LOCATION <$VOLUME.SUBVOLUME> Note:The monitoring Window will show what filter is active with the text at the bottom of the screen.
Examples of valid strings: a) b) c) d) Selecting a single word: CPU Selecting a phrase: CPU Down Using the AND operator: CPU 'And' TMF Using the OR operator: CPU 'Or' TMF Note that AND and OR combination cannot be used together and the UI will gray out the opposite if one is selected e.g. (CPU & PROCESS) | (DISC) Do not include any spaces between the operators. E.g. To search for MSMGR and connect use MSMGR&connect and not MSMGR & connect.
Note: When the screen is reloaded due to an error condition, the events requested start from the “n” minutes or messages point. If there are no events “n” minutes before the reload, on any of the collectors, then a “… will start from current events …” pop-up message will be observed. This interrupts the “continuous” flow of events and hence should be appropriately chosen. Additionally there is a check box present to redirect Web ViewPoint to directly access the monitor screen.
Click on the Submit button once your selections are made. The Live EMS Events Monitor Window will be displayed based on your defined settings. These settings are also recorded in an xml file on your PC. This xml file is read and applied again the next time you open an Event Live Setting Window. So the next time you go into Events-Live there’s no need to browse through the tabs. Just press Submit, and the events will be displayed according to the last saved settings.
Acknowledgment icon: This is a quick method to acknowledge a single Event. Clicking on this icon causes the corresponding event to get acknowledged. The display is updated to change the event color to green (refer to Customizing Event Colors & Types). Event acknowledgements are managed centrally and displays of other users will get updated automatically. By specifying the PARAM HIDEACKS YES in WVPCONF file, the display update can be changed to hide the acknowledged event.
Export to Excel: This opens an instance of Microsoft Excel and populates a spread sheet of a new 'book' with the results of the current Events Settings. A summary bar at the bottom of the Window shows the total count of messages currently displayed for each of the three message type categories (Critical, Action, Others). These are all Hyperlink and on clicking any of the category it will take you to new live window which displays events of only that particular category in live mode.
5.5.2.3 DISPLAYING EMS EVENT HELP & TOKEN DUMP You may retrieve and display help text (where available) for a selected Event, along with a dump of all tokens included with the Event message. The help text is retrieved from one of two databases on the host. This contains information such as summary and detail description of the reported message. Also included, is information on Cause of the Event, its Effect on the system or applications, and Recovery methods. See Section 4.2.1.
Notice that there is a List button next to each log file entry box. This is to aid you to locate a file of your interest. The following is a description of how this button works: On your first click, when the entry box is empty, it displays a list of disk drives. You may click on a disk to select it. Its name will be carried to the entry box. If you have already selected or entered the name of a disk/volume, a click on the same List button exposes a list of sub-volumes.
5.5.3.1 EVENTS QUERY SETTINGS PAGE This is where you define the content to be displayed on the Events Query Window. A. Profile: This option comes into play when a user wishes to save the Event Settings on the NonStop. These profiles are stored and associated with the UserID used to create the profile. Further, the profiles are section specific, i.e. profiles for Event Live are separate from those of Event Query and those of Web Dash. By default, no profiles are populated.
B. Source:The user can specify one or more collector(s) belonging to one or more residents in the neighborhood. By default, the resident that the user is logged into is the one which is displayed in the Resident dropdown box. Once a resident is selected, a list of collectors of that resident is displayed at the bottom dropdown box. Choose a collector from the dropdown box and simply click the right arrow symbol. This will add your selection to those already in the ‘Selected Collectors’ box.
Selected events criteria box can be populated by selecting the Resident, Owner, Subsystem and Event number combination from the drop down and text box provided and clicking the “Select” button. Criteria can be removed by clicking the “Remove” button. If user wants to filter based on a particular event number, then resident, owner and subsystem are mandatory. User can also select or suppress all subsystems and corresponding events from a selected resident and owner.
selected Events to be written to alternate Collector $ALOG (configurable via Web ViewPoint startup file). This Collector uses a log file (name format: ZZEV0000) in the volume and sub-volume where the process was originally created. If it is left to Web ViewPoint to start the collector, the log file will reside in the same location where Web ViewPoint is installed. In case of multiple residents it will contain events from all the residents whose sources have been mentioned.
String Matching now has the option of using AND OR conditional operators. Caution should be used because of the additional overhead required to handle the conditional operators so response time may be slow. Syntax for the String Matching field content has some limitations. See the examples below on how to format your string data with and without the conditional operators. To specify logical operators between search strings use the AND/OR buttons only (i.e.
each token will be whatever has been defined in the template. If an event doesn’t have a value for a token then that column will remain empty for that event. From To, Up To: You can specify a From Date-Time and a To Date-Time or not specify anything. If no start information is provided, then displayed EMS messages will start using the current date-time and go backwards. The Up To specifies the number of EMS messages to be displayed per page.
Web ViewPoint User Guide Version 5.
Include: Collector Name: On selecting this option, the collector of the EMS message will be displayed. The collector name will contain the resident name too. Convert to a single time zone using: All EMS messages will be converted to a common time zone specified in the time zone dropdown whenever events involving multiple time zones are involved. This option comes into play when multiple Nodes belong to a neighborhood.
Information for each message occupies one row. Each row is organized as follows: Token Dump icon: The information icon here is a link to a Window which displays more detailed information about this Event. This includes help text (description, cause, effect, & recovery methods), as well as a token dump. See Displaying EMS Event Help & Token Dumpfor more detail information. Acknowledgment icon: This is a quick method to acknowledge a single Event.
Generation Time:2013/06/13 12:45:31 It is the date and time the message was generated on the NonStop Server. This calculation is done on the NonStop Server where the message was generated. Process ID:\NSDEMO.3,1454 It is the name/id of the process which generated the message. Subsystem ID:TANDEM.SPI.0 It is the owner/subsystem for which the message is generated. It may be an internal hp NonStop subsystem or an in-house application, or third party vendor’s product.
5.5.3.4 ACCESSING TOKEN ANALYZER You may transfer to Token Analyzer, the full content (including all tokens and their values) of first 500 messages currently displayed on the screen. To do so, click on the Token Analyzer icon on the upper right side of the screen. Web ViewPoint retrieves all related information from the NonStop Server, and transfers the data to a new Window under Token Analyzer’s format. See Token Analyzer for more information on its features.
A user will be able to add/save a new subscription only when the group(s) or defined, if not notice that the ‘Save’ & ‘Save New’ buttons will be disabled. To specify a new subscription click on Add Subscription, do the following: Select a Collector, Owner, Subsystem and Event combination to subscribe to. Specify the following parameters for the subscription and then click the 'Add' button. A.
This section provides the users with the delivery options. The user can choose the delivery method, group name & duplicate gap time. Delivery: Notifications can be delivered in any of the following methods. Select the appropriate method. An option may be disabled depending on the configuration specified by the Message Center administrator or the information contained in the User's profile. Popup: The notification will be displayed as a pop-up window within Web ViewPoint’s browser.
E. Search Text: If a search string is added, only those events containing that string will be subscribed to. Do not include any spaces between the operators. User can also choose the ‘Case-sensitive’ option by the selecting the checkbox. Eg: To search for MSMGR and connect use MSMGR&connect and not MSMGR & connect. F. Message: Custom Message:Specify what information will be included in the notification. Items that are checked are included in the notification.
A. Profile: This option comes into play when a user wishes to save the Event Settings on the NonStop. These profiles are stored and associated with the UserID used to create the profile. Further, the profiles are section specific, i.e. profiles for Event Live are separate from those of Event Query and those of Web Dash. By default, no profiles are populated. On selecting an available profile, the Events Settings screen is populated with the values specified in the profile.
Once a resident is selected, a list of collectors of that resident is displayed at the bottom dropdown box. Choose a collector from the dropdown box and simply click the right arrow symbol. This will add your selection to those already in the ‘Selected Collectors’ box. If the user wishes to use log files as their source then they can type in the $volume.Subvol.file in the text box for log file or else click on browse button which opens pop up window and search for particular log file.
User can also select or suppress all subsystems and corresponding events from a selected resident and owner. This can be done by selecting the * symbol from the subsystem box. If there are some subsystems that do not show up in the default list, then the user can manually add them in the owner-subsystem section. For more information on how to add application owner-subsystem refer to Display Template section. Event Type, Filter File, Search Pattern and Save Events to Log are all considered Advanced Options.
String Matching now has the option of using AND OR conditional operators. Caution should be used because of the additional overhead required to handle the conditional operators so response time may be slow. Syntax for the String Matching field content has some limitations. See the examples below on how to format your string data with and without the conditional operators. To specify logical operators between search strings use the AND/OR buttons only (i.e.
Explanation of the effect of the Ascending and Descending options is important to note. Ascending displays the events from a given moment in time forward. Descending displays events from a given moment in time back. In the figure below please note that when just a particular day is selected the affects of the ascending and descending options are as follows: Pivot point is always midnight (i.e. the beginning of that particular day).
[Back to TOC] 5.5.5.2 TOKEN ANALYZER ANALYSIS The Analysis Window displays a set of past EMS Event messages based on your settings in Token Analyzer Settings Page. This new Window contains a list of all Tokens for the selected messages. Navigational controls give you the option of which Events and tokens should be displayed, and in what format. The Window shown below is organized into upper and lower sections.
However they will remain as markers for the token. This enables you to quickly set that filter again, or review the values you had set earlier. Central Panel: When a token name is clicked, this area shows a list of all unique token values for that token for all Event messages on the current Window. Right Panel: Displays the details of any conditions set & provides user options to set their display criteria.
there are too many columns to display, this automatically changes where token values for each individual message are displayed in a token per line format. You also have the option of displaying the content in a CSV (Comma Separated Value) format. Each Token has a sequence number. This is also a link when you can see values for all tokens of that specific message. This is useful when you had previously chosen not to display all tokens, but are interested to know more detail about this specific message.
corresponding VHS processes. Please note that the learning operation takes a few minutes. Learnt environments are remembered. C. Refresh Rate: Select a refresh rate from every 1, 5 or 10 minutes. This specifies how often the browser screen will communicate to the server to retrieve and display the latest information. D. Number of Entries per page: Select from 25, 50, and 100, the maximum number of recent entries to be displayed at one-time on the Browser Window.
5.5.7 PROMPT BROWSER This feature opens a Window where you can display VHS (Virtual Home terminal System) outstanding prompt messages sent to the VHS primary log file. (NOTE: To enable this option in the menu bar, set PARAM SHOWENHANCED YES in the WEBVPT5 section of WVPCONF). You can control the type and scope of the messages that get displayed based on a set of criteria you define in the Setting Window. Following is a description of the available options on the Setting Window. 5.5.7.
5.5.7.2 VHS-PROMPT BROWSER LIVE This Window displays a set of most recent VHS Prompt messages & is refreshed regularly based on your settings in Prompt Browser Settings Page Window. To stop the refresh, click on the icon on the toolbar. The icon changes to: .You may click on this icon to resume the automatic refresh operation. While on the Prompt Browser Window, you may access the Settings Window, by clicking on the upper right side of the screen.
To customize Web ViewPoint to display all TANDEM.TACL events as normal events but in orange color, the following will have to be done: A. Write the following filter: FILTER My^Filter; BEGIN IF ZSPI^TKN^SSID = SSID(TANDEM.TACL.0) THEN PASS 4; IF ZEMS^TKN^EMPHASIS = [ZSPI^VAL^TRUE] THEN PASS 2; IF TOKENPRESENT(ZEMS^TKN^ACTION^NEEDED) THEN BEGIN IF ZEMS^TKN^ACTION^NEEDED = [ZSPI^VAL^TRUE] THEN PASS 1 ELSE PASS 3; END; PASS 0; END; B.
5.6 OPERATIONS While the performance monitor and event viewer describe the state of the NonStop server environment, the operations package provides the mechanism to take action quickly and easily and to apply specific commands. [Back to TOC] 5.6.1 OVERVIEW A generic internal structure enables definition and integration of in-house applications into the Object Manager, which then automatically becomes aware of the customized environments.
Object Manager Tree: When Object Manager starts up, the user sees three frames as under: The leftmost frame is known as the “Tree Frame” which contains several Objects. The right frame having labels regarding the object, instance and command is known as the “Command Frame”. The bottom frame is known as the “Results Frame”, which contains command output. The tree lists the different residents that belong to the neighborhood logged on to. The Object Manager tree of the “home node” is displayed.
on the system and current load conditions, this operation may take a while. Object folder nodes that are expected to produce instances are removed from the tree if the OCM returns no instances for them. Subordinate objects (such as SERVCLASS of PATHWAY) are currently not populated. C. Delete Tree: This command deletes all objects from the tree, except the security objects logon, TACL, and users. These objects are always present in the tree, but are not displayed.
and the security id. If a non-existing object is specified, message "Could not find command info for [object]" will be displayed. J. Add Command (to Object Class): This option adds a new command button to an existing tree object. The change affects the NonStopresident tree database. If the command to be added already exists for this object, it will be replaced. After successful completion, the new command is added to the tree, but the folder must be re-opened to have it show up in the commands frame.
OSS: Discover, monitor, manage filesets, and access the filesystem with full smart command and FTP options. Operation logics are made available in a graphical format. CCM may execute one or more actual commands to one or more NonStop Subsystems, upon a single click. The tree on the left gives a hierarchical layout of the Subsystems and the panel on the right gives results of actions.
Run: This option is valid for files with file code 101 (text files). Opens a sub menu that displays operations that can be taken on a macro file. The operations are Now, Open Dialog, Add To Library. For more details see Macro Library. Open: This option is valid for files with file code 101 (text files). It transfers the file’s content to a browser-based editor on your PC. You may edit this file and save it on the server to the same or a different location.
Macro Library: This displays a new Window showing the Macro Library. For more details read Macro Library. Create File: This displays a new Window where you can specify settings to create a new file on the server. Simple settings for unstructured, entry-sequenced, key-sequenced and relative files are supported. Create Edit File: This displays a new editor window where you can enter the contents of an edit file. Use the File -> SaveAs menu to save the newly edited file to the server.
Nowait: if the option is checked, then the macro is run nowaited. Output to: specifies the out parameter to the macro List Arguments: displays the various arguments expected by the macro. The values for the arguments can be supplied Add to Library: Opens a new and displays the Macro Library Tree. Click on the folder into which the file should be added, specify the bookmark name and click Add. [Back to TOC] 5.6.3.
Status Report Location Possible settings are based on the values available in the current list of jobs. Upon selection and submission of the criteria, a new Window opens which displays the matching list of jobs. E. Toolbar functions: The following icons on the toolbar are used for miscellaneous operations. These icons are available when a list is displayed. Print: this opens the default windows print dialog and prints the information table currently being viewed.
C. Toolbar Functions: The following icons on the toolbar are used for miscellaneous operations. These icons are available when a list is displayed. Print: this opens the default windows print dialog and prints the information table currently being viewed. Export to Excel: This opens an instance of Microsoft Excel and populates a spread sheet of a new 'book' with the information table currently being viewed. The toolbar provides additional operations that can be performed on the directory.
Message Text: Contains the body of the message that was received from the Server. This text is sent out as an Email/SMS/SNMP trap or spoken out depending on the specified delivery method. Recd. From: Indicates the NonStop Node from which the notification was received from. Time Received: Indicates the time in the Local Time at which the notification was received.
The values contained in the database for each of the parameters are populated in the corresponding textboxes. To change the values, enter the new value in the corresponding textbox and click Update button. Loading Owner/Subsystems: SSIDPOP: Web ViewPoint has the option of allowing users to add multiple Owner/Subsystem. This feature is useful for users that monitor multiple Owner/Subsystem in Web ViewPoint. Running the following command [RUN SSIDPOP ], will add the Owner/Subsystem.
WVPHEADERCOLOR: Users can now change the header title color. Adding the following param in WEBCONF or LITECONF [PARAM WVPHEADERCOLOR ], will change the header title color, see screenshot below. For supported colors, please refer to Microsoft’s Colors by Name (Internet Explorer). 5.7.2 ENABLING HTTP SECURE (HTTPS) Web ViewPoint now offers users to operate in a secure mode via HTTPS. This feature encrypts the HTTP requests and their responses.
First and the for most thing, always open the Internet explorer in administrator mode i.e. right click on the IE icon and click on “Run as Administrator mode”. Then you will need to set an additional setting in your java control panel. Please follow the instructions below to make changes to your java settings: 1. Goto ‘control panel’ 2. Click on ‘java’ 3. Go to ‘Advanced tab’ and scroll down to ‘Enable the next-gen Java plugin’. By default this option will be checked.
CHAPTER 6: APPENDIX 6.1 SOFTWARE SUPPORT Support for Web ViewPoint is available through HP's 24-hour Global NonStop Solution Centers (GNSC) throughout the world. In the U.S. call 1-800-255-5010. International numbers see pages 5 through 7 of: http://h20195.www2.hp.com/V2/GetPDF.aspx/c02083951.pdf [Back to TOC] 6.2 HARDWARE & SOFTWARE REQUIREMENTS Hardware: HP NonStop Server with minimum OS release as: H06.10 onward J06.
6.3 PERFORMANCE CONSIDERATIONS 6.3.1 NONSTOP SERVER CONSIDERATIONS For Events Live if the option is to ‘Start With last n messages’ the performance depends on how many residents the distributor (FDIST) has to travel to fetch the EMS messages. In case of last n messages, it visits each resident one-by-one, fetches the last n messages of each and displays them after going through all the residents. Thereafter it displays the live messages as they arrive at the collector of any resident.
6.4 INTEGERATION WITH HP OPEN VIEW Web ViewPoint can be configured to send out SNMP traps as notifications to HP OpenView Operations. Web ViewPoint’s PC Component sends out SNMP traps to different SNMP receivers. For HP OpenView Operations on HP-UX or UNIX, the Web ViewPoint’s MIB can be used by HP OpenView Operations to interpret the SNMP message sent by Web ViewPoint. Identification for WVP traps is 1.3.6.1.4.1.169.3.257.n The 257 identifies the WVP subsystem. Identifiers Name 1.3.6.1.4.1.169.3.257.
lib Config.properties LogConfig.properties wvpspi.sh wvpspi.jar - Folder containing jar files used by the WVP Smart Plug-in - WVP SPI Main Configuration file - WVP SPI Main Logging Configuration file - WVP SPI Startup script - Java archive of the WVP SPI Run the plug-in using the startup script file Note: Please ensure that the path to the java executable is in the PATH variable or fully qualify the location of the java program in the startup script file.
NUMSTATIC 10 ASSIGN MENUFILE, WVPMENU ASSIGN LICENSE-FILE, LICFLV2 For Web ViewPoint AAY or prior: Add the following lines to WVPCONF file in the Web ViewPoint subvolume [PLUG-INOBJECT] TITLE J6530 OBJECTFILE OJ6530 OBJECTID OBJID_ZJ6530 PORT 7399 SECUREPORT 7353 MAXPROCESS 15 NUMSTATIC 10 ASSIGN MENUFILE, WVPMENU ASSIGN LICENSE-FILE, LICFILE Secure port field corresponds to the port that SWAP (in HTTP mode) is listening to. Port field is ignored in this case.
Port field corresponds to the port that SWAP (in HTTP mode) is listening to. Secure Port field is ignored in this case. Yet it is necessary to ensure that the port specified is unused.
connection on the PC used to access WVP the system will provide instructions on how to obtain a license via email. This evaluation license expires after the evaluation period. Keep in mind an evaluation copy for a particular release of Web ViewPoint can be installed only once on a particular system. CUSTOMER LICENSE: Once Web ViewPoint is activated, if there is an internet connection on the PC used to access WVP then the product automatically issued a temporary license (usually multiple months).