
Web ViewPoint User Guide, Version 5.14


Web ViewPoint User Guide Version 5.14 - 528226-014 55
To run the SYNC program, user should run the following command in their Web ViewPoint $volume.subvol:
>run sync
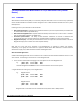
When the program will be run for the first time, the user will be shown a menu screen that looks like this:
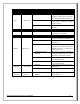
********** WVP Central Router Options **********
* *
* 1. Create Neighborhood *
* 2. Join a Neighborhood *
* 3. Exit *
* *
*********************************************
For creating a new Neighborhood, Option 1 (Create Neighborhood) is chosen which prompts the user for the
Neighborhood name. On entering the name, the Central Router database will be initialized, which will initially have
an entry of just the Resident that initialized it.
To initiate other Residents into this Neighborhood, Option 2 (Join) is chosen. In this case, the user needs to specify
the name of the Neighborhood as well as the location of any one existing Resident belonging to that
Neighborhood. After this step, the user will be prompted to enter the TCPIP process name of the current system.
Using the other Resident’s location information, the program will first update its own Resident’s database with
data obtained from the other and then synchronize the databases of all Residents of the Neighborhood to reflect
the newly-added Resident’s data.
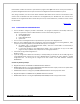
Once a Resident is part of the Neighborhood, subsequent calls to Sync will show a menu as shown below:
Subsequently, any change to the IP address or Port Number by the user should be communicated to the entire
Neighborhood by running Sync again, and selecting option 1 (Synchronize). So if a user makes changes to the IP
address or Port Number in the WVPCONF file, he/she needs to run Sync which will automatically update the
databases of all Neighbors with the new IP Address/Port Number without the user having to specify the changed
IP/port again.
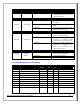
************* WVP Central Router Options **********
* *
* 1. Synchronize *
* 2. Leave Neighborhood *
* 3. Exit *
***********************************************
Note that during synchronization, the database with the most recent “Version” will be used as reference. This
ensures that even if a Resident is down during synchronization, running the program at a later time (when it
becomes available again), will update its database to the latest state.
If option 2 (Leave Neighborhood) is chosen, the Resident’s entry will be removed from the database of all others
belonging to that Neighborhood.
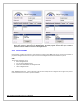
NEIGHBORHOODS:
The Neighborhood section will have the configured Neighborhood listed on the left hand side and the addresses of
the Residents belonging to that Neighborhood, on the right side. The user can select which Resident to connect to
by selecting the address from the right hand table.
Note the option ‘None’ under the Neighborhoods list. This option will be pre-selected if the Resident that the user
connects to is not found in the database.