
XYGATE Merged Audit Reference Manual
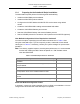
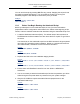
Table Of Contents
- Cover
- Copyright
- Publication History
- Contents
- Quick Reference for Common Tasks
- Introduction
- 1. Installing XMA
- 1.1 Before You Begin
- 1.2 Installing XMA Using the Automated Install Script
- 1.3 Installing the SIEM Log Adapter
- 1.4 Upgrading XMA or XTR Using the AutoInstall Script
- 1.5 Upgrade Considerations
- 1.6 Uninstalling XMA or XTR Using the Auto Uninstall Script
- 1.7 Managing the XYGATE License
- 1.8 Generate Reports Using XYGATE Report Manager (XRM)
- 2. Sending Data to Your ArcSight SIEM
- 3. Configuring Filters and the FILTERS File
- 3.1 How to Edit the FILTERS File
- 3.2 Filter Syntax
- 3.3 Building a Filter
- 3.3.1 Step 1. Name the Filter
- 3.3.2 Step 2. Set the Filter Status
- 3.3.3 Step 3: Set the EVALUATE_MSG Keyword
- 3.3.4 Step 4. Define the Filter’s Mover
- 3.3.5 Step 5. Define the Filter’s Data Selection Criteria
- 3.3.6 Step 6. Define the Filter’s Action
- 3.3.7 Step 7. Syntax Check and Compile Your FILTERS File
- 3.3.8 Step 8. Test Your Alerts
- 3.4 Variable Substitution Processing in the FILTERS File
- 3.5 Node-Conditional Processing in the FILTERS File
- 3.6 Determine the TCP/IP Process for Email, IPALERT, SNMP Alerts
- 3.7 Sending XMA Data to an Audit Logging Appliance
- 4. Generating Reports Using XRM
- 4.1 Generating Audit Reports Using XMA_REPORT
- 4.2 Select the Audit Subvolume
- 4.3 Select by Date and/or Time Range
- 4.4 Select by Subject Userid
- 4.5 Select by Subject Login Name(s)
- 4.6 Select by System
- 4.7 Select by Subject Terminal
- 4.8 Select Subject by Object Type
- 4.9 Select by Object Name
- 4.10 Select by Operation
- 4.11 Select By Outcome
- 4.12 Select the Output File’s Location
- 4.13 Select the Report’s Sort Order
- 4.14 Select by Rule Name
- 4.15 Select by XYGATE Product Code
- 4.16 Select by ALERTED Column
- 4.17 Select by Text in the Result Column
- 4.18 Select by Message Code
- 4.19 Select by Message ID
- 4.20 Run the Report
- 4.21 Running Reports from Archived Tables
- 5. Using XMA_MANAGER
- 6. Configuring MOVERs
- 7. Safeguard Selection Criteria
- 8. Maintaining the XMA Database
- 9. Troubleshooting
- A: The MACONF File
- B: Administrative Tables
- B1: XYGATE MOVER Configuration Tables
- B2: XYGATE MOVER State Tables
- B3: EMS MOVER Table =XMA__EMSMVTBL
- B4: EMS MOVER Parameters Table =XMA_EMSMVPARAMSTBL
- B5: EMS MOVER State Table =XMA_EMSMVSTATETBL
- B6: MEASURE MOVER Tables
- B7: SAFEGUARD MOVER Table =XMA_SFGMVTBL
- B8: SAFEGUARD Parameter Table =XMA_SFGMVPARAMSTBL
- B9: SAFEGUARD MOVER State Tables
- B10: BASE24 MOVER Table
- B11: BASE24 Parameter Table
- B12: BASE24 State Tables
- B13: TCP/IP Syslog Tables
- B14: HLR MOVER TABLE
- B15: HLR Parameter Table
- B16: HLR State Tables
- B17: iTP Secure WebServer MOVER Table
- B18: iTP Secure WebServer State Table
- B19: ARCHIVE Tables
- B20: PARAMS Table
- B21: SESSIONOIP Table
- C: Data Tables
- D: Sample Filters
- D1: Filter out $CMON’s “I’m Alive” Messages
- D2: Filter out XPC STATUS Commands
- D3: Filter out Safeguard reading its own user database
- D4: Filter out Safeguard No Record
- D5: Filter out XOS No Record
- D6: Filter out XOS What-if tests
- D7: Alert for SUPER.SUPER’s password change via XPQ
- D8: Alert when someone logs directly on as SUPER.SUPER
- D9: Alert for XAC command containing "–255"
- D10: Selecting security-related BASE24 EMS events
- D11: Selecting CLIM events
- E: XMA Host Macros
- E1: ADELMAC
- E2: ARCMAC
- E3: CLEANDB
- E4: EMSBUILD
- E5: PARSAMP
- E6: REMFIN
- E7: UPDSTAT
- E8: XMA_AUDIT_REPORT
- E9: XMA_COMPILE_FILTERS
- E10: XMA_DATETIME_MAKE
- E11: XMA_DBVOLUME
- E12: XMA_EDIT_FILTERS
- E13: XMA_FILTERS_CHECK
- E14: XMA_INSTALL_LICENSE
- E15: XMA_LOAD_DEFINES
- E16: XMA_NETWORK_FILTERS_CHECK
- E17: XMA_NETWORK_LICENSE_INSTALL
- E18: XMA_NETWORK_VERSION
- E19: XMA_PWCOLD
- E20: XMA_PWCOOL
- E21: XMA_PWSTOP
- E22: XMA_PWVOLUME
- E23: XMA_SQLCOMPALL
- E24: XMA_SYNTAX_CHECK
- E25: XMA_UPDATE_FILTERS
- E26: XMA_VERSION
- E27: XMA_VOLUME
- F: TCLEXC
- G: Data Mapping
- G1: General Notes on Data Mapping Columns
- G2: Column Descriptions
- G3: How to Use the Data Mapping Tables
- G4: BASE24 Data Mapping
- G5: BASE24-eps Data Mapping
- G6: HLR Data Mapping
- G7: EMS Data Mapping
- G8: iTP Secure WebServer Mapping
- G9: Measure Data Mapping
- G11: Safeguard Data Mapping
- G12: XYGATE Access Control (XAC) Data Mapping
- G13: XYGATE Supported CMON (XCM) Data Mapping
- G14: XYGATE Host Encryption (XHE) Data Mapping
- G15: XYGATE Key Management (XKM) Data Mapping
- G16: XYGATE Process Control (XPC) Data Mapping
- G17: XYGATE Password Quality (XPQ) Data Mapping
- G18: XYGATE Object Security (XOS) Data Mapping
- G19: XYGATE Safeguard Manager (XSM) Data Mapping
- G20: XYGATE Combined Spoolcom Peruse Data Mapping (XSP)
- G21: XYGATE Transaction Router (XTR) Data Mapping
- G22: XYGATE User Authentication (XUA) Data Mapping
- G23: XYGATE Compliance PRO (XSW) Data Mapping
- G24: Column Usage Table
- Glossary
- Index
XYGATE Merged Audit
®
Reference Manual
Chapter 1. Installing XMA
XYPRO Technology Corporation 5 Proprietary and Confidential
Config File Configuration Settings Default Values Assigned by
AutoInstall Script or Locations
FILTERS XMA rule file for setting Filter information
to the Pathway servers
$VOL.XYGATEMA
PATHCTL Pathway run-time configuration file name $VOL.XMAPW
PWLOG Pathway log file name $VOL.XMAPW
1.2.2 Using the AutoInstall Script Tool
This section describes the specific formatting used to indicate installation prompts and
user actions. You should review these formatting conventions before starting the
AutoInstall script:
• Display text and script text are italicized.
• User input for a given prompt(s) is displayed in bold.
• Three vertical dots indicate that output is omitted for brevity in this manual only.
• The Enter key is represented by the standard symbol
• A separate TACL session may be required to perform certain functions during the
AutoInstall script. A “boxed” section of text represents a separate TACL session
with the required commands as shown in the Example below.
Example:
TACL> FUP PURGE $MYVOL.P46DSDST.* !
- or -
TACL> FUP RENAME $MYVOL.P46DSDST.*, $MYVOL.O46DSDST.*
Script prompts will give a default value. The default volume used is the volume on
which you are running the script. Default subvolumes are named by the script as valid,
descriptive names for the product.
Script prompts will give a default value inside a pair of angle brackets <>. If you press
Enter (
) without any input, the AutoInstall script will use the default value shown.
Example:
Enter XTR volume <$DAT90>?
In the above example, $DAT90 is accepted as the default XTR volume.
Script prompts will return an error to the screen if the entered value is not valid. You
can then change your response to a valid entry.
Example:
Enter XTR volume <$DAT90>? Zmywrk
Invalid volume entry, try again
Invalid response