HP OneView for VMware vCenter User Guide Abstract This document contains detailed instructions for configuring and using HP OneView for VMware vCenter (formerly HP Insight Control for VMware vCenter Server). It is intended for system administrators who are experienced in virtual and physical IT infrastructure administration and understand server virtualization, storage, and networking concepts.
© Copyright 2012–2014 Hewlett-Packard Development Company, L.P. Confidential computer software. Valid license from HP required for possession, use or copying. Consistent with FAR 12.211 and 12.212, Commercial Computer Software, Computer Software Documentation, and Technical Data for Commercial Items are licensed to the U.S. Government under vendor's standard commercial license. The information contained herein is subject to change without notice.
Contents 1 Overview..................................................................................................7 2 Configuring HP OneView for vCenter............................................................8 vSphere Web Client administration pages...................................................................................8 vSphere Client administration pages...........................................................................................9 Role-based security........................
Viewing cluster information.............................................................................................38 Managing cluster networking..........................................................................................38 Setting a cluster reference host...................................................................................40 Resolving a network mismatch....................................................................................
Switching Peer Persistence..............................................................................................76 Viewing VMs to volumes................................................................................................76 Viewing HP Infrastructure information....................................................................................79 HP Storage Systems infrastructure page............................................................................
Network portlet for blades is missing the diagram link..........................................................124 Server summary data is not displayed for host.....................................................................124 Health status or information is missing for specific hosts or clusters..........................................124 Auto-login not working for URLs provided for managed nodes by HP OneView for vCenter........
1 Overview HP OneView for VMware vCenter (formerly HP Insight Control for VMware vCenter Server) is a single integrated application that you use to manage ProLiant servers and HP storage systems. The application consists of two modules. • HP OneView for VMware vCenter—Includes support for the following components: ◦ HP OneView for VMware vCenter Server module—Adds HP ProLiant and HP BladeSystem hardware monitoring into the HP OneView for vCenter console.
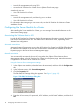
2 Configuring HP OneView for vCenter HP OneView for vCenter is managed as a plug-in in the vCenter Server environment. Several settings can impact the interaction between HP OneView for vCenter and vCenter Server. The configuration settings are accessed from the client Home Settings page. To access the Home Settings page: 1. Run the vSphere Client or vSphere Web Client and access the home page. 2. Under Administration, click the HP Management Administration icon.
vSphere Client administration pages The vSphere Client home page provides access to the following administration pages. The page links are provided in drop-down list. • GUI Theme Selection This page enables you to select your preferred view of the vCenter vSphere Client GUI, either dark text on a light background or light text on a dark background. • vCenter Credential Management This page lists the credentials for all vCenters that are configured in the environment.
• Launch HP management tools using SSO • Access the HP OneView for vCenter Server vSphere Client home page A read-only user can: • View HP OneView for vCenter A user can: • Launch HP management tools, and then log on to use them • View HP OneView for vCenter For information about assigning a user access role, see the HP OneView for VMware vCenter Installation Guide.
Using the HP OneView for vCenter Host Properties page 1. Select a host, and then click the HP Management tab. 2. 3. Click the Settings icon and select Host Properties. Select the iLO global settings, or enter the iLO IP address or host name, and a user name and password. Depending on which client you are using, do one of the following: 4. • vSphere Web Client: Select the iLO global settings, or enter the iLO IP address or host name, and a valid user name and password.
HP OneView Controllers Lists the credentials for all HP OneView controllers that are configured in the environment. You can perform the following tasks: • Add a new HP OneView controller—Click the Add icon and enter the credentials. If the host or the credentials are invalid, the HP OneView controller is not added. • Delete an HP OneView instance—Select the appropriate instance and click the Delete icon . • Import Credentials—To import credentials: 1.
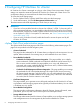
For information about the Storage Administrator Portal, see “About the Storage Administrator Portal” (page 13). For configuration instructions, see “Configuring storage systems and management servers” (page 13) and “Configuring the VMware VASA provider” (page 21). About the Storage Administrator Portal The Storage Administrator Portal for VMware vCenter enables you to configure storage systems and management servers for management by the StoreFront Module for vCenter.
3.
Adding HP 3PAR StoreServ To add an HP 3PAR StoreServ: 1. Access the Storage Administrator Portal. For instructions, see “About the Storage Administrator Portal” (page 13). 2. Click Add. The Add Storage System or Management Server page appears. 3. Select HP 3PAR StoreServ in the Type list, and then click Next. The Add HP 3PAR StoreServ page appears. 4. Enter the following connection parameters for the HP 3PAR StoreServ storage system and click Next.
4. Enter the following parameters for the HP EVA Command View management server you want to add, and then click Next. • Server host name or IP address • User name • Password The Add HP EVA Command View page appears. The Available HP EVAs box shows all available HP EVAs managed (actively or passively) by the HP EVA Command View server. The Selected HP EVAs box shows the HP EVAs that will be monitored by the StoreFront Module for vCenter. 5.
5. To add a HP EVA Command View server, select one or more available servers, and then click Add. To remove a server, select one or more servers, and then click Remove. NOTE: The list of available servers includes only HP EVA Command View management servers that were added using the procedure “Adding HP EVA Command View management servers” (page 15). TIP: Click Add All or Remove All, respectively, to add or remove all HP EVA Command View servers. 6. Click Next.
7. Select the Full Access check box for one or more storage pools to enable provisioning by the StoreFront Module for vCenter. Storage pools do not need to be assigned Full access if they are not intended to be used for provisioning operations. 8. Click Finish. The HP MSA System is added to the Configured Storage Systems and Management Servers list. Adding HP XP P9000 storage systems To add an HP XP P9000 storage system: 1.
Adding HP StoreOnce Backup To add an HP StoreOnce Backup: 1. Access the Storage Administrator Portal. For instructions, see “About the Storage Administrator Portal” (page 13). 2. Click Add. The Add Storage System or Management Server page appears. 3. Select HP StoreOnce Backup in the Type list, and then click Next. The Add HP StoreOnce Backup page appears. 4. Enter the following connection information for the HP StoreOnce Backup array you want to add, and then click Next.
• Managers/Managing—Management servers or management consoles for the listed systems or systems managed by listed management servers • Current User—Name of user currently logged in to the system • Storage Pool—Available storage pools • Access—Access setting for each storage pool Modifying configured storage systems and management servers You can make the following changes to configured storage systems or management servers: • HP EVAs: ◦ Change the user name or password for an HP EVA Command View
4. Click Refresh Cache (in the Storage Administrator Portal) to manually refresh the information displayed on the Configured Storage Systems and Management Servers page. You can also use the cache refresh icon to update the cache. Cache-refresh progress information is displayed. Click Check Cache-Refresh Progress in the Storage Administrator Portal to view updated information.
4. Enter the following information: • Name: Enter HPICSM. • URL: Enter one of the following: ◦ https://vasaProvider_server_name:port/vasa_provider_ws/vasaService (For non-3PAR Storage Systems) ◦ https://vasaProvider_server_name:port/ (For 3PAR Storage Systems) TIP: To view the VASA Provider URL, click the Settings icon Provider URL. 5. , and then select VASA • Login: Enter the login information for the system that runs the vSphere Client.
3. Enter the following information: • Name: Enter HPICSM. • URL: Enter https://vasaProvider_server_name:port/vasa_provider_ws/vasaService. TIP: To view the VASA Provider URL, click the Settings icon then select VASA Provider URL. • 4. on the client page, and Login/Password: Enter the login information for the system that runs the vSphere Web Client. Click OK.
9. Use the Certification Authority tool to generate the CA-signed certificate. This step is performed outside the vSphere Client application. For instructions, see the Certification Authority tool documentation. 10. Copy the generated CA-signed certificate to the server on which the StoreFront Module for vCenter is installed. 11. Select Certificate Upload from the Actions drop-down list. 12. Paste the CA-signed certificate in the text box, and then click Upload.
3 Using HP OneView for vCenter This chapter describes the processes for accessing and using the software. You can access resource inventory, HP Management Administration tools and the HP Management Deployment Wizard from the vSphere Client home page.
For more information about HP Management Administration, see “Configuring HP OneView for vCenter” (page 8). For more information about using the deployment wizard, see “Using the HP Management Deployment Wizard (vSphere Client)” (page 33).
Figure 5 vSphere Web Client — Overview Using the vSphere Client to access HP OneView for vCenter After completing the installation and configuration procedures, you use the vSphere Client to access HP OneView for vCenter: 1. Log into the vSphere Client. In most configurations, this is the same server that you configured during the installation process. 2. 3.
4. Click the HP Management tab. An overview of the VMware component that you selected appears. While HP OneView for VMware vCenter collects information about this VMware component or corresponding HP iLO, HP Onboard Administrator, or Virtual Connect modules; the panes in the overview page display loading.... HP Management refreshes the contents on a periodic basis and updates information.
The main section in the Overview page displays multiple boxes called portlets that provide summary information about the selected VMware component. The portlets will vary based on your configuration and the selected component.
• The HP icon • A row of tabs used to display different views and level of detail. The Monitor page tabs are the same for all components. The Manage page tabs differ depending on the component selected. .
• Software/Firmware • Storage • News Feed (a list of recent events) For detailed information about portlet items, do one of the following: • Click More at the bottom of the portlet. News Feed details are displayed under the Monitor page. All other portlet details are displayed on the Manage page. • Click the corresponding tab. The tabs for some of the information are on the Monitor page.
If you have a server module installed and a cluster is selected in the inventory tree, HP Management provides the following information: • Status/Health • Infrastructure • Software/Firmware • News Feed • Cluster • Tasks If you have a server module installed and a host is selected in the inventory tree, HP Management provides the following information: • Status/Health • Overview • Host • Networking • Software/Firmware • Infrastructure • News Feed • Tasks NOTE: For information abou
From the HP Management Administration page, select Server Module Configuration screen for the cluster, enter the power cost. Entering the power cost for a cluster generates the cost advantage information, which is displayed for each host on the Cluster detail page.
5. Drag and drop the OS onto all or selected host systems, and then click Next. The Step 4 – Add to vCenter window opens. 6. Select the host systems that you want to configure, enter the user names and passwords, select the cluster or datacenter to which you want to add the system, and then click Next. The Step 5 – Summary window opens. 7. Monitor the status of the deployment and when the process is complete, click Finish. The hosts that you selected in Step 6 are added to vCenter. 8.
Manage networking Setting host network configuration preferences NOTE: This feature is available only on the vSphere Web Client. These settings are used to evaluate the network configuration of a host with respect to its Virtual Connect/OneView profile. This page is accessed by selecting Host Network Configuration Preferences in the left pane of the HP Management Administration page. After setting the preferences, click Save or Clear to reset all the selections to the default values.
Port Group Names Displays the port group names defined for the networks. By default, the name of the network in Virtual Connect or HP OneView is used as the port group name. If necessary, the port group name can be changed. • Port Group Name: Enter the new port group name for the network. TIP: Custom port group names simplify configuration of active-active network configuration with Virtual Connect.
Figure 7 Cluster overview page (vSphere Web Client) The Overview page for Cluster Management displays status summary information.
StoreFront Module for vCenter portlets • Software/Firmware • Storage • News Feed For more information on the controls and operation of the Overview page, see “HP Management pages vSphere Client pages” (page 29).
2. For more information, do one of the following: • Click More at the bottom of the Networking Portlet. • Click on the Overall Status icon. • Select the Networking tab on the Manage page. The cluster networking page displays status for the selected cluster and each host in the cluster. It also provides the capability for setting a reference host and resolving network mismatches. The page includes the following: • • Overall Cluster Status—Indicates the overall cluster status.
Setting a cluster reference host The reference host for a cluster identifies the host whose Virtual Connect/OneView Profile is considered as the reference configuration when comparing all the hosts in the cluster. A reference host must be selected to perform cluster configuration. NOTE: • This feature is available only on the vSphere Web Client. • Only servers having Virtual Connect/HP OneView profile information are supported as a reference host.
TIP: Mouse-over the Host Network Configuration status icon to display a pop-up describing the status. To resolve a network mismatch: 1. Select a cluster in the inventory tree. 2. Click the Manage tab and then click HP Management. 3. Select Networking. The cluster networking page opens displaying information for all hosts in the cluster and the status for each. 4. Select a host that has a status of Mismatch ( ) for either Server Profile Network status or Host Network Configuration Status.
2. For detailed software and firmware information, click More at the bottom of the Software/Firmware portlet or do one of the following: • From the vSphere Client, select Software/Firmware from the drop-down list. • From the vSphere Web Client, click the Software/Firmware tab on the Manage page. This page provides all software /firmware details of the host added under the cluster. Growing a cluster Using the HP Grow Cluster feature, you can expand the capacity of an existing cluster.
3. Select the Work Flow used to grow the cluster. Two work flows are available: • Basic deployment work flow—the upper work flow is used for clusters not managed by HP OneView. • Enhanced deployment work flow—the lower work flow is used to grow a cluster managed by HP OneView. If HP OneView credentials are not configured, this work flow is disabled and a warning message is displayed.
11. Click Finish to grow the cluster. A message is displayed indicating where you can monitor the progress of the operation. NOTE: The hosts added using the grow cluster feature remain in Maintenance Mode. Managing hosts To access the host overview summary, select a host in the inventory tree. If you are using the vSphere Client, select the HP Management tab. If you are using the vSphere Web Client, then click Manage→HP Management→Overview. The Host Overview page appears.
Figure 9 Host Overview page — vSphere Web Client view The Overview page provides overall details of Host, Infrastructure (Enclosure), networking, Storage (If storage is installed), Software/Firmware, and News Feed events associated with the selected HP ProLiant server. Depending on the HP Management tools and software installed and configured with HP OneView for vCenter, links are available to launch HP Tools. Host Overview page The Host Overview page displays information for the selected host.
StoreFront Module for vCenter portlets • Software/Firmware • Storage • News Feed For more information on the controls and operation of the Overview page, see “HP Management pages vSphere Client pages” (page 29). TIP: Click the Settings icon Properties.
Viewing host infrastructure information The Host Infrastructure page displays information about blade status, enclosure status, and the enclosure power and thermal status as well as interconnect and OA information. NOTE: The Infrastructure portlet appears for blades only. To view an overview of the blade server infrastructure: 1. Select a blade server in the inventory tree and access HP Management. The Infrastructure portlet on the Overview page displays an overview of the blade server infrastructure. 2.
Host network configuration NOTE: • This feature is available only in the vSphere Web Client. • If management network is not specified, a status of Unknown is displayed at the top of the Networking Portlet in the Overview page. On mouse-over, a pop displays the message Management Network may not be specified. • The host network configuration feature is not supported for hosts running the ESX classic version.
Recommended actions are included for configuring the server profile and VMware host network based on network preference and Virtual Connect/OneView networks. • The Server Profile Status indicates whether the Virtual Connect/OneView profile for this host matches the profile of the reference host. If the Server Profile Status is Mismatch, then a mismatch in the Server Profile Status and Host Network Status can be corrected by triggering a host network configuration using Apply Recommended Action.
NOTE: • This feature is available only on the vSphere Web Client. • Only blade servers are supported as a reference host. • Only servers having Virtual Connect/HP OneView profile information are supported as a reference host. • Ensure that no host network configuration operations are being performed within the cluster when selecting or changing a reference host.
Figure 10 Virtual Connect Network Diagram Viewing host software and firmware NOTE: Firmware information is available for vSphere 5.x/ESXi 5.x systems with the HP Offline Bundle or HP ESXi custom image installed only. To view firmware information and/or update firmware for the selected server: 1. Select a server in the inventory tree and access HP Management. The Software/Firmware portlet on the Overview page provides an overview of primary software and firmware versions. 2.
A rediscovery of all the devices associated with a selected host can be initiated using the Rediscover Node feature. The rediscovery process may take up to 15 minutes to complete. Information collected from the devices will be missing in various places in the plug-in until the rediscovery is complete. To use this feature, select Rediscover Node from the Actions drop-down list. Using HP VMware ESXi Smart Components HP Smart Components are used to update firmware on vSphere 5.x/ESXi 5.
Scheduling firmware baselining 1. 2. 3. 4. 5. From the Actions drop-down list, select Update Firmware. Select the new firmware baseline from the New Firmware Baseline drop-down list. Unselect the Put host in Maintenance Mode option if desired. Unselect the Power on host once baseline is applied option if desired. Unselect the Exit Maintenance Mode once baseline is applied option if desired.
7. Click Schedule to store the baseline update. The baseline update will be initiated at the scheduled date and time. TIP: You can monitor the firmware update in Tasks or News Feed, and in the VMware tasks. Updating scheduled firmware baselining The parameters for a scheduled firmware baselining can be modified before the update is initiated. 1. Make the desired changes to the firmware baselining parameters 2. Click Update to store the changes to the scheduled firmware baselining.
Monitoring tasks Actions performed using the GUI are displayed in the tasks list. For example, updating firmware and toggling UID. To view task information for the selected object: 1. Select a component in the inventory tree for which you want task information and access HP Management. The Tasks portlet on the Overview page provides a tasks overview. 2.
1. 2. 3. On the Onboard Administrator, navigate to Users/Authentication→HP SIM Integration. Set the trust mode to Trust by Certificate. Locate and copy the certificate using one of the following methods: • In the vSphere Client, access the HP Home Settings page. See “Configuring the Server Module for vCenter” (page 10). Click the Certificate Administration tab. Copy the text from the Self Signed Certificate text box. • Access the certificate in the following file: install location\uim\server.
From the Overview page, you can do the following: • Access the News Feed, Storage, and Software/Firmware portlets. • Perform provisioning operations from the Actions drop-down list. For more information, see “Provisioning storage” (page 82). • View read-only information about the storage associated with the selected component.
NOTE: Provisioning changes performed by the StoreFront Module for vCenter do not require a manual cache refresh. This information is automatically updated when the provisioning operation is complete. For more information, see “Provisioning storage” (page 82). Use the following procedures to start a cache refresh immediately using HP Management or the Storage Administrator Portal. Using HP Management 1. Click the cache refresh icon corner of any storage page. .
Restarting a cache refresh using HP Management 1. Click the cache refresh icon corner of any storage page. . In the vSphere Client, this icon is located in the top right The HP Management tab displays the available options. 2. Click Restart. Restarting a cache refresh using the Storage Administrator portal 1. Click the Refresh Cache link in the top right corner of the Storage Administrator Portal. The Storage Administrator Portal displays the options shown in Figure 13 (page 59).
• Click the divider between columns and drag to resize a column. • Click a column heading to sort the data by the selected column. • In the vSphere Client, click a triangle icon to the right of a column heading to change the sorting order. To use ascending order, click the triangle that points up. To use descending order, click the triangle that points down. In the vSphere Web Client, click on the column heading to sort the table by the content of the column.
Figure 14 Adding and removing columns (vSphere Client) Selecting columns for display in the vSphere Web Client Click Select Columns... from the pull-down Filter list. A list of the columns is displayed. See Figure 15 (page 62). • Check the box next to a column to display it. Click Select All to select all the columns. • Clear the box next to a column to not display it. • Click OK to save the changes after you add or remove columns.
Figure 15 Adding and removing columns (vSphere Web Client) Viewing host storage information To view storage information for a host: 1. Select a host in the inventory tree and access HP Management. The Storage portlet on the Overview page provides an overview of the storage systems. 2. For detailed storage information, click More at the bottom of the Storage portlet or do one of the following: • From the vSphere Client, select Storage Details from the drop-down list.
• “Viewing HBAs” (page 72) • “Viewing paths” (page 72) • “Viewing replications” (page 75) • “Viewing VMs to volumes” (page 76) Host storage summary information The storage summary displays the following information about the selected host: HP Storage Provisioned to Host • Volumes—Number of volumes available to the host from configured HP storage arrays and whether any are thin-provisioned • HP Storage Provisioned—Amount of storage available to the host from configured HP storage arrays • HP Sto
Storage Pool • Total pool size—Total size of the storage pool • Provisioned used on pool—Amount of provisioned space used on the storage pool • Provisioned free on pool—Amount of provisioned space free on the storage pool • Unallocated space on pool—Amount of space not provisioned or allocated on the storage pool Datastores This section lists the datastores provisioned from the selected host to VMs. For each datastore, move the cursor over the status bar to view storage information.
• “Viewing HBAs” (page 72) • “Viewing paths” (page 72) • “Viewing replications” (page 75) • “Viewing VMs to volumes” (page 76) Cluster storage summary information The storage summary displays the following information about the selected cluster: HP Storage Provisioned to Cluster • Volumes—Number of volumes available to the cluster from configured HP storage arrays and whether any are thin-provisioned • HP Storage Provisioned—Amount of storage available to the cluster from configured HP storage ar
This section lists the HP StoreOnce Backup Systems available. For each HP StoreOnce Backup System, move the cursor over the status bar to view storage information. For each configured backup system, all the service sets are displayed.
Provisioned from Datastore to Virtual Machines • Current storage inventory—Number of datastores, RDMs, and unused volumes provisioned to VMs • Datastore Provisioned Capacity—Total amount of storage available to the datastore • Datastore Used Capacity—Amount of storage used by the datastore • Datastore Available Capacity—Amount of available storage on the datastore • Datastores overprovisioned—The number of over-provisioned datastores HP Storage Arrays This section lists the arrays that provide sto
The VM storage summary displays information about HP storage and includes a graphical representation of the information. For more information, see “VM storage summary information” (page 68). Viewing detailed VM information Click the Storage Volumes, Virtual Disks, HBAs, Paths, Replications, or VMs to Volumes tab to view detailed information about the selected VM.
The following information is displayed for each datastore: • Virtual disks—Number of virtual disks on datastores provisioned from the selected host to VMs • Total—Amount of storage provisioned on the host as virtual disks (VMDKs or RDMs) • Used—Amount of storage used on the host as virtual disks (VMDKs or RDMs) • % Savings—Amount of storage saved through the use of VMware thin provisioning Available HP StoreOnce Backup Systems This section lists the HP StoreOnce Backup Systems available.
◦ HP MSA—System name ◦ HP XP P9000/HP XP—Array serial number ◦ HP StoreOnce Backup—Not applicable • Array Type—HP array type • Datastore/RDM—Datastore name or the associated .
◦ HP MSA—Unallocated space in the storage pool (cluster) that can be used to meet storage needs for a snapshot or thin-provisioned volume. The calculation of this value assumes all unallocated space is formatted the same as this volume. For all other volume types, no value is displayed. ◦ HP XP P9000/HP XP—P9000 or XP thin provisioning pool capacity.
Viewing HBAs The HBAs page displays the following information: • Host Names—Host name or cluster host names • Type—HBA type • VMware Device Identifier—HBA identifier assigned by VMware • WWN/IQN—HBA WWN NOTE: • HBA WWN address is not available for HP MSA SAS arrays. Label—HBA identifier assigned by VMware Viewing paths The Paths tab is displayed for selected components.
• Array Port WWN/IQN ◦ HP StoreVirtual—IQN used by the host for connecting to this disk on this storage array ◦ HP 3PAR StoreServ (FC)—WWN for the storage array port on the storage array end of this path ◦ HP 3PAR StoreServ (iSCSI)—IQN used by the host for connecting to this disk on this storage array ◦ HP EVA—WWN for the storage array port on the storage array end of this path ◦ HP MSA (FC, SAS)—WWN for the storage array port on the storage array end of this path ◦ HP MSA (iSCSI)—IQN used by t
• Host Access ◦ HP StoreVirtual—Host access level assigned to the presentation of the disk to the host (for example, READ/WRITE or READ-ONLY) ◦ HP 3PAR StoreServ—N/A. 3PAR storage volumes operate in a read-only/read-write configuration.
• ◦ HP XP P9000/HP XP—Not applicable ◦ HP StoreOnce Backup—Not applicable Active Path—Specifies whether the path is active or in standby status If a path is active and then goes offline, a standby path takes over.
Switching Peer Persistence The Switch Peer Persistence page is used to reverse the source and target roles of an HP 3PAR StoreServ Peer Persistence relationship. NOTE: Switch Peer Persistence is only applicable to HP 3PAR StoreServ source disks. The Switch Peer Persistence operation can be initiated from any of the Storage tabs that display the source disk. 1. 2.
◦ HP XP P9000/HP XP—Emulation type and LDKC:CU:LDEV (for example, HP OPEN-V-CVS (00:04:3F)) ◦ HP StoreOnce Backup—Not applicable • Array Disk Type—Array disk type • Array Name ◦ HP StoreVirtual—Management group name ◦ HP 3PAR StoreServ—Array display name ◦ HP EVA—Array display name ◦ HP MSA—System name ◦ HP XP P9000/HP XP—Array serial number ◦ HP StoreOnce Backup—Not applicable • Array Type—HP array type • Array Disk Total Capacity—Total amount of storage available to the datastore •
NOTE: The HP XP P9000/HP XP array does not allow host access to be specified on a per-host or per-path basis.
• LUN Number—LUN used for presenting the storage disk from the storage array port to the host HBA port • Path ID—Path ID assigned by VMware • Preferred Path • ◦ HP StoreVirtual—Not applicable ◦ HP 3PAR StoreServ—Not applicable ◦ HP EVA—Specifies whether the path uses a port on the controller that is configured as the preferred path for the vdisk (Yes, No, No preference) ◦ HP MSA—Not applicable ◦ HP XP P9000/HP XP—Not applicable ◦ HP StoreOnce Backup—Not applicable Active Path—Specifies wh
The Storage Module for vCenter provides an inventory list that can be displayed to view more information on the configured storage systems. To view the storage systems on the HP Infrastructure page, they must first be configured using the Storage Administrator Portal. For more information, see “Configuring the StoreFront Module for vCenter” (page 12).
HP Enclosures infrastructure summary page The HP Enclosures infrastructure summary page displays information for all enclosures configured in the environment. The number adjacent to the HP Enclosures link in the left navigation panel indicates the number of enclosures in the environment. Click on HP Enclosures to expand the list of enclosures.
4 Provisioning storage The StoreFront Module for vCenter supports storage provisioning for HP 3PAR StoreServ, HP StoreVirtual, HP EVA, and HP MSA arrays. You can perform storage provisioning operations such as creating a new datastore, deleting or expanding an existing datastore, creating new VMs, or cloning existing VMs. For HP EVAs, provisioning operations are supported for thick-provisioned virtual disks.
Viewing the audit log The StoreFront Module for vCenter provides an audit log for provisioning operations. The audit log, provisionAuditLog.txt, is available in the following directory: /Storage/JBoss/standalone/log Creating a datastore You can create a new datastore on a host or cluster that meets the following prerequisites. Hosts • The host must exist in the vSphere Client. • In an FC environment, the SAN must be zoned between the storage pools and the host.
2. Use one of the following methods to start the Create Datastore wizard: • Right-click a host or cluster and select All HP Management Actions→HP Create Datastore. • Select Actions→Create Datastore on the HP Management page for a host or cluster. • Right-click a host or cluster in any StoreFront Module for vCenter table, and then select Create Datastore. TIP: You can minimize the wizard using the minimize control ( ) in the upper right corner of the screen.
5. 6. Enter the number of datastores to create in the Number of datastores box. Enter the capacity for the new datastores in the Datastore Capacity box. NOTE: The actual value used by the software might be slightly higher than specified in order to accommodate the VMware overhead. 7. 8. Select a storage pool. Depending on the type of array selected, perform one of the following steps: • For an HP 3PAR StoreServ, select a Copy Space Pool to use for the new datastore.
If Enable Peer Persistence was selected, the Configure Peer Persistence window opens. Continue with step 11.
11. To enable Peer Persistence, perform the following steps: a. Select a storage pool. b. Select a remote copy space pool. c. Click Next. The Specify Names window opens. 12. If a single datastore is being created, perform the following steps: a. Enter the name for the new datastore in the Datastore Name box. The name is added to Generated Names. b. Click Next.
13. If more than one datastore is being created, perform the following steps: a. Enter the name for the new datastores in the Datastore Name box. The # symbol is required and represents the numeric sequence for the new datastore names. In the generated datastore names, the # symbol is replaced with a number. b. Enter the start value for the numeric sequence of datastore names in Where # is numeric and starts at. The Generated Names box displays the names of the datastores that will be created. c.
14. Review the information that will be used to create the datastore. Validation of the information begins automatically. During the validation process a green icon indicates a successful validation step, and a red icon indicates failure. If a validation step fails, a message is displayed at the bottom of the provisioning wizard. Correct the problem, and then click Retry to repeat the validation step. If you need to change values entered in the wizard, use the Back and Next buttons to navigate.
4. Click Next. For HP 3PAR StoreServs only, the Specify Copy Space window opens. 5. 6. Select the copy space for the HP 3PAR StoreServ. Click Next. The Specify New Names window opens. 7. Enter the following information: • New Datastore Names: Enter the base name for the new datastores. The # symbol is required and represents the numeric sequence for the new datastore names. In the generated datastore names, the # symbol is replaced with a number.
After the size of the datastore is increased by the plug-in, the new size will be shown in HP OneView. To ensure that the new size is shown in HP OneView: • The HP OneView server profile corresponding to an ESX Host that is managed by the plug-in must be created in HP OneView. • The same storage systems must be configured in the plug-in and in HP OneView. • The same CPGs must be configured in the plug-in and in HP OneView. To expand a datastore: 1.
4. Click Finish to expand the selected datastore. If the expand operation cannot be performed, an error message is displayed describing why the operation failed. TIP: • View the progress of the operation in the Tasks pane of the vSphere Client. • Manual cache refresh is not necessary when the operation is finished. The cache will be refreshed automatically. Expand a datastore using the vSphere Client Follow this procedure when using the vSphere Client or the VMware 5.1 vSphere Web Client. 1.
Deleting a datastore You can delete a datastore if it is not used by a VM or VM template. • If the disk used by the datastore is replicated using snapshot, the delete operation will fail. • If the datastore is used by a VM or VM template, the delete operation will fail. Delete a datastore using the vSphere Web Client Use this procedure with the VMware 5.5 vSphere Web Client. If you are using the VMware 5.
• Select a datastore in the inventory tree, click Storage Tools in the HP Management pane, and then click the Delete Datastore link. • Right-click a datastore in any StoreFront Module for vCenter table and select Delete Datastore. The StoreFront Module for vCenter prompts you to confirm the delete request. 3. Click Delete to confirm the request. The StoreFront Module for vCenter removes the storage volumes from all hosts, deletes the volumes, and re-scans the hosts.
NOTE: When VMware converts a VM to a template, all RDMs are converted to empty virtual disks (VMDKs). Therefore, VMs created from this template will not have associated RDMs. For more information, see Virtual Disk Compatibility Modes in the VMware vSphere Online Library. • If a cluster is used to initiate the VM creation, all hosts in the cluster must be zoned to the storage, and hostgroups must be configured. Create a VM from a template using the vSphere Web Client Use this procedure with the VMware 5.
3. Select the host or the cluster which will own the new virtual machine(s) in Select location. A compatibility check is done to ensure the selected location is valid. If it is not, an error message is displayed and a different location must be selected. 4. Click Next. The Select VM Template window opens. 5. 6. Enter the number of VMs to create in Number of virtual machines. Select the template to be used to create new VM(s).
10. Enter the number of datastores to create in Number of datastores. The new VMs are distributed among these new datastores. 11. Enter the capacity for the new datastores in Datastore Capacity. NOTE: The actual value used by the software might be slightly higher than specified in order to accommodate the VMware overhead. 12. Select a storage pool to use for the new datastore in Select Storage Pool. The configured storage pools with Full Access on arrays that support provisioning are listed.
18. Enter the base name for the new virtual machine(s) in the Virtual Machine name. For single virtual machine, the # symbol is not required. For multiple virtual machines, the # symbol is required. It represents a numeric sequence. In the generated virtual machine names, the # symbol is replaced with a number. 19. Enter the start value for the numeric sequence in Where # is numeric and starts at. The Generated names box displays the names of the virtual machines to be created. 20.
22. Review the information that will be used to create the virtual machines. Validation of the information begins automatically. During the validation process a green icon indicates a successful validation step, and a red icon indicates failure. If a validation step fails, a message is displayed at the bottom of the wizard screen. Correct the problem by going Back to the previous screens. 23. When validation completes successfully, click Next. The Ready to Complete window opens. 24.
The Specify VMs window opens. 3. 4. Enter the following information: • Owner: Select the host or cluster that will own the new VMs. This information is entered automatically if you initiated the VM creation from a host or cluster. • VM Template: Select the template to use for the new VMs. This information is entered automatically if you initiated the VM creation from a VM template. • VM Quantity: Enter the number of VMs to create.
The Generated Names box shows the names of the VMs that will be created. • Datastore Names: Enter the base name for the new datastores. The # symbol is required and represents the numeric sequence for the new names. In the generated datastore names, the # symbol is replaced with a number. The Generated Names box shows the names of the datastores that will be created. • 8. Where # is numeric and starts at: For both the VM and datastore names, enter the start value for the numeric naming sequence.
1. 2. Start the vSphere Web Client. Use one of the following methods to start the Clone Virtual Machine wizard: • Right-click a VM and select All HP Management Actions→Clone VM. • Select Actions→Clone VM on the HP Management page for a VM. • Right-click a VM in any StoreFront Module for vCenter table, and then select Clone VM. TIP: You can minimize the wizard using the minimize control ( ) in the upper right corner of the screen. The wizard will be added to the Work in Progress panel on the right.
5. 6. Enter the Number of copies to make of the selected virtual machine. Select the virtual machines to be cloned. If a datastore associated with the selected VM contains additional VMs, the additional entries will be shown in the table. The datastores that will be cloned are selected automatically. The related RDMs that will be cloned are listed. 7. Click Next. The Specify VM Details window opens.
9. Select a customization specification (if any are available) in Customization Specification. For more information, see the VMware documentation in the VMware vCenter Server at http://www.vmware.com/products/vcenter-server/. 10. Enter the base name for the new virtual machine(s) in Virtual Machine Name. The Generated Names box displays the names of the VMs that will be created. For a single virtual machine, the # symbol is not required. For multiple virtual machines, the # symbol is required.
17. Review the information that will be used to create the virtual machines. Validation of the information begins automatically. During the validation process a green icon indicates a successful validation step, and a red icon indicates failure. If a validation step fails, a message is displayed in the Warning and Validation Results box. Correct the problem by going Back to the previous screens. 18. When validation completes successfully, click Next. The Ready to Complete window opens. 19.
3. Enter the following information: • Target Owner: Select the host or cluster that will own the new VMs. • Target VM Quantity: Enter the number of VMs to create. • Target VM Initial State: Specify whether the initial VM state is Power On or Power Off. • Customization Specification: Specify a customization specification (if available). For more information, see the VMware documentation. • Clone Type: Select Snapshot or Clone.
9. Click Finish to create the specified VMs. You can view the progress of the task in the Recent Tasks pane at the bottom of the vSphere Client window. TIP: No manual cache refresh is necessary. When a provisioning operation is complete, the StoreFront Module for vCenter data is refreshed automatically. Deploying StoreVirtual VSA Overview of the Deploy HP VSA wizard The Deploy HP VSA wizard configures and deploys the HP StoreVirtual VSA on ESX hosts using the hosts’ local and direct attached storage.
3. 4. 5. 6. 7. HP FTP server, it will automatically detect and download the latest HP StoreVirtual VSA version. You can also manually upload the HP StoreVirtual VSA software as follows: Click Upload HP StoreVirtual VSA. A new window appears and you have the opportunity to download the installer from HP Software Depot if you have not done so. Browse to the location where the installer is downloaded and click Upload.
9. Specify Network Settings: a. Configure a new username and password. b. • Management Group Name—Automatically populates a group name. • Username—Specify a user name for the new management group. • Password—Specify a new password. • Confirm Password—Confirm the password for the new management group. Configure Network Settings: • iSCSI Network Interface—The wizard attempts to automatically choose the appropriate iSCSI network.
5. Start provisioning storage on the new array as the Storage Administrator Portal has full provisioning access to the StoreVirtual management group. HP OneView for VMware vCenter plugin presents StoreVirtual storage from the new management group to the ESX hosts. For the best performance, ensure the proper number of virtual CPUs are created for the StoreVirtual SAN based on Table 1 (page 110).
5 Working with VASA Provider The communication between HP 3PAR VASA provider and vCenter server is a secure connection based on SSL certificate and Windows credential. Before HP 3PAR VASA Provider can be registered by vCenter server, VASA provider requires that you extract the SMS certificate from vCenter server and install it to the HP 3PAR Recovery Manager for VMware installed host to allow client certificate negotiation in the Transport Layer.
Figure 17 Add Vendor Provider Screen Table 2 Add Vendor Provider Information Fields Field Name Value Name Any name to identify the VASA provider. URL VASA Service Web URL. For example (https://:/).1 Login Windows user name to Recovery Manager for VMware installed host. Password Windows Password. 1 The last slash ("/") after is required, or the registration will fail. Once registration is successful, the provider status is available online.
Figure 18 Manage Storage Capabilities Screen The name of an HP 3PAR storage capability has five parts and each identifies the value of one of the volume attributes. The following table shows the volume attributes and possible values. (See the HP 3PAR documentation for details of these attributes.
NOTE: 114 Consult the appropriate VMware documentation for more details.
6 Viewing hardware alert notifications This chapter describes the HP OneView for vCenter hardware alert events and alarms. HP OneView for vCenter events HP OneView for vCenter loads events from Onboard Administrator, HP SNMP agents, and HP CIM providers into vCenter Server, enabling administrators to view and manage them from the vSphere Client. This provides administrators with a single, heterogeneous view of all host system events within the managed environment.
For more information, see the HP BladeSystem Onboard Administrator User Guide, which is available on the HP website: http://www.hp.com/go/oa vCenter Server event category: info Blade events Enclosure name: Blade in bay number status changed to OK. Enclosure name: Blade in bay number status changed to other.
Enclosure name: Blade in bay number: iLO dead Interconnect events Enclosure name: Interconnect in bay number status changed to unknown. Enclosure name: Interconnect in bay number: reset Power supply events Enclosure name: Power supply in bay number status changed to unknown. Enclosure name: Power supply in bay number status changed to degraded. Fan events Enclosure name: Fan in bay number status changed to unknown. Enclosure name: Fan in bay number status changed to degraded.
Enclosure name: Power subsystem status changed to non-recoverable error. Enclosure name: Power subsystem status changed to predictive failure. Enclosure name: Power subsystem status changed to error. Fan zone events Enclosure name: Fan zone number status changed to non-recoverable error. Enclosure name: Fan zone number status changed to predictive failure. Enclosure name: Fan zone number status changed to error.
• Alarms associated with HP ProLiant and HP BladeSystem fan zones These alarms are triggered by an HP BladeSystem subsystem event. The alarm states are controlled by the type (severity) of the event. The alarms are triggered on all HP ProLiant and BladeSystem servers in the affected fan zone. • Alarms associated with HP ProLiant and HP BladeSystem power subsystem These alarms are triggered by an HP BladeSystem power subsystem event. The alarm states are controlled by the type (severity) of the event.
7 Troubleshooting Before troubleshooting issues with HP OneView for vCenter, you must do the following: • Verify that the correct user name and password are entered for vCenter Server. • Verify that the software is installed and configured as described in the HP OneView for VMware vCenter Installation Guide. • View the log files. For instructions, see “Viewing the log files” (page 120). Viewing the log files Server module logs are located in the following directories: File Directory hpserver.
HP Management tab not available in the vSphere Web Client Possible cause: The vSphere Web Client has not deployed the plug-in. NOTE: The plug-in is deployed only when the vSphere Web Client is executed. Action: Execute the vSphere Web Client. 1. If the vSphere Web Client was running when the plug-in was installed, log out of the vSphere Web Client. 2. Log into the vSphere Web Client.
• HP OneView Storage Module for vCenter • HP OneView for vCenter UI Manager Slow response in the vSphere Client Possible cause: The system on which HP OneView for vCenter is installed does not meet the hardware requirements for all software installed on the server. Action: Ensure that: • HP SIM and vCenter Server are not installed on the same server. This is not a supported configuration. • All hardware requirements are met for all software installed on the system.
Error Communicating with iLO at VM host The following error appears if the Windows Proxy Server is enabled and the host is using iLO 3: Error Communicating with iLO at "VM hostname" Text object has no attribute 'ribcl' . Possible cause: Windows proxy server settings are not configured to allow LAN communication from the HP OneView for vCenter to iLO 3 on the target vSphere 5.x/ESXi 5.x host system.
Action: Use the Host Properties page or the Server Password Management page to verify that the OA credentials are correct and reachable for HP OneView for vCenter, and change them if necessary. Network portlet for blades is missing the diagram link Possible cause: Virtual Connect credentials are missing or incorrect.
• Verify that either the global credentials or the credentials specific to each iLO, Onboard Administrator, and VMware host are configured properly. • Ensure that the initial polling cycle is complete. This may take a few moments, depending on the settings. Auto-login not working for URLs provided for managed nodes by HP OneView for vCenter Possible cause: A valid user name and password are not configured, or an SSO certificate (for SSO to Onboard Administrator) is not installed.
Cost Advantage field not showing values Possible cause: The managed vCenter Server cluster is not a DPM-configured cluster or the power cost value is not configured. Action: Verify the cluster type and power cost setting. • Verify that the cluster is DRS-enabled. This feature applies only to DRS-enabled clusters with DPM configured. • Verify that the power cost value is configured correctly. For more information, see “Setting the power cost for a cluster” (page 32).
• The Virtual Connect credentials are not valid. • Other errors occurred while retrieving Virtual Connect data. For more information, see the HP OneView for vCenter logs. For information about accessing the logs, see “Viewing the log files” (page 120). Troubleshooting the StoreFront Module for vCenter This section includes troubleshooting information specific to the StoreFront Module for vCenter. For general HP OneView for vCenter troubleshooting, see “Troubleshooting HP OneView for vCenter” (page 120).
HP MSA array information not displayed in StoreFront Module GUI Possible cause: The SMI-S service on the array might be unresponsive. Use the following actions to solve this issue. If one action does not work, proceed to the next action. Action: Restart the HP MSA SMI-S service. This will not affect disk access. 1. Log in to the SMU interface of the HP MSA array as a user with Manage access. Use the available management IP address (for example: http://Management_IP_address). 2.
Action: There are two options for addressing this issue: • Reconfigure the LUNs so they have a single LUN number across all paths. For more information, see article 1003973 in the VMware Knowledge Base. • Disable the VMware advanced setting Scsi.CompareLUNNumber. 1. Select a host in the vSphere Client. 2. Click the Configuration tab. 3. Click Advanced Settings in the Software pane. 4. Click Scsi in the list of advanced settings. 5. Edit the Scsi.CompareLUNNumber value, and then click OK.
Cannot configure datastore block size You cannot configure the block size for the VMFS-5 file system when creating a datastore in an vSphere 5.x/ESXi 5.x environment. Cause: When creating datastores using the VMFS-5 file system, VMware does not support values other than 1 MB for the block size. Cannot configure HP MSA array when using user-created account When configuring HP MSA arrays, an Unable to Authenticate error occurs.
SUGGESTED ACTION Refer to Alert Code 0x300fa in HP 3PAR OS Message and Operator's Guide. MESSAGE (ID:400fa) -{Info} SUGGESTED ACTION Refer to Alert Code 0x400fa in HP 3PAR OS Message and Operator's Guide. MESSAGE (ID:e0001) -{Info} SUGGESTED ACTION Refer to Alert Code 0xe0001 in HP 3PAR OS Message and Operator's Guide. MESSAGE (ID:e0002) -{Info} SUGGESTED ACTION Refer to Alert Code 0xe0002 in HP 3PAR OS Message and Operator's Guide.
MESSAGE (ID:1a00de) -{Info} SUGGESTED ACTION Refer to Alert Code 0x1a00de in HP 3PAR OS Message and Operator's Guide. MESSAGE (ID:1a00fa) -{Info}} SUGGESTED ACTION Refer to Alert Code 0x1a00fa in HP 3PAR OS Message and Operator's Guide. MESSAGE (ID:230003) -{Info} SUGGESTED ACTION Refer to Alert Code 0x230003 in HP 3PAR OS Message and Operator's Guide. MESSAGE (ID:230004) -{Info} SUGGESTED ACTION Refer to Alert Code 0x230004 in HP 3PAR OS Message and Operator's Guide.
SUGGESTED ACTION Refer to Alert Code 0x270004 in HP 3PAR OS Message and Operator's Guide. MESSAGE (ID:270005) -{Info} SUGGESTED ACTION Refer to Alert Code 0x270005 in HP 3PAR OS Message and Operator's Guide. MESSAGE (ID:270006) -{Info} SUGGESTED ACTION Refer to Alert Code 0x270006 in HP 3PAR OS Message and Operator's Guide. MESSAGE (ID:270007) -{Info} SUGGESTED ACTION Refer to Alert Code 0x270007 in HP 3PAR OS Message and Operator's Guide.
MESSAGE (ID:30010) -{Info} SUGGESTED ACTION Refer to Alert Code 0x0030010 in HP 3PAR OS Message and Operator's Guide. MESSAGE (ID:40004) -{Info} SUGGESTED ACTION Refer to Alert Code 0x0040004 in HP 3PAR OS Message and Operator's Guide. MESSAGE (ID:50002) -{Info} SUGGESTED ACTION Refer to Alert Code 0x0050002 in HP 3PAR OS Message and Operator's Guide. MESSAGE (ID:50003) -{Info} SUGGESTED ACTION Refer to Alert Code 0x0050003 in HP 3PAR OS Message and Operator's Guide.
Suggested Action No action required. Message (ID:450002) -{Info} Suggested Action Refer to Alert Code 0x0450002 in HP 3PAR OS Message and Operator's Guide. Message (ID:460002) -{Info} Suggested Action Refer to Alert Code 0x0460002 in HP 3PAR OS Message and Operator's Guide. Message (ID:460003) -{Info} Suggested Action Refer to Alert Code 0x0460003 in HP 3PAR OS Message and Operator's Guide. Message (ID:1a000a) -{Info} Suggested Action Refer to Alert Code 0x01a000a in HP 3PAR OS Message and Operator's Guide.
Message (ID:1a000f) -{Info} Suggested Action Refer to Alert Code 0x01a000f in HP 3PAR OS Message and Operator's Guide. Message (ID:1a0010) -{Info} Suggested Action Refer to Alert Code 0x01a0010 in HP 3PAR OS Message and Operator's Guide. Message (ID:1a0011) -{Info} Suggested Action Refer to Alert Code 0x01a0011 in HP 3PAR OS Message and Operator's Guide. Message (ID:1a0012) -{Info} Suggested Action Refer to Alert Code 0x01a0012 in HP 3PAR OS Message and Operator's Guide.
Suggested Action Refer to Alert Code 0x01a001f in HP 3PAR OS Message and Operator's Guide. Message (ID:2a00de) -{Info} Suggested Action Refer to Alert Code 0x02a00de in HP 3PAR OS Message and Operator's Guide. Message (ID:2a00fa) -{Info} Suggested Action Refer to Alert Code 0x02a00fa in HP 3PAR OS Message and Operator's Guide. Message (ID:3b0002) -{Info} Suggested Action Contact HP Technical Support.
MESSAGE (ID:3a00de) -{Info} SUGGESTED ACTION Refer to Alert Code 0x3a00de in HP 3PAR OS Message and Operator's Guide. MESSAGE (ID:3a00fa) -{Info} SUGGESTED ACTION Refer to Alert Code 0x3a00fa in HP 3PAR OS Message and Operator's Guide. MESSAGE (ID:30005) -{Info} SUGGESTED ACTION Refer to Alert Code 0x30005 in HP 3PAR OS Message and Operator's Guide. Message (ID:a0004) -{Info} Suggested Action Refer to Alert Code 0x00a0004 in HP 3PAR OS Message and Operator's Guide.
SUGGESTED ACTION This is an indication that a particular LUN has a change in its capability profile as the result of being removed from a Remote Copy group. Please contact your storage administrator if this is not an intended change. MESSAGE (ID:1000000b) -Node status has been changed. Additional information: {Info} SUGGESTED ACTION This is an indication that a node has property or configuration changes. If this is not an intended action, contact your storage administrator for assistance.
SUGGESTED ACTION Refer to Alert Code 0xa0002 in HP 3PAR OS Message and Operator's Guide. MESSAGE (ID:e0001) -{Info} SUGGESTED ACTION Refer to Alert Code 0xe0001 in HP 3PAR OS Message and Operator's Guide. MESSAGE (ID:e0002) -{Info} SUGGESTED ACTION Refer to Alert Code 0xe0002 in HP 3PAR OS Message and Operator's Guide. MESSAGE (ID:e0005) -{Info} SUGGESTED ACTION Refer to Alert Code 0xe0005 in HP 3PAR OS Message and Operator's Guide.
MESSAGE (ID:270006) -{Info} SUGGESTED ACTION Refer to Alert Code 0x270006 in HP 3PAR OS Message and Operator's Guide. MESSAGE (ID:270007) -{Info} SUGGESTED ACTION Refer to Alert Code 0x270007 in HP 3PAR OS Message and Operator's Guide. MESSAGE (ID:270012) -{Info} SUGGESTED ACTION Refer to Alert Code 0x270012 in HP 3PAR OS Message and Operator's Guide. MESSAGE (ID:27000e) -{Info} SUGGESTED ACTION Refer to Alert Code 0x27000e in HP 3PAR OS Message and Operator's Guide.
SUGGESTED ACTION Refer to Alert Code 0x270014 in HP 3PAR OS Message and Operator's Guide. MESSAGE (ID:270015) -{Info} SUGGESTED ACTION Refer to Alert Code 0x270015 in HP 3PAR OS Message and Operator's Guide. MESSAGE (ID:270016) -{Info} SUGGESTED ACTION Refer to Alert Code 0x270016 in HP 3PAR OS Message and Operator's Guide. MESSAGE (ID:270017) -{Info} SUGGESTED ACTION Refer to Alert Code 0x270017 in HP 3PAR OS Message and Operator's Guide.
MESSAGE (ID:30005) -{Info} SUGGESTED ACTION Refer to Alert Code 0x30005 in HP 3PAR OS Message and Operator's Guide. MESSAGE (ID:10000001) - New LUN is created. Additional information: {Info} SUGGESTED ACTION No action is required. This indicates that a LUN is exposed to one of the monitored ESX host. MESSAGE (ID:10000002) - Existing LUN in 3PAR Storage Server has been removed. Additional information: {Info} SUGGESTED ACTION This indicates that an existing exposure to the monitored ESX host has been removed.
MESSAGE (ID:10000009) -Storage system name has been changed. Additional information: {Info} SUGGESTED ACTION No action is required. This indicates that there is a name change to the storage system. MESSAGE (ID:1000000a) -Node attribute has been changed. Additional information: {Info} SUGGESTED ACTION This indicates that the status of associated port under the node has been changed. Check your storage system to make sure port is in good status. MESSAGE (ID:1000000b) -Node status has been changed.
8 Support and other resources This chapter describes the support available for HP OneView for vCenter.
HP authorized resellers For the name of the nearest HP authorized reseller, see the following sources: • In the United States, see the HP U.S. service locator website: http://www.hp.com/service_locator • In other locations, see the Contact HP worldwide website: http://www.hp.
9 Documentation feedback HP is committed to providing documentation that meets your needs. To help us improve the documentation, send any errors, suggestions, or comments to Documentation Feedback (docsfeedback@hp.com). Include the document title and part number, version number, or the URL when submitting your feedback.
A Firewall port requirements For complete information on port requirements, see the “Default port values” appendix in the HP OneView for VMware vCenter Installation Guide.
B Creating a custom build plan When using the enhanced deployment option to grow a cluster, a custom build plan is required. Use the following procedure to create a custom build plan for growing a cluster. 1. Log in to HP Insight Control Server Provisioning. 2. Select Configuration Files from the DEPLOYMENT options. 3. Select the Kickstart configuration file to modify, and then select Save as in the Actions menu. 4. Enter a valid name for the new Kickstart file, and then click OK. 5.
Figure 21 Script example 7. 8. 9. 10. 11. Click OK to save the updated Kickstart configuration file. Select OS Build Plans from the DEPLOYMENT options. Select the OS Build Plan to modify, and then select Save as in the Actions menu. Enter a valid name for the new custom OS Build Plan, and then click OK. Select the new custom OS Build Plan, and then select Edit in the Actions menu. The OS Build Plan Edit window opens. 12. Select the ESXi 5.
13. In the Configuration File field, select the new Kickstart configuration file created in the preceding steps. 14. Verify that the Install path field value is maintained from the original OS Build Plan. 15. Click OK to save the edits to the step. 16. Click OK in the OS Build Plan Edit window to save the new build plan. The new custom build plan can now be used to grow a cluster using the enhanced deployment option.
Glossary CIM Common Information Model. CLI Command-line interface. An interface comprised of various commands which are used to control operating system responses. datastore A storage location for VM files in the VMware environment. DNS Domain Name System. DPM Distributed power management. DRS Distributed Resource Scheduler. ESX An enterprise-level virtualization product offered by VMware. EVA Enterprise Virtual Array. FC Fibre Channel.
SMU Storage Management Utility. The web browser interface that system administrators can use to configure, monitor, and manage MSA2000 Family storage systems. SMU is accessible from any management host that can access a system through an out-of-band Ethernet connection. SPOCK Single Point of Connectivity Knowledge website. SPOCK is the primary portal used to obtain detailed information about supported HP storage product configurations. SSO Single Sign-On. SUM Software Update Manager.
Index A accessing HP OneView for vCenter, 26 adding arrays HP StoreOnce Backup, 19 adding management servers HP EVA Command View, 15 adding storage systems EVA , 16 HP 3PAR StoreServ, 15 HP MSA, 17 HP StoreVirtual, 14 HP XP, 18 HP XP P9000, 18 administration, 8 alarm conditions, 118 alarms troubleshooting, 115, 118 alert notification hardware, 115 auto-login failure, 125 B bare-metal provisioning, 33 blade events, 116, 117 C CA-signed certificate VASA provider, 23 certificate administration, 8 certificate
H I hardware alert notification, 115 HBAs viewing, 72 health information viewing, 54 health status, 124 health status information missing, 124 host infrastructure information, 47 network information, 47 overview page, 45 viewing information, 46 host management, 44 host network configuration, 48 host network configuration preferences setting, 35 virtual connect, 35 hosts managing, 44 viewing storage information, 62 HP 3PAR StoreServ adding storage systems, 15 HP EVA adding storage systems, 16 customizing v
switching, 76 poll interval, 8 portlets, 29, 31 Power Control, 51 power cost setting, 32 power events, 117 power subsystem events, 116, 117 power supply events, 116, 117 powering cycling a server, 51 properties server management, 32 provisioning storage, 82 adding datastores, 83 cloning VMs, 101 creating VMs, 94 deleting datastores, 93 deleting unassigned volumes, 94 expanding datastores, 90 enabling, 55 failure, 125 Storage Administrator Portal about, 13 troubleshooting, 127 storage module, 7 storage syst
launching, 55 vendor providers list VASA provider, 21 viewing cluster storage information, 64 datastore storage information, 66 HBAs, 72 host storage information, 62 management servers, 19 paths, 72 replications, 75 storage systems, 19 storage volumes, 69 virtual disks, 71 VM storage information, 67 VMs to volumes, 76 Virtual Connect network diagram, 50 virtual connect, 35 virtual disks customizing location, 82 viewing, 71 virtual machines (VMs) cloning, 101 creating from a template, 94 viewing storage info