
HP OneView 1.10 Installation Guide

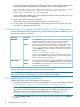
Table Of Contents
- HP OneView 1.10 Installation Guide
- Contents
- 1 Preparing for installation
- 2 Installing HP OneView on a VM host
- 3 Support and other resources
- 3.1 Gather information before contacting an authorized support representative
- 3.2 How to contact HP
- 3.3 Get connected to the HP OneView online user forum
- 3.4 Software technical support and software updates
- 3.5 Related information
- 3.5.1 Product bulletins and Quick Specs for all HP products
- 3.5.2 HP OneView documentation and websites
- 3.5.3 Enclosure, iLO, and server hardware documentation and websites
- 3.5.4 HP 3PAR StoreServ Storage documentation and websites
- 3.5.5 HP Virtual Connect documentation and websites
- 3.5.6 Finding documents on the HP Support Center website
- 3.6 Submit documentation feedback
- A About using your appliance
- B Troubleshooting installation issues

because the VM guest will synchronize with that time. If your VM host does not have the time
set properly, the following message can be displayed when you boot the appliance:
The time and date on your hypervisor appears to be incorrect. Please
power off your appliance, correct the time and date on your
hypervisor, and power on your appliance.
If you encounter this problem, power off your appliance, set the correct time and date on your
VM host and power on the appliance.
7. Power on the virtual machine for the first time.
In the Hyper-V Manager, right-click on the appliance VM and power it on.
8. On the console you will see the appliance license and support screens. You are now ready
to log into your appliance for the first time.
2.3 Connecting to the appliance in DHCP and non-DHCP environments
Connect to the appliance for the first time using one of the following methods, depending on how
your host environment is configured:
DescriptionEnvironment
With DHCP vSphere Use the Summary tab on the vSphere virtual console to determine the initial
IP address for the appliance. Then, connect to the appliance using the
appliance IP address in a browser running on your local computer.
Hyper-V If you have DHCP and Dynamic DNS available on the management LAN,
the appliance registers a DNS name at startup with the format: ci-<MAC
address>. You can determine the Ethernet MAC address of the appliance
using the Network tab of Hyper-V Manager. Use the name in the browser's
address bar. For example:
https://ci-<MAC address>.example.com
If you do not have dynamic DNS, use the virtual console to connect to the
appliance. Select Connect in Hyper-V Manager to connect to the appliance
console to perform the first time setup steps.
Without DHCP vSphere Use the vSphere virtual console to connect to the appliance using the browser
running on the virtual console. Press Ctrl+Alt to exit from the virtual console.
Hyper-V Select Connect in Hyper-V Manager to connect to the appliance console to
perform the first time setup steps.
Connect to the appliance using the assigned host name or IP address.
NOTE: If there are networking issues and you cannot connect to the appliance, use the hypervisor's
virtual console to log on to the appliance to verify or change network settings.
2.4 Completing appliance startup tasks
Complete these steps to start up the appliance for the first time.
1. If you have not already done so, connect to the appliance using one of the methods described
in “Connecting to the appliance in DHCP and non-DHCP environments” (page 10).
NOTE: You can also use REST APIs to complete the remaining installation steps. For more
information, see the Quick Start for initial configuration in the REST API scripting help. For
information about accessing the help before the appliance is installed, see “Enabling
off-appliance browsing of UI HTML help and REST API HTML help” (page 21).
2. On the HP OneView EULA screen, review the end user license agreement, and click Agree to
continue.
10 Installing HP OneView on a VM host