
OpenView Storage Provisioner v1.1 - Quick Reference


Page 2
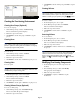
Figure 3: Manage storage navigation and content panes
Creating the Provisioning Environment
Creating Host Groups (Optional)
To create a host group:
1. On the Manage Storage toolbar, click Host Group.
The Create Host Group wizard displays.
2. Follow the steps in the wizard.
3. Click Finish to add the host group or Cancel to stop the
process.
Creating Hosts
Note: A host can be added without being a member of a host
group. Adding a host to the host group during the host creation
process is optional
.
An existing host can be added to a host group
at anytime by using the modify function.
To create a host:
1. On the Manage Storage toolbar, click Host.
The Create Host wizard displays.
2. Follow the steps in the wizard.
3. Click Finish to add the host or Cancel to stop the process.
Creating Paths
To create a path:
Note: Storage Provisioner does not validate World Wide IDs
(WWID), and it does not provide a selectable list. Obtain the valid
WWIDs before you begin creating paths.
1. In the Navigation pane, select a host system.
2. On the Manage Storage toolbar click Path.
The Create Path wizard displays.
3. Follow the steps in the wizard.
4. Click Finish to add the path or Cancel to stop the process.
Creating Volume Groups (Optional)
To create a volume group:
1. On the Manage Storage tab, click Volume Group.
The Create Volume Group wizard displays.
2. Follow the steps in the wizard.
3. Click Finish to add the volume group or Cancel to stop the
process.
Creating Volumes
Note: A volume can be added without being a member of a
volume group. Adding a volume to the volume group during the
volume creation process is optional
.
An existing volume can be
added to a volume group at anytime by using the Modify function.
To create a volume:
1. In the Navigation pane, select a path.
2. On the Manage Storage toolbar, click Volume.
The Create Volume wizard displays.
3. Follow the steps in the wizard.
4. Click Finish to add the volume or Cancel to stop the
process.
Accessing Volumes
To access volumes:
1. In the Navigation pane, select a volume.
2. On the Manage Storage toolbar, click Access.
The Access Volumes wizard displays.
3. Follow the steps in the wizard.
4. Click Finish to enable to volume for use or Cancel to stop
the process.
Note: The Access function allows multiple hosts to write to the same
volume. Only under special circumstance should multiple hosts be
allowed to write to the same volume. When assigning multiple
hosts, a warning message displays. If the warning message
displays, click Yes to enable the configuration or No to cancel the
action.
Modifying Provisioning Components
1. In the Navigation pane select the component to be
modified.
2. One the Manage Storage toolbar, Click Modify.
The appropriate wizard displays.
3. Follow the steps in the wizard.
4. Click Finish to complete or Cancel to stop the
modification.
Navigation pane Content pane