
OpenView Storage Provisioner v1.1 - Installation Instructions


Page 4
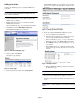
4. Select Install Software.
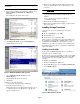
5. After the Installation Wizard displays, click Next.
Figure 3: Installation wizard
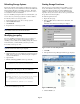
6. Select CD-ROM Drive on the Storage Management
Appliance.
7. Click Next at the bottom of the page.
8. Insert the installation CD into the CD-ROM drive of the
SMA.
9. Click Next.
The installation program reads the CD and displays the
program that is available for installation. This should be the
Storage Provisioner. This window also notifies you that the
SMA will restart after the install is completed.
10. Confirm the Storage Provisioner is displayed in the “Select
from the list” field, then click Next.
A message indicates that the installation is in progress.
When the installation completes, the SMA reboots,
breaking your browser’s connection with the SMA.
11. Close your browser.
After the SMA has rebooted, the Storage Provisioner is
available for your use.
Installing from an FTP Server
To install from an FTP server:
1. On the SMA Home page, choose Settings > Maintenance.
2. Choose Install Software.
3. After the Installation Wizard displays, click Next.
4. Select FTP Server.
5. Click Next.
6. Type the FTP server name in the field indicated.
7. Type the fully qualified file name in the field indicated.
(The file name should end in an SWP extension.)
8. Type the user name that you want to use to log in to the
FTP server.
9. Type the password for the user name.
10. Click Next.
A message indicates the progress of the download. When
the installation program has unpacked the file, it displays
the program that was contained in the SWP file. This
should be the Storage Provisioner.
11. Confirm the Storage Provisioner is displayed in the “Select
from the list” field, then click Next.
A message indicates that the installation is in progress.
When the installation completes, the SMA reboots,
breaking your browser’s connection with the SMA.
12. Close your browser.
After the SMA has rebooted, the Storage Provisioner is
available for your use.
Installing from a Local Disk
To install a SWP file from a local disk on the SMA:
1. Place the SWP file on a network drive that is accessible
from the SMA.
2. Open a Microsoft Terminal Services session to connect and
log in to the SMA.
Note: If Terminal Services is not available, connect a monitor,
mouse, and keyboard to the SMA.
3. From the SMA desktop, connect to the network drive that
contains the SWP file.
4. Copy the file from the share drive into the
C:\COMPAQ\SWPInstallKits folder on the SMA.
5. Disconnect from the accessed share drive.
6. Log off from Terminal Services or disconnect the monitor,
keyboard, and mouse from the SMA.
7. On the SMA Home page, choose Settings > Maintenance.
8. Choose Install Software.
9. After the Installation Wizard displays, click Next
10. Choose Local Disk on the SMA.
11. Click Next.
The installation programs displays all of the SWP files that
are available for installation in a drop-down list.
12. Select the file: Storage Provisioner.swp
13. Click Next.
The installation program displays a warning that the SMA
will restart after the install is complete.
14. Click Next.
A message indicates that the installation is in progress.
When the installation completes, the SMA reboots,
breaking your browser’s connection with the SMA.
15. Close your browser.
After the SMA has rebooted, the Storage Provisioner is
available for your use.