
OpenView Storage Provisioner v1.1 - Installation Instructions


Page 5
Adding a Local Host
Complete the following steps if your SAN has HSG array
controllers.
Note: This description uses
HSG Element Manager
. On your system
you may need to substitute HSG Element Manager for the new
name,
Command View HSG
.
1. Using a web browser, access the SMA and log in. The
SMA home page displays.
2. Enable Storage Provisioner to communicate with the
HSG80 Array Controller:
From the SMA home page, open Command View HSG:
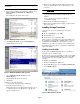
3. Click Devices and then HSG Element Manager.
The HSG Element Manager page displays.
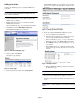
Figure 4: HSG Element Manager page
4. On the toolbar, click Options.
The Options page displays.
Figure 5: Options page
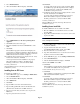
5. On the Options page toolbar, click Agent Options.
The HSG Element Manager Agent Options page displays,
where you can define your agent options, local host, and
host name.
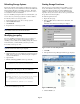
Figure 6: Change passwords and clients
6. Define the following HSG Element Manager options:
a. Leave the Old Password field blank.
b. In the New Password field, type a valid password and
retype it in the Confirm New Password field.
c. In the Add Client row, type localhost in the Host
Name field, and select the CLI Config option button.
d. Click Submit at the top of the Content pane to accept
your changes.
e. In the Modify Client row, confirm the localhost-CLI
Config option appears in the list, but you do not need to
select it.
Figure 7: Modify client area
f. Exit the HSG Element Manager window and return to
the SMA home page.
Note: The SMA reboots after the installation completes.
7. Restart the Storage Management Appliance and log in.
You may need to wait for it to finish rebooting before you
log in.
Note: If you had Storage Provisioner V1.0 installed and have
installed version 1.1, after installation you must refresh each storage
system.