
9.5.01 HP P4000 SAN Solution User Guide (AX696-96168, February 2012)
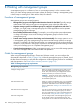
Add administrative user
1. Click Next to add an administrative user.
2. Enter the administrative user’s name, a description, and a password.
The first administrator is always at full administrator level.
3. Click Next to set the time for the management group.
Set management group time
1. Select the method by which to set the management group time.
• [Recommended] To use an NTP server, know the URL of the server, or its IP address,
before you begin.
Note: if using a URL, DNS must be configured on the storage systems in the group.
• To set the time manually, select Edit to display the Date and Time Configuration window.
Check each field on this window to set the time for all storage systems in this management
group.
2. Click Next to set the DNS server.
Set DNS server
1. Enter the DNS domain, suffix, and server IP address.
2. Click Next to set up email for notification.
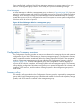
Set up email for notification
1. Enter the email (SMTP) server IP address or host name, port number, and email address to
use for the sender for event notification.
2. Click Next to create a cluster.
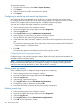
Create cluster and assign a VIP
The following steps are for creating a standard cluster. If you are creating a Multi-Site cluster, see
“Creating Multi-Site Clusters and Volumes” in Chapter 2 of the HP P4000 Multi-Site HA/DR Solution
Pack User Guide.
1. Select Standard Cluster on the Create a Cluster window, and click Next.
2. Enter a cluster name in the Create Cluster window.
3. From the list, select the storage systems to include in the cluster.
4. Click Next to assign a Virtual IP.
5. Add the VIP and subnet mask.
6. Click Next to create a volume and finish creating the management group.
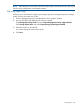
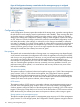
Create a volume and finish creating management group
1. Enter a name, description, data protection level, size, and provisioning type for the volume.
2. Click Finish.
3. Review the details on the summary window and click Close.
4. A message opens notifying you to register and receive license keys.
5. Click OK.
6. As a last step, save a .txt file of the configuration information for the entire management group.
See “Saving management group configuration information” (page 117).
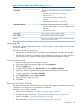
Management group map view tab
After you create the management group and finish setting up the SAN, use the Map View tab for
viewing the relationships between servers, sites, clusters, volumes, snapshots, and remote copies
106 Working with management groups