
HP P4800 G2 SAN Solution for BladeSystem Quick Start Guide (AX696-96152, November 2011)

Step 2 Configuring the network interface
Step 3
Setting up the SAN
Using the Onboard Administrator:
For each P4460sb G2 node, connect to the iLO Integrated Management Console and
complete the following instructions.
Prerequisites
Before configuring the network settings on individual storage systems, have the
following information ready:
• Host names
• IP addresses, subnet mask and gateway.
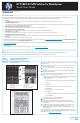
Logging into the configuration interface
Press enter to log in. Use the tab key to move through the fields and menu options in
the configuration interface.
Configuration interface main menu
Tab to network TCP/IP settings and press enter.
Selecting an interface to configure
Tab to select the network interface that you want to configure (eth0 or port1) and press
enter.
Change the host name and set IP address
Set the IP address, subnet mask and gateway.
Best practice
Manually assign IP addresses to the storage systems. Using DHCP to obtain an IP
address is not recommended unless using reserved addresses.
Verify IP address
Ping the IP address of the storage system from another host on the network to verify that
it is operating correctly.
Repeat for each storage system.
1
2
3
4
5
6
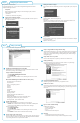
Using the HP P4000 Management Software DVD:
Insert the DVD in the DVD drive. The installer should launch automatically.
Installing the Centralized Management Console (CMC)
Install the CMC on the computer that you will use to administer the SAN. You need
administrative privileges while installing the CMC.
Using the installation wizard (Windows):
1. Click Centralized Management Console.
2. Click Install CMC.
3. Continue through the installation wizard, following the instructions on each
window.
Mount the HP P4000 Management Software DVD on the Server (Linux):
Navigate to the Linux CMC directory.
#cd /mnt/cdrom
#cd 8_1_management_software
#cd GUI
#cd Linux
#cd Disk1
#cd InstData/
#cd VM
#./CMC_Installer.bin
Preparing to install...
Extracting the JRE from the installer archive...
Unpacking the JRE...
Extracting the installation resources from the installer archive...
Configuring the installer for this system's environment...
Launching installer...(CMC installation starts)
Install the Failover Manager
Install the Failover Manager onto a separate server on the network.
Caution: Do not install the Failover Manager on the P4800 G2 BladeSystem
SAN, since this would defeat the purpose of the Failover Manager.
Using the installation wizard:
1. Click Failover Manager.
2. Click Install FOM.
3. Continue through the installation wizard, following the instructions on each
window.
4. Click Finish to exit the wizard and start the Failover Manager.
Discover storage systems on the network
The Find Systems window opens the first time you open the CMC. Use Find Systems to
discover the storage systems on the network, either by adding individual IP addresses
or by selecting the Auto discover by broadcast checkbox.
Verify or configure RAID and configure network settings
Verify the RAID configuration on your storage systems before creating a management
group. You can only reconfigure RAID on storage systems that are in the Available
Systems pool. Change network settings, including bonding NICs, before creating a
management group.
Verify software version is up to date
Use the “Check for Updates” to update your software to the latest version.
Setting up SAN storage
Use the management groups, clusters and volumes wizard to set up the storage
configuration and create a storage volume.
Download and install iSCSI initiator(s)
Install the appropriate iSCSI initiator on your application servers.
Enable access to volumes
Use the Assign Volume and Snapshot wizard to prepare the volume for server access.
You set up application servers in the management group, and then assign volumes to
the servers.
Log in to volumes via iSCSI initiator(s)
Configure the initiator(s) to ...
• Connect to the cluster VIP.
• Discover the targets.
• Log on.
• Format the disks with a file system.
Next Steps:
• Check the Alarms panel and resolve any alarms.
• Check the Best Practices Analyzer under the Configuration Summary.
1
2
4
6
7
8
9
10
3
5