
HP Controller Enclosure Battery Replacement Instructions (5697-1348, June 2012)
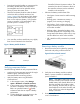

4. Position one hand under the battery module, and
with the other hand, pull the battery out of the
enclosure.
Figure 3 Removing a battery module
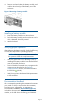
Installing a battery module
1. Insert the battery module into the enclosure.
2. Push the battery module into the enclosure until a
click is detected when fully seated.
3. Attach the bezel.
Verifying proper operation
After replacing the battery module, check the following
to verify the component is operating properly:
NOTE: Wait approximately three minutes for
the system to check the component status.
• Verify the green LED is lit or blinking. If not, try
reseating the battery module. Press the front bezel
onto the controller enclosure.
• From HP P6000 Command View, navigate to the
component as described in the Verifying
component failure section, and check the status.
It should be (Good).
• Verify that you have the desired LUN presentation
to the controllers.
Documentation feedback
HP is committed to providing documentation that meets
your needs. To help us improve the documentation,
send any errors, suggestions, or comments to
Documentation Feedback (docsfeedback@hp.com).
Include the document title and part number, version
number, or the URL when submitting your feedback.
Page 3