
HP StorageWorks Disk enclosure I/O module replacement instructions (504221-001, September 2009)
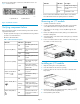


There are two I/O modules on of the rear of the disk enclosure. See
Figure 1 for the locations.
2. I/O module B1. I/O module A
Figure 1 I/O module locations
Verifying component failure
Before replacing the module, check the following and confirm with HP
support that it has failed:
• Analyze any failure messages received. HP fault monitoring software
provides a recommended action.
• Check the I/O module LEDs.
Table 1 I/O module LED descriptions
DescriptionLED StatusLED name
No cable, port not con-
nected
Off
SAS Port Link (Green) The port is being identi-
fied
Blinking
HealthySolid
No cable, port not con-
nected
Off
SAS Port Error (Amber)
Error detected by Applic-
ation client
Blinking
Error, fault conditions
detected on the port by
I/O module
Solid
Not being identified or
no power
Off
Module unit identifica-
tion (Blue)
The module is being
identified
Blinking
No power or firmware
fault
Off
Module Health (Green)
Starting up and not
ready, performing POST
Blinking
The module is operating
normally
Solid
No fault conditions de-
tected on the module or
no power
Off
Module Fault (Amber)
DescriptionLED StatusLED name
A fault of lesser import-
ant was detected on the
module
Blinking
I/O failed to startSolid
• Use the locate feature that flashes the blue LED to ensure that the
correct IO module that needs replacing has been identified.
Removing an I/O module
1. Schedule a maintenance window.
2. Use the locate feature that flashes the blue LED to ensure that the
correct IO module that needs replacing has been identified.
3. Stop all access to the storage, or force all I/O through the other
I/O module.
4. Remove all cabling from the module, making sure to label them to
facilitate recabling later.
5. Squeeze the button on the bottom of the locking lever (1) and rotate
out the handle (2).
6. Position one hand under the module, and with the other hand, pull
the module out of the enclosure (3).
Installing an I/O module
1. Open the locking lever on the I/O module.
2. Insert the module into the enclosure opening.
3. Push the module into the enclosure until a click is detected when
fully seated.
4. Connect the cables to the replacement module, making sure they
are connected to their designated ports.
5. Restart I/O through the module.
Page 2