HP StorageWorks P9000 Cluster Extension Software Administrator Guide Abstract This guide contains instructions for configuring and troubleshooting HP StorageWorks P9000 Cluster Extension Software in Windows and Linux environments with HP StorageWorks P9000 and XP disk arrays. The intended audience has independent knowledge of P9000 and XP disk arrays and related array software. Previous versions of this product were called HP StorageWorks XP Cluster Extension.
© Copyright 2010, 2011 Hewlett-Packard Development Company, L.P. Confidential computer software. Valid license from HP required for possession, use or copying. Consistent with FAR 12.211 and 12.212, Commercial Computer Software, Computer Software Documentation, and Technical Data for Commercial Items are licensed to the U.S. Government under vendor's standard commercial license. The information contained herein is subject to change without notice.
Contents 1 P9000 Cluster Extension features..................................................................8 Integration into cluster software...................................................................................................8 Enhanced disaster tolerance......................................................................................................8 Automated monitoring and redirecting of Continuous Access pairs..................................................
Starting the P9000 Cluster Extension configuration tool...........................................................19 Defining P9000 Cluster Extension configuration information using the GUI................................20 Defining P9000 Cluster Extension configuration information using the CLI.................................22 Importing and exporting configuration information.................................................................23 Exporting configuration settings using the GUI.................
Deleting a resource............................................................................................................49 Using Hyper-V Live Migration with P9000 Cluster Extension..........................................................49 Timing considerations for MSCS...............................................................................................50 Bouncing service or application................................................................................................
CLI commands.......................................................................................................................72 clxrun...............................................................................................................................72 clxchkmon.........................................................................................................................73 Displaying resources.........................................................................................
Subscription service..........................................................................................................105 New and changed information in this edition...........................................................................105 Related information...............................................................................................................105 White papers..................................................................................................................
1 P9000 Cluster Extension features HP StorageWorks P9000 Cluster Extension Software monitors P9000 and XP Continuous Access disk pairs and enables automatic access to remote data copies when clustered applications become unavailable locally. P9000 Cluster Extension integrates with popular cluster software to ensure that consistent and concurrent data copies on HP disk arrays can be accessed when needed.
Command-line interface (CLI) P9000 Cluster Extension Software provides a CLI to enable disaster tolerance without cluster software. The CLI is convenient if you use in-house software to migrate application services from one system to another or if you want P9000 Cluster Extension to check disk states to make sure you can automatically start an application service on the local disk array. Fast Failback using Continuous Access P9000 Cluster Extension supports the RAID Manager Fast Failback feature.
Each cluster host node needs redundant FC or SCSI I/O paths to the disk array. Individual hosts cannot be connected to both the primary (P-VOL) and the secondary (S-VOL) copy of the application disk set. HP recommends a minimum of two cluster host nodes per site. This allows for a preferred local failover in case of a system failure. Local failover operations are faster than a remote failover between disk arrays because the mirroring direction of the disks does not need to be changed.
asynchronous replication modes, see the Continuous Access documentation. For information about journal replication, see the Continuous Access Journal documentation. The Continuous Access fence level is used to configure the remote replication feature of a P9000 or XP disk array based on your requirements for application service availability, data concurrency, and replication performance. P9000 Cluster Extension supports all Continuous Access fence levels: NEVER, DATA, and JOURNAL.
This means that losing half the nodes in a 2-, 4-, 6-, or 8-node cluster or losing the communication links with 50% of the nodes on each site forces every node to terminate the cluster services because none of them have access to a majority of the configured nodes.
There are three types of resource constraints: • Resource location: Defines the nodes on which a resource can run, cannot run, or is preferred to be run. • Resource colocation: Defines which resources can or cannot run together on a node. • Resource order: Defines the sequence of actions for resources running on a node. Resource operation attribute SLE HA does not monitor resource health by default. To enable this feature, add the monitor operation to the resource definition.
Disk monitoring For the situations in which disk access is lost or read/write protection is in effect due to storage fencing, application monitoring agents, file system agents, or LVM resource agents detect the IO failure. P9000 Cluster Extension does not monitor the disk access status. RHCS cluster setup considerations Quorum In RHCS, the quorum is based on a simple voting majority of the defined nodes in a cluster. To re-form successfully, a majority of all possible votes is required.
A failover domain can have the following characteristics: • Unrestricted: Specifies that the subset of members is preferred, but the cluster service assigned to this domain can run on any available member. • Restricted: The cluster service is allowed to run only on a subset of failover domain members. • Unordered: The member on which the cluster service runs is chosen from the available list of failover domain members with no preference order.
Setting up RAID Manager In addition to the cluster software it integrates with, P9000 Cluster Extension depends on RAID Manager. Before configuring P9000 Cluster Extension, verify that RAID Manager is installed and configured, and that the host and disk array systems are properly configured as described in the following topics.
numbers used for the RaidManagerInstances object must be the same among all servers using P9000 Cluster Extension. • HP recommends that the RAID Manager instances be running at all times to provide the fastest failover capability. P9000 Cluster Extension provides scripts to include the RAID Manager startup procedure in the system startup file (for example, /etc/inittab for non-Windows systems). See “Starting and stopping the RAID Manager instances” (page 17) for more information.
Test takeover function After configuring RAID Manager for the device/copy groups used by P9000 Cluster Extension, verify that each device fails over correctly from each server in the cluster. The device/copy group must be in PAIR state. CAUTION: RAID Manager keeps configuration data of the disk array in system memory. Therefore, you must stop and restart RAID Manager instances on all servers if a configuration change is applied to any disk array.
2 Configuring P9000 Cluster Extension for Windows After installing P9000 Cluster Extension, use the configuration tool to define the setup configuration. After you configure P9000 Cluster Extension, use Cluster Administrator (Windows Server 2003), Failover Cluster Management (Windows Server 2008/2008 R2), or cluster commands in the CLI to add and configure resources. For information about how to install P9000 Cluster Extension, see the HP StorageWorks P9000 Cluster Extension installation guide.
NOTE: The service name clxmonitor is appended with the text “(not configured)” unless the port number is configured in the configuration tool. Defining P9000 Cluster Extension configuration information using the GUI 1. 2. Open the configuration tool. For instructions, see “Starting the P9000 Cluster Extension configuration tool” (page 19).
NOTE: Command device authentication is not supported with XP arrays or versions of RAID Manager earlier than 1.24.15. a. Click Command Dev Auth in the RAID Manager Instance Configuration section. The Command Device Authentication dialog box appears. b. c. Select a P9000 array. Enter the user name and password associated with a RAID Manager command device.
b. Select the servers that are possible owners of the P9000 Cluster Extension-managed disks, and then click OK. NOTE: See the Microsoft Cluster Administrator (Windows Server 2003) or Failover Cluster Management (Windows Server 2008/2008 R2) documentation for more information about possible owners. 6. Click OK to save the information and close the configuration tool. The configuration information is saved to the ClxXPCfg file.
Where DKCNumber is the disk controller/array serial number, and the available options are: • LOGIN /USER=User Name: The user name. • /PASSWORD=Password: The password. IMPORTANT: The configured RAID Manager instance associated with the selected DKC number must be running when you use this command. For instructions on starting a RAID Manager instance, see “Starting and stopping the RAID Manager instances” (page 17).
Importing configuration settings using the CLI 1. 2. Open a command window. Enter CLXXPCONFIG IMPORT /FILE=filepath, where filepath specifies the file location and name. Adding a P9000 Cluster Extension resource IMPORTANT: In Cluster Administrator (Windows Server 2003), resources are added to resource groups. In Failover Cluster Management (Windows Server 2008/2008 R2), the term resource groups changed to services and applications.
Description: As appropriate for the resource. Resource type: Select Cluster Extension XP from the list. Group: Select a group to associate with the resource. 4. Add or remove possible resource owners, and then click Next. The Dependencies window appears. 5. Do not add any dependencies. Click Next to open the Parameters window. The Parameters window contains values entered during the P9000 Cluster Extension configuration steps. 6.
cluster resource clx_fileshare /create /group:CLX_SHARE /type:"Cluster Extension XP" Changing a P9000 Cluster Extension resource name When changing resource names, observe the following rules: • Do not change a P9000 Cluster Extension resource name when the resource is online and the pair/resync monitor is enabled for the resource. Changing the name when the resource is online might cause problems with the pair/resync monitor functionality.
Configuring P9000 Cluster Extension resources IMPORTANT: In Cluster Administrator (Windows Server 2003), resources are added to resource groups. In Failover Cluster Management (Windows Server 2008/2008 R2), the term resource groups changed to services and applications. In this guide, the term services and applications refers to resource groups for Windows Server 2003 and services and applications for Windows Server 2008/2008 R2.
If a post-executable is specified, the PendingTimeout must be greater than the number of remote systems multiplied by three times tWT. • When a copy group is used in the RAID Manager configuration file, the copy group name is listed in the resource configuration tool P9000 device/copy group menu.
Table 1 Setting resource properties and values in the GUI (continued) Property Format Description Value If a resource fails, attempt restart on current node – Maximum restarts in the specified period (Windows Server 2008/2008 R2) Integer Defines whether a resource can be 0 (Required) automatically restarted after it has failed.
TIP: To change the properties in “Service or application properties and values” (page 30) with the CLI, use the following command: cluster group groupname /prop propertyname="propertyvalue".
Configuring RAID Manager instance numbers for the RAID Manager service Use the Cluster Administrator Properties window to change RAID Manager instance numbers. 1. 2. 3. 4. Open Cluster Administrator and double-click the resource you want to edit. Click the Parameters tab. To remove an instance, select it and click Remove. To add an instance: a. Click Add to open the Add RAID Manager instances window. b. Select one or more instances, and then click OK. 5.
4. 5. • For the ASYNC fence level, you can update the ASYNC takeover timeout value. See “AsyncTakeoverTimeout” (page 85) for more information about this value. • For the journal fence level, you can update the Journal data currency on S-VOL and ASYNC takeover timeout values. See “JournalDataCurrency” (page 89) and “AsyncTakeoverTimeout” (page 85) for more information about these values. Update the settings as needed, and then click OK to close the window.
the HORCM file. If you do this, restart the HORCM manager instance and reconfigure the P9000 Cluster Extension resource. • Do not use HORCM commands to change the device/copy group property for a device/copy group that is configured for a P9000 Cluster Extension resource. If you do this, the changed property is not reflected immediately in the Parameters tab. To work around this situation, re-select the device/copy group from the P9000 device/copy group menu in the Parameters tab.
CAUTION: If a resource cannot be taken offline manually, and goes into a failed state, the cluster administrator must disable monitoring of the device/copy group for this resource. To avoid data corruption, this task must be part of the recovery procedure when P9000 Cluster Extension is deployed in an MSCS/Failover Cluster Service environment. See “Stopping the pair/resync monitor” (page 73).
4. Update the PreExecScript, PostExecScript, and PostExecCheck values as needed, and then click OK. When configuring pre/post takeover executable paths, enter the full path to the script. If a script fails, the P9000 Cluster Extension resource will fail. 5. Click OK to save your changes and close the Properties window or Resource Configuration tool. Configuring rolling disaster protection To configure rolling disaster protection for a P9000 Cluster Extension resource: 1. 2. 3.
NOTE: For more information, see “Setting P9000 Cluster Extension objects to enable rolling disaster protection” (page 93). Setting P9000 Cluster Extension resource properties using the GUI (Windows Server 2008/2008 R2, Server Core, and Hyper-V Server) This section describes the procedures for setting P9000 Cluster Extension resource properties with a GUI.
Using the resource configuration tool to set resource properties (Server Core and Hyper-V Server) For Server Core or Hyper-V Server, use the P9000 Cluster Extension resource configuration tool to set resource properties. When using the resource configuration tool: • You must run the tool on a Server Core or Hyper-V cluster node. You cannot run the tool on a remote management station. • You cannot use the resource configuration tool to add or delete a resource.
Configuring the RAID Manager device/copy group details To configure RAID Manager device/copy group details from the Failover Cluster Management Parameters tab or the resource configuration tool: 1. Select a value in the P9000 device/copy group menu. 2. Click OK to save your changes and close the window.
2. 3. Update the settings as needed, and then click OK to close the window. Click OK to save your changes and close the window. Notes • After a device/copy group is configured in the resource configuration utility, do not change the device/copy group name or swap the name with another device/copy group name in the HORCM file. If you do this, restart the HORCM manager instance and reconfigure the P9000 Cluster Extension resource.
2. 3. Update the ApplicationStartup and AutoRecover values as needed, and then click OK. Click OK to save your changes and close the Properties window or Resource Configuration tool. Activating the pair/resync monitor The pair/resync monitor detects and responds to suspended Continuous Access links if the ResyncMonitor object is set to YES. If the ResyncMonitorAutoRecover object is set to YES, automatic disk pair resynchronization is also activated.
To configure takeover actions from the Failover Cluster Management Parameters tab or the resource configuration tool: 1. Click Pre/Post Exec to display the Pre/Post Executable Properties window. 2. Update the PreExecScript, PostExecScript, and PostExecCheck values as needed, and then click OK. When configuring pre/post takeover executable paths, enter the full path to the script. If a script fails, the P9000 Cluster Extension resource will fail. 3.
3. 4. Update the BCResyncEnabledA, BCResyncEnabledB,BCResyncMuListA, and BCResyncMuListB values as needed, and then click OK. Click OK to save your changes and close the Properties window or Resource Configuration tool. NOTE: For more information, see “Setting P9000 Cluster Extension objects to enable rolling disaster protection” (page 93).
NOTE: When you configure P9000 Cluster Extension resource properties using the CLI, the properties you enter are not validated, so you must enter the property values accurately, and verify them against the P9000 Cluster Extension documentation.
Adding dependencies using Cluster Administrator (Windows Server 2003) 1. 2. 3. 4. 5. 6. Open Cluster Administrator. Select the Resources folder in the console-tree. Double-click the disk resource you want to edit. Click the Dependencies tab, then click Modify. Add the P9000 Cluster Extension resource to the Dependencies of the disk resource. Click OK to finish your modifications.
The following command adds a dependency on the P9000 Cluster Extension clx_fileshare resource to the physical disk resource Disk_32b_00b: cluster resource Disk_32b_00b /adddependency:clx_fileshare Disaster-tolerant configuration example using a file share The following example describes a configuration in which: • Your environment consists of four systems (host1_DCA, host2_DCA, host3_DCB and host4_DCB). • Your environment includes two disk arrays with serial numbers 35014 and 35013.
Figure 4 CLX_FILESHARE resource sample Figure 5 P9000 Cluster Extension resource tree for CLX_SHARE P9000 Cluster Extension is configured as a single resource to enable read/write access to the physical disk resource used for the CLX_SHARE cluster group. The physical disk resource depends on the P9000 Cluster Extension resource and can be brought online only when the P9000 Cluster Extension resource is already online.
1. 2. 3. 4. 5. 6. 7. 8. Log in to the host3_DCB system with the Administrator account. Create the file share service or application with all previously mentioned resources and its dependencies, except the P9000 Cluster Extension resource on host3_DCB. Create a new resource of type Cluster Extension XP and add systems host2_DCA, host3_DCB, and host4_DCB to its possible owners.
16. Move the service or application to system host4_DCB and verify that all resources are available: C:\>cluster group CLX_SHARE /moveto:host4_DCB C:\>cluster group CLX_SHARE 17. Check the cluster service settings of system host2_DCA, and the group and resource settings. 18. Move the service or application to system host2_DCA and verify that all resources are available: C:\>cluster group CLX_SHARE /moveto:host2_DCA C:\>cluster group CLX_SHARE 19.
Deleting a resource Deleting a running resource causes the resource and its dependents to go offline. CAUTION: Deleting a running P9000 Cluster Extension resource does not remove the resource_name.online file and does not remove the device/copy group from the list of monitored device/copy groups if the pair/resync monitor is used to monitor the Continuous Access Software link.
TIP: For more information about using Hyper-V Live Migration with P9000 Cluster Extension, see the white paper Live Migration across data centers and disaster tolerant virtualization architecture with HP StorageWorks Cluster Extension and Microsoft Hyper-VTM on the white papers website: www.hp.com/storage/whitepapers. Timing considerations for MSCS P9000 Cluster Extension gives priority to disk array operations over cluster software operations.
Bouncing service or application P9000 Cluster Extension will alternate (start and fail) between local nodes if the ApplicationStartup property has been set to FASTFAILBACK and no remote system is available until the service or application restart limit has been reached. For more information, see “ApplicationStartup” (page 84). The FastFailbackEnabled property is not used by the P9000 Cluster Extension integration with MSCS.
Remote management of P9000 Cluster Extension resources in a cluster (Windows Server 2003) You can use Cluster Administrator to manage clusters and configure P9000 Cluster Extension resources.
3 Configuring P9000 Cluster Extension for Linux P9000 Cluster Extension supports integration with the following cluster software for Linux: • RHCS. See “Configuring P9000 Cluster Extension with RHCS” (page 54). • SLE HA. See “Configuring P9000 Cluster Extension with SLE HA” (page 60). NOTE: For a list of P9000 Cluster Extension versions and the cluster software versions they support, see the HP SPOCK website: http://www.hp.com/storage/spock.
for the LVM volume groups vgweb and vghtdocs. The sample CLXP9000.config file shows the contents of the configuration file with the described failover behavior. For SLE HA, the P9000 Cluster Extension resource configuration file /etc/opt/hpclx/ conf/CLXP9000.config is associated with the SLE HA resource CLXWEB. SLE HA invokes the resource agent script, /usr/lib/ocf/resource.
2. 3. 4. 5. Create an RHCS shared resource. For instructions, see “Creating an RHCS P9000 Cluster Extension shared resource” (page 55). Create an RHCS service using the P9000 Cluster Extension shared resource. For instructions, see “Creating an RHCS service using the P9000 Cluster Extension shared resource” (page 56). Configure the pair/resync monitor if you plan to use the pair/resync feature (optional). For instructions, see “Configuring the pair/resync monitor” (page 67).
7. 8. Enter CLXP9000 in the Name box. Enter /usr/share/cluster/clxp9000.sh in the File (with path) box. 9. Click OK. 10. Select File→Save to save the configuration changes. The service configuration in /etc/cluster/cluster.conf is updated. 11. Click Send to Cluster to propagate the cluster configuration to the other cluster nodes.
5. Click Add a Service. The Add a Service page appears. 6. Enter the service name in the Service name box. IMPORTANT: The service name must match the name that is defined for the APPLICATION property in the P9000 Cluster Extension configuration file CLXP9000.config. 7. 8. 9. Select a failover domain. For information about the failover domain requirements, see “Failover domains” (page 14). Select Relocate for the recovery policy.
6. Enter the service name in the Name box, and then click OK. IMPORTANT: The service name must match the name that is defined for the APPLICATION property in the configuration file CLXP9000.config. The Service Management dialog box appears. 7. Click Add a Shared Resource to this service. The Resource Configuration dialog box appears. 8. 9. Select CLXP9000 in the Select a Resource Type menu, and then click OK.
2. Create the configuration file CLXP9000.config in the /etc/opt/hpclx/conf directory, by copying and editing the sample file CLXP9000.config provided in the /opt/hpclx/ sample directory. $cp /opt/hpclx/sample/CLXP9000.config /etc/opt/hpclx/conf/CLXP9000.config 3. In the configuration file (CLXP9000.
4. Start the service on Host2. #clusvcadm –e CLXWEB –m Host2 5. Relocate the service to a remote data center node. a. Verify that the disks CLXWEB uses are in the PAIR state: #export HORCMINST=101 #pairdisplay –fcx –g clxwebvgs b. Move the service CLXWEB to Host3. Verify that service has successfully moved and started on Host3: #clusvcadm -r CLXWEB -m Host3 #clustat -s CLXWEB c. Verify that the disk pairs are now in read/write mode on the remote storage system: #pairdisplay –fcx –g clxwebvgs d.
Configuration overview 1. For P9000 arrays, configure command device user authentication. For instructions, see “Configuring RAID Manager command device user authentication” (page 65) 2. Create and configure a P9000 Cluster Extension resource. For instructions, see “Creating and configuring a P9000 Cluster Extension resource” (page 61). 3. Configure the pair/resync monitor if you plan to use the pair/resync feature (optional). For instructions, see “Configuring the pair/resync monitor” (page 67) 4.
NOTE: For more information about these values, see “User configuration file and P9000 Cluster Extension objects” (page 79). For example: APPLICATION XPSerialNumbers RaidManagerInstances DeviceGroup DC_A_Hosts DC_B_Hosts ResyncMonitor FenceLevel DataLoseMirror DataLoseDataCenter CLXWEB 30060 30080 101 vgnetscape sys1A sys2A sys1B sys2B yes never yes yes IMPORTANT: If you are using Device Mapper Multipath, configure the multipath_rescan.sh script as a PostExecScript.
8. Add a resource colocation constraint between the resource group ID assigned in Step 2 and the last resource in the group hierarchy. 9. Set location constraints for the group ID to achieve the required failover order for the group. 10. Set the operation defaults to control failover behavior. To specify that when a resource fails, the resources attempts to restart on the same node or another node in the cluster, use the following settings: Name Value requires nothing on-fail restart timeout 30 11.
3. Set the value of the app parameter to the APPLICATION tag name configured in the P9000 Cluster Extension resource configuration file (/etc/opt/hpclx/conf/CLXP9000.config). NOTE: The resource hierarchy depends on the order in which resources are added. Always add P9000 Cluster Extension resources as the first resource in a group. 4. 5. 6. 7. 8. 9. Add an LVM resource to the group created in Step 2.
Configuring RAID Manager command device user authentication For configurations with P9000 arrays and P9000 RAID Manager only, use the clxAuthenticateCmdDev utility to add configured RAID Manager instances, list instances, and add command device user authentication credentials. The utility is available in the /opt/hpclx/ bin directory. TIP: Enter clxAuthenticateCmdDev - help to view the clxAuthenticateCmdDev usage information. To add a configured instance and its command device credentials: 1.
Rescanning multipath devices IMPORTANT: only. The information in this section applies to Device Mapper Multipath Software users When a device/copy group takeover occurs, the permission settings of the LUs in the device/copy group change from read-only to read-write at the destination site. In Linux configurations with the Device Mapper Multipath Software, the hosts do not dynamically detect the LU permission change.
Finding the user-friendly name of a multipath device The multipath_rescan.sh script requires that you enter the user-friendly names of the multipath devices. To obtain the user-friendly name of a multipath device: 1. Run the pvs command to view the multipath device names for your volume groups. In the following example, dm-21 and dm-23 are the multipath devices for the volume group vg01: [root@node1 ]# pvs PV VG /dev/dm-21 vg01 /dev/dm-23 vg01 /dev/dm-24 vg02 2.
Activating the pair/resync monitor The pair/resync monitor detects and reacts to suspended Continuous Access links. To activate the pair/resync monitor, set the ResyncMonitor object to YES. To activate automatic disk pair resynchronization, set the ResyncMonitorAutoRecover object to YES. When a RHCS service or SLE HA resource group is stopped, the pair/resync monitor is stopped for the RAID Manager device/copy group the service or resource group uses.
This ensures that the disk array cache can be transferred from the remote disk array, even in the event of a single surviving replication link between the disk arrays. NOTE: Because the failover environment is dispersed over two or more data centers, the failover time cannot be expected to be the same as that of a single data center with a single shared disk device.
4 P9000 Cluster Extension and CLI P9000 Cluster Extension allows integration into almost any cluster software for commercial UNIX, Linux, and Windows operating systems. Use the clxrun command to check proper functionality of P9000 Cluster Extension prior to integration with the cluster software. The CLI also allows integration of the Continuous Access software. For information on supported platforms, see the HP SPOCK website: http://www.hp.com/storage/spock.
resynchronize. If this is the case, clxrun may take some time to complete. Do not stop clxrun; use it to check the status of the associated RAID Manager device/copy groups. Even if the RAID Manager version and the array firmware version allow a delta resynchronization, the amount of delta data to be transferred between the primary and the secondary could be long enough for the copy process to take a while.
CLI commands This section describes the following CLI commands: • “clxrun” (page 72) • “clxchkmon” (page 73) clxrun Check disk set Description clxrun can be used to manually prepare the application service's disk set before an existing application service start procedure is invoked. When using clxrun, the status of the associated RAID Manager device/copy group is checked to ensure that access to the disk set will occur under data consistency and concurrency situations only.
3 ERROR_LOCAL Application service should not start on this system. Example 1 # clxrun sap Example 1 is based on the assumption that you have defined an APPLICATION tag named sap in the UCF.cfg file and you have specified all necessary objects, including the DeviceGroup object, to map the disk set to the application service sap.
2. Select the application and device/copy group combination you want to remove from the pair/resync monitor and remove it with the following command: clxchkmon -n [[application_name] | [resource_group_name] | [resource_name]] -g device/copy_group_name –remove where application_name|resource_group_name|resource_name is the resource name (as defined by the APPLICATION tag in the UCF.cfg file) of the P9000 Cluster Extension resource and should match the clxchkmon output.
4 Device/copy group's pair status is pending. 10 Pair/resync monitor internal error. 11 Invalid argument to pair/resync monitor. 12 Pair/resync monitor received signal (control-c) interrupt. 13 Unknown status for device/copy group. 14 No port number is specified in services file for clxmonitor. 16 Invalid use of the –clx option on a non-P9000 Cluster Extension resource or P9000 Cluster Extension resource specified without the –clx option. 100 RAID Manager error.
5 P9000 Cluster Extension recovery procedures P9000 and XP disk pair states “Disk pair states” (page 76) provides basic disk pair state information. The disk pair state transition process is complex; see the Continuous Access and Continuous Access Journal documentation for more information.
Recovery sequence To recover from a server or Continuous Access link failure: 1. Start the RAID Manager instances on both local and remote servers: Linux/UNIX export HORCMINST=instance_number horcmstart.sh instance_number Windows set HORCMINST=instance_number HORCMSTART instance_number 2. Gather general pair status information: pairdisplay –g device_group 3. Display the pair status information after a failed swap-takeover (the S-VOL state is SSWS): pairdisplay –g device_group –fc 4.
5. Display the pair status information after a P-VOL takeover (local P-VOL PSUS; remote S-VOL PAIR): pairdisplay –g device_group –fc To recover from these states, invoke the following command from the P-VOL side: pairresync –c 15 –g device_group CAUTION: The application must be shut down and the file systems unmounted before a fenced disk in fence level DATA can be set in read/write mode again. After the P-VOL takeover, the file system must be checked before it can be mounted.
6 User configuration file and P9000 Cluster Extension objects Objects (also called properties in this document) define the disk array environment and failover/failback behavior. Information comes directly from the cluster software, indirectly from the disk array through RAID Manager, and from a configuration file created by users. This file describes the dependencies between application services and RAID Manager device/copy groups in one file for all application services in the cluster.
Objects have one of the following formats: tag A definition of an object; for example, COMMON or APPLICATION integer A number; for example, a timeout value string A name, which can include alphabetic and numeric characters and underscores; for example, an application startup value list A list of space-separated strings, for example, a list of host names (lists of numbers are stored as lists of strings) Text that is a comment starts with the pound (#) symbol and continues until the end of the line.
Table 4 Cluster software supported objects (continued) System Object CLI HACMP MSCS VCS RHCS, SLE HA BCMuListB • • • • • BCResyncEnabledA • • • • • BCResyncEnabledB • • • • • BCResyncMuListA • • • • • BCResyncMuListB • • • • • ClusterNotifyCheckTime • ClusterNotifyWaitTime • DataLoseDataCenter • • • • • DataLoseMirror • • • • • DC_A_Hosts • • • • • DC_B_Hosts • • • • • DeviceGroup • • • • • FastFailbackEnabled • FenceLevel • • Filesy
Objects of the type COMMON can appear only one time. Those objects must be placed after the COMMON tag in the configuration file. If the default values fit your environment, there is no need to specify them in the file. COMMON Format tag Description Distinguishes between general (common) and application-specific objects. LogDir Format String Description (Optional) Defines the path to the P9000 Cluster Extension log file.
The APPLICATION object requires the name of the application service as its value. The objects specified after an APPLICATION tag must appear only once per application. As with the COMMON objects, the APPLICATION objects have predefined default values. P9000 Cluster Extension uses the following rules to define objects: • If you use the default value, you do not have to specify the object. • P9000 Cluster Extension uses objects depending on the setting of other objects.
If specified in a user configuration file, resource_name is the value of the APPLICATION tag; otherwise, resource_name is the value of the P9000 Cluster Extension resource name. ApplicationStartup Format String Description (Optional) Specifies where a cluster group should be brought online.
In a P9000 Cluster Extension for MSCS integration, P9000 Cluster Extension can detect when there is no target failback system available in the remote data center. In this case, P9000 Cluster Extension behaves as if the ApplicationStartup resource property is set to RESYNCWAIT. RESYNCWAIT The online local cluster group must wait until the disk status is PAIR. P9000 Cluster Extension initiates a resynchronization of the local disk based on the remote disk.
If the resynchronization attempt fails, P9000 Cluster Extension will not fail. The internal logic will first apply the concurrency and consistency rules to allow access to the disk set. If you configure fence level DATA for the device/copy group and set the FenceLevel object to DATA, the AutoRecover object will change P9000 Cluster Extension's behavior. P9000 Cluster Extension will attempt to re-establish the PAIR state and wait for the PAIR state before it allows access to the disk.
Business Copy pair is located in the same data center where P9000 Cluster Extension is started. Valid values YES NO (default) BCResyncMuListA Format List Description (Optional) Space-separated list defines the MU number of the Business Copy disk pairs in data center A. BCResyncMuListB Format List Description (Optional) Space-separated list defines the MU number of the Business Copy disk pairs in data center B.
Valid values YES (default) NO DataLoseMirror Format String Description (Optional) Specifies whether a resource should be brought online while the disk pair is suspended or deleted. Used only if the FenceLevel object value is DATA and local and remote disk status information can be gathered. If the remote disk state information is not available (remote state EX_ENORMT), the setting of the DataLoseDataCenter object will be used.
FastFailbackEnabled (VCS only) Format String Description (Optional) Disables VCS service groups for the data center. This allows the immediate transferring of the service group back to the remote data center. To allow this operation, the VCS configuration file (main.cf) will be write-enabled and saved later. The service group will be disabled for all systems contained in either the DC_A_Hosts object or DC_B_Hosts object. Then, the VCS configuration file will be saved (dumped).
LocalDCLMForNonPAIRDG Format String Description Specifies whether a live migration operation within the local data center is allowed when the device/copy group is not in PAIR state. Set this property to YES to allow live migration operations in the local data center when the device/copy group is not in PAIR state, the latest data is in the local data center, and the P9000 Cluster Extension resource can come online.
Description A space-separated list of RAID Manager instances that P9000 Cluster Extension can use to communicate with the disk array. The instance numbers must be the same among all cluster systems. P9000 Cluster Extension can alternate between the specified instances. VCS This object is a string-vector element. Add a new element to the list for each system name. Files Linux/UNIX /etc/horcmX.conf Windows %systemroot%\horcmX.conf where X is the RAID Manager instance number.
StatusRefreshInterval Format Integer Description Specifies how often P9000 Cluster Extension will gather disk array information. Default value 300 seconds Vgs (CLI only) Format List Description List of volume groups. XPSerialNumbers (Required) Format List Description A space-separated list of at least two serial numbers must be specified: the serial numbers of the primary and secondary disk arrays. P9000 Cluster Extension checks whether the local disk array is contained in this list.
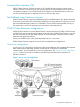
7 Advanced P9000 Cluster Extension configuration This chapter describes advanced P9000 Cluster Extension configuration procedures. Implementing rolling disaster protection To implement rolling disaster protection, create Business Copy disk pairs for the local Continuous Access disks. • Create the Business Copy disk pairs using the paircreate command with the –m noread option. This option ensures that Business Copy disks are unavailable to other services and reserved for rolling disaster protection only.
numbers as the Business Copy software supports. Disk pair MU numbers are specified by the BCMuListA and BCMuListB objects for data centers A and B. • To enable resynchronization of Business Copy disk pairs that have been split by P9000 Cluster Extension, use the BCResyncEnabledA and BCResyncEnabledB objects for data centers A and B. • P9000 Cluster Extension maintains a list of all associated Business Copy disk pairs that were in PAIR state before a resynchronization attempt.
Figure 7 Disaster-tolerant configuration with rolling disaster protection Monitoring and resynchronizing device/copy groups The pair/resync monitor can either only monitor or both monitor and resynchronize the state of the RAID Manager device/copy group for an application service. CAUTION: If the application service stops, the cluster software or your customized solution must be able to stop the monitoring or resynchronization utility.
If the ResyncMonitorAutoRecover object is set to YES, the monitor tries to resynchronize the remote disk based on the local disk. Resynchronization occurs only if the disks are in a P-VOL/S-VOL or S-VOL/P-VOL relationship. If one or both disk pairs are in the SMPL state or the device/copy group state is mixed, automatic resynchronization is not attempted. The ResyncMonitorAutoRecover object set to YES is supported only if the minimum disk array firmware version is 01-11-xx (XP512/XP48) or 21.01.
c:\perl\bin\perl.exe c:\tmp\preExec.pl %3 %4 %5 exit /B %ERRORLEVEL% Arguments The following arguments are transferred to the scripts in this order: 1. 2. 3. Name RaidManagerInstances DeviceGroup The device and/or copy group names. 4. local device/copy group state (check) Pre-executable status before failover and post-executable status after failover 5. local device/copy group state (display) Pre-executable status before failover and post-executable status after failover IMPORTANT: 6.
4 PRE_ERROR_TAKEOVER Pre-executable failed; takeover action allowed. 5 PRE_OK_NOTKVR_NOPST Pre-executable ok; no takeover; no post-exec. CAUTION: If the pre-execution program returns 1, 2, 3, or 5, a post-executable will not be executed. If a takeover function fails, the post-executable will not be executed. Post-executable return codes Post-executables must give a return code. These return codes determine whether the application is stopped. 0 POST_OK Post-executable OK; continue.
8 Troubleshooting To troubleshoot problems with P9000 Cluster Extension, you must understand Continuous Access environments. Many issues can be attributed to incompatible disk pair states. See the Continuous Access and RAID Manager documentation before assuming that a problem has been caused by P9000 Cluster Extension. CAUTION: P9000 Cluster Extension cannot handle device/copy group states automatically and correctly when they result from manual manipulations.
Failover error handling P9000 Cluster Extension automatically fails over application services if the system the application service is running on becomes unavailable. This also means that if a problem with the disk array state occurs, an application service startup process will be stopped. The behavior of P9000 Cluster Extension is highly configurable. Depending on the customer setting, P9000 Cluster Extension is used to prevent application services from starting automatically under the wrong conditions.
group is alternating between the surviving systems. This happens until the previously mentioned resource and resource group property values are reached or you disable the restarting of the resource. This could be also the case if the ApplicationStartup resource property has been set to FASTFAILBACK. If a disk array state has been discovered that does not allow bringing the resource group online on any system in the cluster, a cluster error would be reported and the resource would fail on all systems.
Using the Domain user account (Windows Server 2008/2008 R2 only) When using the Domain user account to manage the cluster, modifying HORCM files might not be possible, and P9000 Cluster Extension tools might not run as expected. If you experience any of these issues, turn off UAC. To turn off UAC, select Control panel→User Accounts, and click Turn User Account Control on or off. Clear the User Account Control (UAC) to help protect your computer check box.
3. Restart the node that was shut down. NOTE: The time to detect a storage outage due to failure of all paths to storage depends on the setting for no_path_retry in the multipath software configuration. A value of fail does not queue I/O in the event of a failure in all paths and returns an immediate failure. For information about the recommended value for your environment, see the DM-Multipath documentation.
This could be caused by Continuous Access link failures or manual manipulation of the disk pair state. TIP: Recover the PAIR state immediately, because replication of your data is not possible. Check monitored disk pairs by invoking the following command from the command line: clxchkmon –n application_name –g device_group –show TIP: Disable application service failover for the time of the disk pair recovery (resynchronization).
9 Support and other resources Contacting HP For worldwide technical support information, see the HP support website: http://www.hp.
http://www.hp.com/support/manuals In the Storage section, click Storage Software, and then select your product. White papers The following white papers are available at www.hp.
Table 5 Document conventions (continued) Convention Element Monospace, italic text • Code variables • Command variables Monospace, bold text WARNING! CAUTION: IMPORTANT: NOTE: TIP: Emphasized monospace text Indicates that failure to follow directions could result in bodily harm or death. Indicates that failure to follow directions could result in damage to equipment or data. Provides clarifying information or specific instructions. Provides additional information.
Glossary CHA Channel adapter. A device that provides the interface between the array and the external host system. Occasionally, this term is used synonymously with the term channel host interface processor (CHIP). CLI Command-line interface. An interface comprised of various commands which are used to control operating system responses.
port A physical connection that allows data to pass between a host and a disk array. primary site The data center location that owns the cluster group (quorum resource). PSUS Pair suspended-split. quorum In MSCS, a cluster resource that has been configured to control the cluster, maintaining essential cluster data and recovery information. In the event of a node failure, the quorum acts as a tie-breaker and is transferred to a surviving node to ensure that data remains consistent within the cluster.
Index A APPLICATION section description, 82 application service failover, 104 ApplicationDir object description, 83 ApplicationStartup object description, 84 AsyncTakeoverTimeout object description, 85 AutoFailbackType description, 30 automatic recovery, 99 AutoRecover object description, 85 rolling disaster protection, 94 B Basic Resource Health Check Interval description, 28 BCEnabledA object description, 86 BCEnabledB object description, 86 BCMuListA object description, 86 BCMuListB object description,
description, 30 fast failback Continuous Access, 9 FASTFAILBACK value description, 84 FastFailbackEnabled object description, 89 features P9000 Cluster Extension, 8 fence levels Continuous Access, 10 FenceLevel object description, 89 files clxhosts, 67 event log, 103 force flag, 96 services, 67 Filesystems object description, 89 force flag file, 96 forceflag option, 72 G group names Microsoft Cluster Service, 24, 26 H help obtaining, 105 HP technical support, 105 Hyper-V Live Migration, 49, 52 I importin
configuring with Microsoft Cluster Service, 19 dependency on RAID Manager, 16 environments, 11 features, 8 pair/resync monitor configuring for Linux, 67 configuring for Microsoft Cluster Service, 20 integration with Microsoft Cluster Service, 33, 40 invoking, 95 port, 20, 22, 67 troubleshooting, 103 PendingTimeout description, 29 post-execution programs invoking, 96 return codes, 98 PostExecCheck object description, 90 PostExecScript object description, 90 pre-execution programs invoking, 96 return codes, 9
UCF requirement, 43 Subscriber's Choice, HP, 105 symbols in text, 107 sample, 92 SearchObject object, 82 specifying object values, 80 structure, 79 VcsBinPath object, 82 Vgs object, 92 XPSerialNumbers object, 92 T takeover function failure, 98 technical support HP, 105 text symbols, 107 Thorough Resource Health Check Interval description, 28 timing Microsoft Cluster Service considerations, 50 timing considerations Linux, 68 troubleshooting P9000 Cluster Extension problems, 99 typographic conventions, 106