
HP XP7 RAID Manager Installation and Configuration User Guide (T1610-96065)
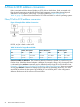
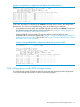
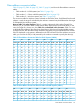
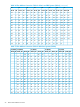
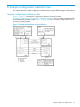
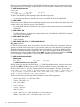
Table Of Contents
- XP7 RAID Manager Installation and Configuration User Guide
- Contents
- 1 Installation requirements
- System requirements
- Supported environments
- Supported Business Copy environments
- Supported Continuous Access Synchronous environments
- Supported Continuous Access Asynchronous environments
- Supported Continuous Access Journal environments
- Supported Snapshot environments
- Supported Data Retention environments
- Supported Database Validator environments
- Supported guest OS for VM
- Supported IPv4, IPv6 platforms
- Requirements and restrictions for z/Linux
- Requirements and restrictions for VM
- Porting notice for OpenVMS
- Using RAID Manager with Hitachi and other storage systems
- 2 Installing and configuring RAID Manager
- 3 Upgrading RAID Manager
- 4 Removing RAID Manager
- 5 Troubleshooting
- 6 Support and other resources
- A Fibre-to-SCSI address conversion
- B Sample configuration definition files
- Glossary
- Index

Example 6 Using Raidscan to Display TID and LUN for Fibre-Channel Devices
C:\>raidscan -pd hd6 -x drivescan hd6
Harddisk 6... Port[ 2] PhId[ 4] TId[ 3] Lun[ 5] [HITACHI ] [OPEN-3 ]
Port[CL1-J] Ser#[ 30053] LDEV#[ 14(0x00E)]
HORC = SMPL HOMRCF[MU#0 = SMPL MU#1 = SMPL MU#2 = SMPL]
RAID5[Group 1- 2] SSID = 0x0004
PORT# /ALPA/C,TID#,LU#.Num(LDEV#....)...P/S, Status,Fence,LDEV#,P-Seq#,P-LDEV#
CL1-J / e2/4, 29, 0.1(9).............SMPL ---- ------ ----, ----- ----
CL1-J / e2/4, 29, 1.1(10)............SMPL ---- ------ ----, ----- ----
CL1-J / e2/4, 29, 2.1(11)............SMPL ---- ------ ----, ----- ----
CL1-J / e2/4, 29, 3.1(12)............SMPL ---- ------ ----, ----- ----
CL1-J / e2/4, 29, 4.1(13)............SMPL ---- ------ ----, ----- ----
CL1-J / e2/4, 29, 5.1(14)............SMPL ---- ------ ----, ----- ----
CL1-J / e2/4, 29, 6.1(15)............SMPL ---- ------ ----, ----- ----
Specified device is LDEV# 0014
In this case, the target ID indicated by the raidscan command must be used in the configuration
definition file. This can be accomplished using either of the following two methods:
• Using default conversion table. Use the TID# and LU# indicated by the raidscan command in
the HORCM configuration definition file (TID=29 LUN=5 in Example 6 “Using Raidscan to
Display TID and LUN for Fibre-Channel Devices”).
• Changing default conversion table. Change the default conversion table using the
HORCMFCTBL environmental variable (see Example 7 “Using HORCMFCTBL to Change the
Default Fibre Conversion Table”) (TID=3 LUN=5 in Example 7 “Using HORCMFCTBL to Change
the Default Fibre Conversion Table”).
Example 7 Using HORCMFCTBL to Change the Default Fibre Conversion Table
C:\> set HORCMFCTBL=X → 'X' is fibre conversion table number.
C:\> horcmstart ... → Start of HORCM.
:
:
Result of "set HORCMFCTBL=X" command:
C:\>raidscan -pd hd6 -x drivescan hd6
Harddisk 6... Port[ 2] PhId[ 4] TId[ 3] Lun[ 5] [HITACHI ] [OPEN-3 ]
Port[CL1-J] Ser#[ 30053] LDEV#[ 14(0x00E)]
HORC = SMPL HOMRCF[MU#0 = SMPL MU#1 = SMPL MU#2 = SMPL]
RAID5[Group 1- 2] SSID = 0x0004
PORT# /ALPA/C,TID#,LU#.Num(LDEV#....)...P/S,Status,Fence,LDEV#,P-Seq#,P-LDEV#
CL1-J / e2/0, 3, 0.1(9).............SMPL ---- ------ ----, ----- ----
CL1-J / e2/0, 3, 1.1(10)............SMPL ---- ------ ----, ----- ----
CL1-J / e2/0, 3, 2.1(11)............SMPL ---- ------ ----, ----- ----
CL1-J / e2/0, 3, 3.1(12)............SMPL ---- ------ ----, ----- ----
CL1-J / e2/0, 3, 4.1(13)............SMPL ---- ------ ----, ----- ----
CL1-J / e2/0, 3, 5.1(14)............SMPL ---- ------ ----, ----- ----
CL1-J / e2/0, 3, 6.1(15)............SMPL ---- ------ ----, ----- ----
Specified device is LDEV# 0014
LUN configurations on the RAID storage systems
The RAID storage systems (XP1024/XP128 Disk Array and later) manage the LUN configuration
on a port through the LUN security as shown in the following figure.
LUN configurations on the RAID storage systems 53