
HP XP7 RAID Manager Installation and Configuration User Guide (T1610-96065)
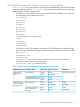
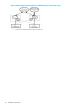
Table Of Contents
- XP7 RAID Manager Installation and Configuration User Guide
- Contents
- 1 Installation requirements
- System requirements
- Supported environments
- Supported Business Copy environments
- Supported Continuous Access Synchronous environments
- Supported Continuous Access Asynchronous environments
- Supported Continuous Access Journal environments
- Supported Snapshot environments
- Supported Data Retention environments
- Supported Database Validator environments
- Supported guest OS for VM
- Supported IPv4, IPv6 platforms
- Requirements and restrictions for z/Linux
- Requirements and restrictions for VM
- Porting notice for OpenVMS
- Using RAID Manager with Hitachi and other storage systems
- 2 Installing and configuring RAID Manager
- 3 Upgrading RAID Manager
- 4 Removing RAID Manager
- 5 Troubleshooting
- 6 Support and other resources
- A Fibre-to-SCSI address conversion
- B Sample configuration definition files
- Glossary
- Index
to UNIX commands that may be different on your platform. Please consult your operating system
documentation (for example, UNIX man pages) for platform-specific command information.
To install the RAID Manager software into the root directory:
1. Insert the installation medium into the I/O device properly.
2. Move to the current root directory: # cd /
3. Copy all files from the installation medium using the cpio command:
4. # cpio -idmu < /dev/XXXX XXXX = I/O device
Preserve the directory structure (d flag) and file modification times (m flag), and copy
unconditionally (u flag).
5. Execute the RAID Manager installation command: # /HORCM/horcminstall.sh
6. Verify installation of the proper version using the raidqry command:
# raidqry -h
Model: RAID-Manager/HP-UX
Ver&Rev: 01-24-03/12
Usage: raidqry [options]
To install the RAID Manager software into a non-root directory:
1. Insert the installation medium (for example, CD-ROM) into the proper I/O device.
2. Move to the desired directory for RAID Manager. The specified directory must be mounted
by a partition of except root disk or an external disk.
3. # cd /Specified Directory
4. Copy all files from the installation medium using the cpio command:
5. # cpio -idmu < /dev/XXXX XXXX = I/O device
Preserve the directory structure (d flag) and file modification times (m flag), and copy
unconditionally (u flag).
6. Make a symbolic link for /HORCM:
7. # ln -s /Specified Directory/HORCM /HORCM
8. Execute the RAID Manager installation command: # /HORCM/horcminstall.sh
9. Verify installation of the proper version using the raidqry command:
# raidqry -h
Model: RAID-Manager/HP-UX
Ver&Rev: 01-24-03/12
Usage: raidqry [options]
Changing the RAID Manager user (UNIX systems)
The RAID Manager software is initially configured to allow only the root user (system administrator)
to execute RAID Manager commands. If desired (for example, RAID Manager administrator does
not have root access), the system administrator can change the RAID Manager user from root to
another user name.
To change the RAID Manager user:
1. Change the owner of the following RAID Manager files from the root user to the desired user
name:
• /HORCM/etc/horcmgr
• All RAID Manager commands in the /HORCM/usr/bin directory
• All RAID Manager log directories in the /HORCM/log* directories
34 Installing and configuring RAID Manager