
HP XP7 Audit Log User and Reference Guide (H6F56-96001)
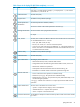


Table Of Contents
- HP XP7 Audit Log User and Reference Guide
- Contents
- 1 Introduction
- 2 Using audit logs
- 3 Quick reference
- 4 Audit log examples
- Audit Log Descriptions
- ACM Descriptions
- BASE Descriptions
- [BASE] Certificate Update
- [BASE] ControlPanel Backup
- [BASE] ControlPanel Restore
- [BASE] Create Conf Report
- [BASE] Delete CVAE Info
- [BASE] Delete Reports
- [BASE] Delete Tasks
- [BASE] Disable Auto Delete
- [BASE] Edit Alert Setting
- [BASE] Edit SIM Syslog Serv
- [BASE] Edit Storage System
- [BASE] Edit System Options
- [BASE] Enable Auto Delete
- [BASE] Entry Tasks
- [BASE] Environment Setting
- [BASE] HCSSO Authentication
- [BASE] HCSSO SetOneTimeKey
- [BASE] Login
- [BASE] Logout
- [BASE] Release HTTP Block
- [BASE] Resume Tasks
- [BASE] Set CVAE Info
- [BASE] Set Up HTTP Block
- [BASE] Suspend Tasks
- [BASE] Unlock Forcibly
- [BASE] Update HCS Crt
- [BASE] Update SMIS CrtFiles
- [BASE] Upload SMIS ConfFile
- Parallel Access Volumes Descriptions
- E-Mail Descriptions
- Information Descriptions
- Install Descriptions
- [Install] Add Host Group
- [Install] Add LU Path
- [Install] Add WWN
- [Install] All Config
- [Install] Backup Config
- [Install] Change Host Group
- [Install] Change WWN
- [Install] DCR Prestaging
- [Install] Define Config.
- [Install] Delete DKC WWN
- [Install] Delete Host Group
- [Install] Delete LU Path
- [Install] Delete WWN
- [Install] Dku Emulation
- [Install] FlashDrive ORM Value
- [Install] Force Reset
- [Install] Format
- [Install] Format Stop
- [Install] Initialize ORM Value
- [Install] Install
- [Install] Install CV
- [Install] Machine Install Date
- [Install] Make Volume
- [Install] Micro Program
- [Install] MP Install
- [Install] M/F DCR
- [Install] Open DCR
- [Install] Remove
- [Install] Restore Config.
- [Install] Set Battery Life
- [Install] Set Channel Speed
- [Install] Set CommandDev
- [Install] Set CommandDevSec
- [Install] Set DevGrpDef
- [Install] Set Fibre Address
- [Install] Set Fibre Topology
- [Install] Set Host Mode
- [Install] Set IP Address
- [Install] Set Security Switch
- [Install] Set Subsystem Time
- [Install] Set UserAuth
- [Install] System Option
- [Install] System Tuning
- [Install] Update Config
- [Install] Volume to Space
- Local Replication Descriptions
- Maintenance Descriptions
- [Maintenance] Blockade
- [Maintenance] Correction Copy
- [Maintenance] DMA Restore
- [Maintenance] Drive Interrupt
- [Maintenance] DRR Restore
- [Maintenance] Format
- [Maintenance] Format Stop
- [Maintenance] MP Restore
- [Maintenance] PCB Restore
- [Maintenance] Pre QuickFormat Stop
- [Maintenance] Quick Format
- [Maintenance] Replace
- [Maintenance] Restore
- [Maintenance] Restore Data
- [Maintenance] Set Battery Life
- [Maintenance] Size Change
- [Maintenance] Spare Disk
- [Maintenance] Switch SVP
- [Maintenance] Transfer Config
- [Maintenance] Type Change
- [Maintenance] Verify
- [Maintenance] Verify Stop
- Monitor Descriptions
- Performance Monitor Descriptions
- Program Product Key (PP KEY) Descriptions
- Provisioning Descriptions
- [PROV] Add Hosts
- [PROV] Add LUN Paths
- [PROV] Assign MP Blade
- [PROV] Block LDEVs
- [PROV] Complete SIMs
- [PROV] Create Host Groups
- [PROV] Create LDEVs
- [PROV] Create Resource Grps
- [PROV] Create VDKC-Box
- [PROV] Create/Expand Pools
- [PROV] Delete Host Groups
- [PROV] Delete LDEVs
- [PROV] Delete Login WWNs
- [PROV] Delete LUN Paths
- [PROV] Delete Resource Grps
- [PROV] Delete VDKC-Box
- [PROV] DRU Expiration-Lock
- [PROV] Edit Cmd Dev(Auth)
- [PROV] Edit Cmd Dev(DevGrp)
- [PROV] Edit Cmd Dev(Sec)
- [PROV] Edit Command Devices
- [PROV] Edit DRU Attribute
- [PROV] Edit Host
- [PROV] Edit Host Grps(Mode)
- [PROV] Edit Host Grps(Name)
- [PROV] Edit LDEVs(tier)
- [PROV] Edit LDEV Tier Rank
- [PROV] Edit MP Blades
- [PROV] Edit Ports(Address)
- [PROV] Edit Ports(Attr)
- [PROV] Edit Ports(Security)
- [PROV] Edit Ports(Speed)
- [PROV] Edit Ports(Topology)
- [PROV] Edit Resource Grp
- [PROV] Edit SCP Time
- [PROV] Edit Tiering Policy
- [PROV] Edit VR Attribute
- [PROV] Edit V-VOL Option
- [PROV] Edit/Delete Pools
- [PROV] Edit/Delete UUIDs
- [PROV] Expand V-VOLs
- [PROV] Format LDEVs
- [PROV] Format LDEVs(H)
- [PROV] Format LDEVs(Q)
- [PROV] Initialize Pools
- [PROV] LDEV Name
- [PROV] Monitor Pools
- [PROV] Move Resources
- [PROV] Pool Name
- [PROV] Reclaim Zero Pages
- [PROV] Release HostReserved
- [PROV] Relocate Pool
- [PROV] Remove Hosts
- [PROV] Restore LDEVs
- [PROV] Restore Pools
- [PROV] Set FCSP Host
- [PROV] Set FCSP Port Info
- [PROV] Set FCSP Port Switch
- [PROV] Set FCSP Target
- [PROV] Set PageTieringLevel
- [PROV] Set SSID
- [PROV] Set Virtual LDEV
- [PROV] Shrink Pool
- [PROV] Stop Monitoring
- [PROV] Stop Reclm ZeroPages
- [PROV] Stop Relocating
- [PROV] Stop Shrinking Pool
- [PROV] VTOC
- Remote Maintenance Descriptions
- Remote Replication Descriptions
- [Remote Replication] Add path
- [Remote Replication] Add RCU
- [Remote Replication] Change JNL Option
- [Remote Replication] Change Mirror Option
- [Remote Replication] Change RCU Option
- [Remote Replication] Clear SIM
- [Remote Replication] Create Pairs
- [Remote Replication] Delete Cmd.Dev
- [Remote Replication] Delete Pairs
- [Remote Replication] Delete path
- [Remote Replication] Delete RCU
- [Remote Replication] Edit Options
- [Remote Replication] Edit Pair Options
- [Remote Replication] Journal Owner
- [Remote Replication] Journal Vol
- [Remote Replication] R-Cmd.Dev.
- [Remote Replication] Resync Pairs
- [Remote Replication] Split Pairs
- SNMP API Descriptions
- Performance Control Descriptions
- Spreadsheet Descriptions
- External Storage Descriptions
- [Ext Stor] Add External Volumes
- [Ext Stor] Assign MP Blade
- [Ext Stor] Delete ES VOLs
- [Ext Stor] Disconnect ES Paths
- [Ext Stor] Disconnect ES VOLs
- [Ext Stor] Edit ES Path Config
- [Ext Stor] Edit ES VOLs
- [Ext Stor] Edit External WWNs
- [Ext Stor] Merge ES Path Grps
- [Ext Stor] ProfileUpgrade
- [Ext Stor] Reconnect ES Paths
- [Ext Stor] Reconnect ES VOLs
- [Ext Stor] Split ES Path Grp
- Auto LUN Descriptions
- Cache Partition Descriptions
- Volume Shredder Descriptions
- Compatible XRC Descriptions
- HDD Easy Replace Descriptions
- 5 Audit log examples for encryption key operations
- ENC Descriptions
- [ENC] Add keys to DKC
- [ENC] Backup Keys
- [ENC] Backup Keys to File
- [ENC] Backup Keys to Serv
- [ENC] Change CEK Status
- [ENC] Change DEK Status
- [ENC] Clear Keys
- [ENC] Create KEK Dynamic
- [ENC] Create Keys
- [ENC] Create Keys
- [ENC] Create Keys On Serv
- [ENC] DEK assign SpareDisk
- [ENC] DEK delete
- [ENC] Delete KEK Dynamic
- [ENC] Delete Keys
- [ENC] Delete Keys
- [ENC] Delete Keys on Serv
- [ENC] Edit Encryption
- [ENC] Edit ENC Settings
- [ENC] Edit Password Policy
- [ENC] Register KEK Dynamic
- [ENC] Rekey CEK
- [ENC] Rekey KEK Dynamic
- [ENC] Restore Keys
- [ENC] Restore Keys fr File
- [ENC] Restore Keys fr Serv
- [ENC] Retry KEK Dynamic
- [ENC] Set Up Key Mng Serv
- [ENC] Use Keys for CEK/KEK
- KEK Acquisition Descriptions
- ENC Descriptions
- 6 Audit log examples of commands sent from hosts, computers using RAID Manager, or hosts using Business Continuity Manager
- Config Command (Open system)
- Add Copy Group
- Add Device Group
- Add Device Group(Nick Name)
- Add TP Pool
- Add External Group
- Add Host Group
- Add Journal(Ldev)
- Add Ldev
- Add Ldev(Thin Provisioning)
- Add Ldev(Snapshot)
- Add LUN
- Add Path
- Add RCU
- Add RCU Path
- Add Resource(Group)
- Add Resource/Delete Resource
- Add Snap Pool
- Add Snapshot
- Add PFC Group
- Add PFC WWN
- Add SSID
- Add WWN
- Check External Storage Group
- Check External Storage Path
- CTQM
- Delete Copy Group
- Delete Device Group
- Delete External Group
- Delete Host Group
- Delete Journal
- Delete Journal(Ldev)
- Delete Ldev
- Delete LUN
- Delete Path
- Delete Pool
- Delete Pool(Ldev)
- Delete RCU
- Delete RCU Path
- Delete Resource(Group)
- Delete Snapshot
- Delete PFC Group
- Delete PFC WWN
- Delete PFC WWN(Nick Name)
- Delete SSID
- Delete WWN
- Disconnect External Group
- Disconnect Path
- Extend Ldev
- Initialize Ldev(Format)
- Initialize Ldev(Shredding)
- Initialize Ldev(Stop Shredding)
- Map Resource(LDEV)
- Map Resource(Port)
- Modify CLPR
- Modify Device Group(Name)
- Modify External Group(ALUA Switch)
- Modify External Group(Cache Inflow)
- Modify External Group(Cache Mode)
- Modify External Group(Load Balance Mode)
- Modify External Group(MP Blade)
- Modify Host Group(Host Mode)
- Modify HostGroup(Host Mode Option)
- Modify Journal
- Modify Journal(MP Blade)
- Modify Ldev(Blocked)
- Modify Ldev(CLPR)
- Modify Ldev(Command Device)
- Modify Ldev(Discard Zero Page)
- Modify Ldev(MP Blade)
- Modify Ldev(Nick Name)
- Modify Ldev(Restore)
- Modify Ldev(SSID)
- Modify Ldev(Tier)
- Modify Pool Attribute
- Modify Pool(Restore)
- Modify Pool(Threshold)
- Modify Port
- Modify Port Attribute
- Modify RCU
- Modify Snapshot(Restore)
- Modify Snapshot(Resync)
- Modify Snapshot(Split)
- Modify PFC Group
- Modify PFC WWN
- Modify PFC WWN(NickName)
- Monitor Pool
- Paircreate
- Pairresync
- Pairsplit
- Pairsplit-S
- Reallocate Pool(Start)
- Reallocate Pool(Stop)
- Rename Pool
- Reset Command Status
- Reset Ldev Priority
- Reset WWN
- Set Ldev Priority
- Set WWN
- Stop Monitor Pool
- Unmap Resource(LDEV)
- Unmap Resource(Port)
- Config Command (Mainframe system)
- FC-SP
- User Auth
- Config Command (Open system)
- 7 Support and other resources
- A Audit log user operations
- B Audit log SVP operations
- C Audit log GUI reference
- Glossary
- Index

Prerequisites
• You must have Audit Log Administrator (View Only) or Audit Log Administrator (View & Modify)
role to download syslog files.
To download the syslog file from SVP:
1. Click Settings > Security > Edit Audit Log Settings. Select Syslog tab on the Edit Audit Log
Settings window.
2. Select Transfer Protocol. The output file format is different by the selected protocol.
3. Click Download Syslog. The Specify the Destination dialog box appears.
4. Enter the destination and the file name and click Save.
Related topics
• “Edit Audit Log Settings wizard” (page 314)
Automatically transferring audit log files to FTP servers
If you configure FTP server settings, the audit log will be automatically transferred to the FTP server
when the number of lines in the file reaches the threshold.
NOTE: Keep a list of the items such as the IP address you entered in the FTP tab on Edit Audit
Log Settings window. You may need to enter them again when an SVP is replaced.
Prerequisites
• You must have Audit Log Administrator (View & Modify) role to configure FTP server settings.
• Ensure that SVP is connected to the FTP server on a LAN.
To transfer the audit log file to the FTP server:
1. Click Settings > Security > Edit Audit log Settings. Select FTP tab on the Edit Audit Log Settings
window.
2. Perform the following if using a primary FTP server.
1. Click Enable the Primary Server.
2. Select IPv4 or IPv6 on IP Address setting and enter the IP address.
3. Enter the user name and the password you use to log in to the primary FTP server.
4. Enter the output folder to which the audit log file is sent with the relative path from the
home directory.
3. Perform the following if using a secondary FTP server.
1. Click Enable the Secondary Server.
2. Select IPv4 or IPv6 on IP Address setting and enter the IP address.
3. Enter the user name and the password you use to log in to the secondary FTP server.
4. Enter the output folder to which the audit log file is sent with the relative path from the
home directory.
4. Click Finish.
5. Confirm the settings from the setting confirmation window, and then enter the task name on
Task Name.
6. Click Apply. The task is registered. If you check the Go to tasks window for status check box,
the Task window is displayed.
Automatically transferring audit log files to FTP servers 27