
Quick Setup Guide - Windows 8

dual-monitor setup (or for three monitors), and proceed to the instructions for ATI
Eyefinity Catalyst™ setup.
1. Verify that the PC is set up according to the instructions in the setup view.
Do not power on the PC or monitor.
2. Connect the monitors to an available display connector on the back of the
PC. The monitor’s connection type must match the connector on the PC.
NOTE: The three-monitor setup requires that you separately purchase
an additional monitor and cable. The monitor should have a DVI, HDMI, or
VGA connector. A DVI-to-VGA adapter is required for monitors with a VGA
connector.
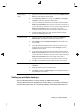
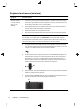
DVI
HDMI
DisplayPort
●
Connect the DisplayPort cable to the DisplayPort connector (required).
● Connect the DVI cable to the bottom DVI connector.
3. Connect power to each additional monitor.
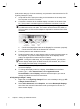
4. Press the power button on each display and then press the power button on
the computer. The power indicator light on each of the displays will be
amber; the lights will turn blue when the PC starts.
NOTE: During the initial setup, only one display is active; you may see
various display states (such as blank screens, blue screens, etc.) on the
other displays until the setup is completed.
5. When the setup is complete, you will see the extended desktop on all
connected displays.
6. To change the display mode for a display, select Start, from the Start
screen, type c, select Control Panel, select Appearance and
Personalization, select Display, and then select the option you want to
change and follow the onscreen instructions.
ATI Eyefinity Catalyst™ setup
1. Right-click on the Eyefinity Catalyst™ icon on the desktop to bring up ATI
Catalyst Control Center™.
2. Select CCC-Advanced, select Graphics, and select Desktop & Displays,
then follow the onscreen instructions to set up the layout for the two- or
three-monitor display.
8 Chapter 3 Setting up additional features