
Start Here Guide


Table Of Contents
- Table of Contents
- Setting Up Your Computer
- Putting Your Computer Together
- Connecting a Digital Camera (Photo or Video)
- Connecting Other Devices
- Storing Documentation and Recovery Discs
- Adjusting the Monitor
- Setting Up a Local Area Network
- Setting Up a Wired (Ethernet) Connection
- Integrated Wireless Devices
- Connecting the Wireless LAN Device
- Connecting a Modem
- Connecting Speakers or Microphone
- Using Speakers
- Sound Connector Types
- Connecting a Microphone
- Speaker Configurations
- Connecting 2/2.1 (Two Speakers and a Subwoofer) Audio Speakers
- Connecting 4.1 (Four Speakers and a Subwoofer) Audio Speakers
- Connecting 5.1 (Five Speakers and a Subwoofer) Audio Speakers
- Connecting 7.1 (Seven Speakers and a Subwoofer) Audio Speakers
- Connecting the Computer to a Home Audio System
- Connecting Digital Audio
- Connecting Speakers Using the Creative Sound Blaster X-Fi Sound Card
- Connecting the Television Signal and Video Cables
- Using TV Cables
- Audio and Video Cables
- Connecting the TV Signal Source
- Connecting the Remote Sensor
- Connecting the TV Signal Source When You Have an Existing Setup
- Using Your TV as a Monitor
- Using the Windows Media Center Setup for Optional Setup of Your TV Display
- Disabling the TV-out Option
- Disconnecting the TV
- Connecting to a Monitor or High-Definition TV
- Connecting to a Standard TV
- Getting Help
- Index
54 Start Here
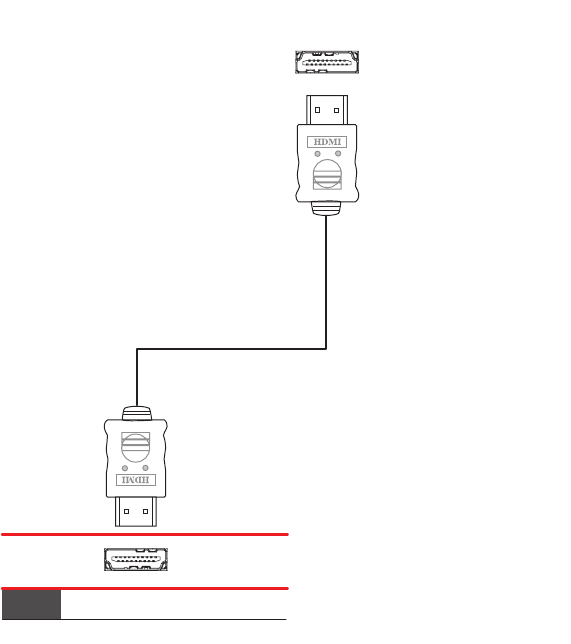
Connecting an HDMI device
This is the recommended connection for video and audio. The HDMI cable is sold
separately.
1 Connect the HDMI cable to the HDMI connector on the computer. (There are no
separate audio inputs for HDMI.)
2 Connect the cable to the HDMI device.
3 Turn on the HDMI device, and start play.
4 Plug in the computer.
5 Turn on the computer.
6 In the TV Option menu, define the HDMI Setup items.
HDMI
Output
HDMI
Connector on the Computer