
Upgrading and Servicing Guide


Upgrading and Servicing Guide 27
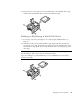
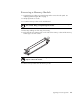
Installing an Add-in Card
1 Align the edge of the add-in card with the slot on the chassis and gently but firmly
press the card straight down into the add-in card slot. The whole connector should be
seated properly in the card slot.
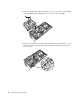
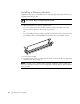
2 On the back of the PC, replace the bracket cover for the add-in card slots, and then
install the screw.
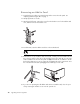
3 Set the chassis upright.
4 Complete the procedures to replace the side panel, and close the PC. See “Opening
and Closing the PC” on page 1.
NOTE: If the new card or device isn’t working, read through the card manufacturer’s
installation instructions and recheck all connections, including those to the card, power
supply, keyboard, and monitor.