
Getting Started (English UK Only)


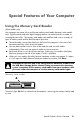


Table Of Contents
- Setting Up Your Computer
- Preparing to Use Your Computer
- Turning Off the Computer
- Restarting the Computer
- Connecting to the Internet
- Adjusting the Speaker Volume
- Selecting the Microphone
- Protecting Your Computer
- Configuring the Computer for Automatic Microsoft Software Updates
- Setting Up User Accounts
- Guidelines for Installing Software and Hardware Devices
- Transferring Files and Settings from an Old Computer to Your New Computer
- Special Features of Your Computer
- Getting More Information
- Troubleshooting and Maintenance
- Index
22 Getting Started (features vary by model)
To use the memory card reader:
1 Insert the media into the card slot until it stops.
The activity light (A) on the memory card reader lights, and the computer automatically
detects the media.
2 Select a program to access your files. You can copy files from or to the media.
Or
If the AutoPlay window does not open, click the Start button, click Computer, and
then double-click the Memory Card icon to display the files on the media. You can
copy files from or to the media.
3 When you are finished, right-click the drive icon, click Eject, check that the memory
card reader activity light is on or off, but not blinking, and then remove the media.
NOTE: You must insert media correctly. Note the direction of the notched corner on the
media. For more information, open the Help and Support Center or refer to the Support
Web site; see “Getting More Information” on page 25.
Also:
CompactFlash and Microdrive media are keyed and cannot be inserted incorrectly.
Insert the receptacle edge (holes) of this media into the slot.
Some memory cards, such as CF Ultra/III, are not compatible with the memory
card reader that came with your computer.
Do not use SM and xD media in the memory card reader at the same time. The
reader recognizes only the first one that is inserted.
CAUTION: Do not try to remove media when the activity light is blinking.
Doing so may cause loss of data.