
PDU MANAGEMENT MODULE INSTALLATION INSTRUCTIONS


Launching a terminal emulation
program
NOTE:
HyperTerminal is the remote communication
program provided with Microsoft® Windows® and is
used in this section as an example for setting up a
terminal emulation session. If you are using another
utility, the steps might be different.
1.
On the host computer, click
Start, and select
Programs>Accessories>Communications>
HyperTerminal.
The Connection Description window appears.
2.
Enter a description, select an icon for the connection,
and then click
OK. The Connect To window appears.
3.
Select the serial connector on
the host computer to which
the serial cable is attached, and click
OK. The COM
Properties window appears.
4.
Select the following para
meter values, and click
OK.
•
Bits per second—38400
NOTE:
When you operate the management module
in Serial Pass Through mode, set the Bits per second
option to 2400.
•
Data bits—8
•
Parity—None
•
Stop bits—1
•
Flow control—None
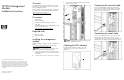
Configuring the management
module for remote access
1.
Be sure that you have connected the network cable to
the management module.
2.
Be sure that you have connected the serial cable to the
management module and the host computer with an
open terminal emulation session.
3.
Set the DIP switches to enable Serial Configuration
mode:
a.
Place DIP switch 1 in the on position.
b.
Place DIP switch 2 in the off position.
4.
Press the
Reset button on the front panel of the PDU.
5.
Press the
Reset button on the side of the management
module.
NOTE:
All components must be reset within the same
two-minute window.
The HP PDU Management Module Configuration Utility
appears on the terminal emulation session screen
running on the host computer.
Configuring the management module
network parameters
Use the HP PDU Management Module Configuration Utility to
configure the minimum settings required to access the
management module remotely using telnet or the web
interface. You can configure other settings using this utility in
conjunction with a terminal em
ulation program or a telnet
connection.
1.
On the main menu, enter
1 at the prompt to open the
Network Configuration submenu.
NOTE:
If your network is
configured with a BOOTP
server, the network settings are automatically
assigned. Verify and note the assigned values.
2.
Enter 1 at the prompt, and enter the IP address of the
management module.
3.
Enter 2 at the prompt, and enter the subnet mask of the
management module.
4.
Enter 3 at the prompt, and enter the default gateway of
the management module.
5.
Enter 0 at the prompt to return to the main menu.
6.
Enter 0 at the prompt to exit the configuration utility.
7.
Enter 2 at the prompt to save the settings and close the
configuration utility.
Placing the management
module in Normal mode
1.
Place DIP switch 1 in the off position.
2.
Press the
Reset button on the front panel of the PDU.
3.
Press the
Reset button on the side of the management
module.
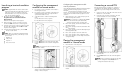
Connecting a second PDU
If the management module is installed on a single PDU, a
second PDU can be cabled to that PDU in a daisy-chain
configuration to provide a management link to the second
PDU.
1.
Connect one end of a serial cable to the serial connector
marked Port 1 on the first PDU.
2.
Connect the other end of the serial cable to the serial
connector marked Port 2 on the second PDU.
3.
Press the
Reset button on the front panel of each
connected PDU.
4.
Press the
Reset button on the side of the management
module.
NOTE:
If the second PDU is removed at a later date,
press the management module
Reset button to
configure the module for rediscovery.