HP Performance-Optimized Datacenter Maintenance and Service Guide Part Number 510057-001 May 2009 (First Edition)
© Copyright 2009 Hewlett-Packard Development Company, L.P. The information contained herein is subject to change without notice. The only warranties for HP products and services are set forth in the express warranty statements accompanying such products and services. Nothing herein should be construed as constituting an additional warranty. HP shall not be liable for technical or editorial errors or omissions contained herein. Intended audience This guide is for an experienced service technician.
Contents Customer self repair ...................................................................................................................... 4 Parts only warranty service ......................................................................................................................... 4 Customer self repair details ...................................................................................................................... 14 Illustrated parts catalog ..............................
Customer self repair HP products are designed with many Customer Self Repair (CSR) parts to minimize repair time and allow for greater flexibility in performing defective parts replacement. If during the diagnosis period HP (or HP service providers or service partners) identifies that the repair can be accomplished by the use of a CSR part, HP will ship that part directly to you for replacement. There are two categories of CSR parts: Mandatory—Parts for which customer self repair is mandatory.
Obligatoire - Pièces pour lesquelles la réparation par le client est obligatoire. Si vous demandez à HP de remplacer ces pièces, les coûts de déplacement et main d'œuvre du service vous seront facturés. Facultatif - Pièces pour lesquelles la réparation par le client est facultative. Ces pièces sont également conçues pour permettre au client d'effectuer lui-même la réparation.
NOTA: alcuni componenti HP non sono progettati per la riparazione da parte del cliente. Per rispettare la garanzia, HP richiede che queste parti siano sostituite da un centro di assistenza autorizzato. Tali parti sono identificate da un "No" nel Catalogo illustrato dei componenti. In base alla disponibilità e alla località geografica, le parti CSR vengono spedite con consegna entro il giorno lavorativo seguente.
anrufen und sich von einem Mitarbeiter per Telefon helfen lassen. Den Materialien, die mit einem CSRErsatzteil geliefert werden, können Sie entnehmen, ob das defekte Teil an HP zurückgeschickt werden muss. Wenn es erforderlich ist, das defekte Teil an HP zurückzuschicken, müssen Sie dies innerhalb eines vorgegebenen Zeitraums tun, in der Regel innerhalb von fünf (5) Geschäftstagen.
Centro de asistencia técnica de HP y recibirá ayuda telefónica por parte de un técnico. Con el envío de materiales para la sustitución de componentes CSR, HP especificará si los componentes defectuosos deberán devolverse a HP. En aquellos casos en los que sea necesario devolver algún componente a HP, deberá hacerlo en el periodo de tiempo especificado, normalmente cinco días laborables. Los componentes defectuosos deberán devolverse con toda la documentación relacionada y con el embalaje de envío.
periode, gewoonlijk vijf (5) werkdagen, retourneren aan HP. Het defecte onderdeel moet met de bijbehorende documentatie worden geretourneerd in het meegeleverde verpakkingsmateriaal. Als u het defecte onderdeel niet terugzendt, kan HP u voor het vervangende onderdeel kosten in rekening brengen. Bij reparatie door de klant betaalt HP alle verzendkosten voor het vervangende en geretourneerde onderdeel en kiest HP zelf welke koerier/transportonderneming hiervoor wordt gebruikt.
Serviço de garantia apenas para peças A garantia limitada da HP pode incluir um serviço de garantia apenas para peças. Segundo os termos do serviço de garantia apenas para peças, a HP fornece as peças de reposição sem cobrar nenhuma taxa. No caso desse serviço, a substituição de peças CSR é obrigatória. Se desejar que a HP substitua essas peças, serão cobradas as despesas de transporte e mão-de-obra do serviço.
Customer self repair 11
Customer self repair 12
Customer self repair 13
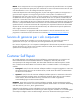
Customer self repair details Replacement parts are express-shipped. Most in-stock parts are shipped the very same day you contact HP. You may be required to send the defective part back to HP, unless otherwise instructed. Available for most HP products currently under warranty or contract. For information on the warranty service, refer to the HP website (http://h18004.www1.hp.com/products/servers/platforms/warranty/index.html).
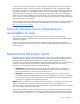
Illustrated parts catalog Replaceable spare parts Item Description Spare part number Customer self repair 1 SPS-POD, 225A, 3-phase, PDU, NA 536901-001 Optional2 1 SPS-POD, 225A, 3-phase, PDU, INTL 571711-001 Optional2 1 SPS-POD, 3-phase, C19, Optimized 536619-001 Master, NA Optional2 1 SPS-POD, 3-phase, C19, Optimized 536621-001 Master, INTL Optional2 Illustrated parts catalog 15
Item Description Spare part number Customer self repair 2 SPS–Busway, Drop Box, 225A, 3phase, NA 571709-001 Optional2 2 SPS-Busway, Drop Box, 225A, 3phase, INTL 571710-001 Optional2 2 SPS-Busway, Drop Box, 400A, 3phase 536900-001 Optional2 Mandatory—Parts for which customer self repair is mandatory. If you request HP to replace these parts, you will be charged for the travel and labor costs of this service. 2 Optional—Parts for which customer self repair is optional.
sustitución de estos componentes. Dichos componentes se identifican con la palabra “No” en el catálogo ilustrado de componentes. Mandatory: Verplicht—Onderdelen waarvoor Customer Self Repair verplicht is. Als u HP verzoekt deze onderdelen te vervangen, komen de reiskosten en het arbeidsloon voor uw rekening. 2 Optional: Optioneel—Onderdelen waarvoor reparatie door de klant optioneel is. Ook deze onderdelen zijn ontworpen voor reparatie door de klant.
Removal and replacement procedures Safety considerations The HP POD has been listed to the UL 69050 as an Information Technology Product and Classified according to the National Electric Code, NFPA-70, 2008. The HP POD is not suitable for long term personnel occupancy. The HP POD provides service access areas for periodic maintenance and service, only to be used by owner authorized personnel specifically trained in the maintenance and service of the HP POD IT components.
CAUTION: All customer supplied water fittings must be composed of carbon steel, stainless steel, or copper. Do not use cast iron, aluminum, or PVC fittings. CAUTION: During operation, avoid leaving the HP POD doors open, to maintain accurate environmental conditions inside the HP POD. Spare replacement tips The following tips might ease the removal and replacement of spare parts: Take note of the orientation and location of the parts as you remove them.
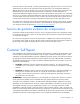
WARNING: Use caution when removing and replacing the busway drop box. The drop box weighs approximately 9 kg (20 lb). 5. Rotate the busway drop box 90 degrees so that it is parallel to the electrical busway, and then remove it from the electrical busway (3). Replacing the busway drop box WARNING: Use caution when removing and replacing the busway drop box. The drop box weighs approximately 9 kg (20 lb). 1.
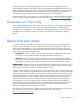
3. Secure the busway drop box to the retaining hardware bracket by using a wrench to insert and tighten a bolt. 4. Connect the PDUs to the busway drop box (1). 5. Turn the power back on (2) by closing both breakers on the busway drop box. PDU There are either 22 or 44 PDUs installed in the HP POD. The PDUs are installed to the rear of each rack and provide power for the rack components. You will need a driver for installation. Removing the PDU 1.
3. Disconnect the PDU from the busway drop box (2). NOTE: Be sure to note which device you disconnected from the PDU and where it was connected. 4. Disconnect all of the devices from the PDU strip. 5. Loosen the two thumb screws on the top and bottom of the PDU that secure the PDU to the rack frame (1).
6. Lift the PDU up and off of the rack frame (2). 7. Remove the top and bottom PDU brackets from the PDU. a. Record the location of each bracket. The top bracket is different than the bottom bracket. b. Use a driver to remove the screws securing the brackets to the PDU.
c. Remove the brackets from the PDU. Replacing the PDU 1. Install the top and bottom PDU brackets to the PDU. a. Install the top bracket to the top of the PDU and the bottom bracket to the bottom of the PDU.
b. Use a driver to insert and tighten the screws to secure each bracket to the PDU 2. Install the PDU to the rear of the rack frame, sliding it down until it locks into place (1).
3. Tighten the two thumb screws at the top and bottom of the PDU to secure the PDU to the rack frame (2). 4. Reconnect all devices to the PDU in the same location from which you disconnected them. 5. Connect the PDU to the busway drop box (1).
6. Turn the power back on (2) by closing the appropriate breaker on the busway drop box. 7. Turn on all of the rack components connected to the PDU.
Troubleshooting HP POD troubleshooting Issue Resolution The water is not flowing, or flowing too slowly. Verify that all applicable valves are open. Inspect the water lines for blockage, unblock, or replace them as necessary. The HP POD is overheating. If the fan is not functioning, check the integrity of the electrical connection to the fan. If the electrical connection seems OK, replace the fan. If the fan is functioning, check for a kink or blockage in the water line to the heat exchanger.
Maintenance Periodic maintenance Perform periodic inspections of the HP POD to ensure there is no sign of overheating. During periodic inspections, pay special attention to electrical connections and wiring. Periodic thermal scans of all electrical connections by a professional electrician can reduce issues caused by loose connections. Air filter maintenance Disposable air filters are located in the hot aisle, near the ceiling of the HP POD.
Component maintenance For all HP POD contractor-installed components and IT equipment maintenance, see the Operations and Maintenance Manual that shipped with your HP POD.
Specifications HP POD specifications Features Specifications Dimensions 12 m x 2.4m x 2.7m (40 ft x 8 ft x 9.
Input circuit breaker information Feature Electrical busway breakers House breakers Number of breakers 1 per busway 1 per panel (main) Main breaker size 225A 125A (main) Branch circuit breaker size N/A Up to 30 poles General characteristics 3-pole 1-pole or 2-pole 100% rated thermalmagnetic trip sized per panel schedule 25 kA interrupt capacity thermalmagnetic trip provide with shunt trip coil 14 kA interrupt capacity Fire alarm panel connections The electric
Feature Specification Tempered water package pressure drop 34,474 Pa (5 psi) max Water flow rate to the tempered water package 757 to 1,893 l/min (200 to 500 gal/min) based on a facility operating delta T range of 6°to 12°C (10º– 20ºF) Tempered water package flow rate to the HP POD 908.5 l/min (240 gal/min) Chilled water supply and return connections (2) 10.16 cm (4 inch) 150# flange Humidifier 3.
Environmental specifications Features Specifications Operating temperature -28.9ºC to 54.4ºC (-20ºF to 130ºF) Non-operating temperature* 2ºC to 54ºC (35ºF to 130ºF) Transit temperature** -30ºC to 60ºC (-22ºF to 140ºF), up to 72 hours Operating humidity 15% to 80% relative noncondensing 26ºC (79ºF) maximum wet bulb temperature 5 to 95% relative noncondensing 39ºC (102ºF) maximum wet bulb temperature Non-operating humidity* Operating altitude -76.
Acronyms and abbreviations BMS building management system EPO emergency power off PDU power distribution unit POD Performance-Optimized Datacenter Acronyms and abbreviations 35
Index A air and water heat exchanger maintenance 29 air filter replacement 29 B busway drop box 19 busway drop box, removing 19 busway drop box, replacing 20 C spare replacement tips 19 specifications 31 specifications, electrical 31 specifications, environmental 34 specifications, HP POD 31 specifications, rack 33 specifications, water 32 T tips, removal and replacement procedures 19 troubleshooting 28 component maintenance 30 E electrical busway maintenance 29 I illustrated parts catalog 15 M main