
HP Performance Optimized Datacenter 240e North America (Adiabatic) Maintenance and Service Guide


Removal and replacement procedures 26
DIN rail components
The HP POD 240e NA contains several types of electrical components that are attached using DIN rails. The
methods to remove and replace the DIN rail components differ depending on the type of components and the
manufacturer of the components.
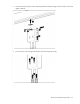
The methods for attaching components to DIN rails include the following:
• Mechanical sliding of the component onto the DIN rail, which requires the removal of the DIN rail
• Mechanical snapping of the component onto to the DIN rail with or without elastic deformation
• Mechanical release of the component from the DIN rail
WARNING: A licensed electrician must determine the electrical isolation of the power circuit
before the removal or replacement of any DIN rail components.
CAUTION: The continued operation of the HP POD 240e NA during replacement of DIN rail
components might affect the controls of the HP POD 240e NA, the electricity that is supplied to the
HP POD 240e NA, or the operating efficiency of the HP POD 240e NA.
CAUTION: The repair technician must be qualified and trained in the maintenance and service
of the HP POD 240e NA DIN rail components.
The removal and replacement procedures for every type of DIN rail component that might be installed in the
HP POD 240e NA are beyond the scope of this guide. One example, however, is provided in the Control
relay module (on page 26) section. These instructions assume that no power is being supplied to the
components during the removal and replacement procedure.
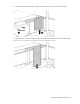
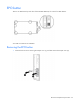
DIN rail components are located throughout the HP POD 240e NA.
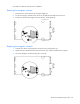
Control relay module
The HP POD 240e NA uses analog and digital control relays to communicate sensed parameters to the ECS
for overall POD control and reporting features.
You need a screwdriver for installation.
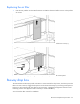
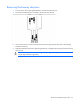
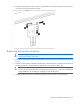
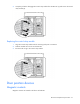
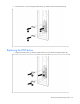
Removing the control relay module
1. Label the wired connections or take a picture to record which wires connect to the control relay module.
2. Using a screwdriver, release the installed wiring.