hp photosmart 120 series digital camera user's manual
Trademark and copyright information © Copyright 2002 Hewlett-Packard Company All rights are reserved. No part of this document may be photocopied, reproduced, or translated to another language without the prior written consent of Hewlett-Packard Company. The information contained in this document is subject to change without notice. Hewlett-Packard shall not be liable for errors contained herein or for consequential damages in connection with the furnishing, performance, or use of this material.
Table of Contents 1-Getting Started Camera Parts . . . . . . . . . . . . . . . . . . . . . . . . . . . . . . 8 Setup . . . . . . . . . . . . . . . . . . . . . . . . . . . . . . . . . . . 12 Attaching the wrist strap . . . . . . . . . . . . . . . . . . 12 Installing the batteries . . . . . . . . . . . . . . . . . . . . 12 Installing a memory card (optional) . . . . . . . . . . 13 Turning on power . . . . . . . . . . . . . . . . . . . . . . . 14 Choosing the language . . . . . . . . . . . . . . . . . . .
4-Troubleshooting and Support Problems and Solutions. . . . . . . . . . . . . . . . . . . . . . .39 Error Messages . . . . . . . . . . . . . . . . . . . . . . . . . . . .45 Error Messages on the Display . . . . . . . . . . . . . .45 Error Messages on the Computer . . . . . . . . . . . .47 Getting Assistance . . . . . . . . . . . . . . . . . . . . . . . . . .48 Finding help on the web. . . . . . . . . . . . . . . . . . .48 Contacting HP Customer Support . . . . . . . . . . . .48 Hardware Repair Services . .
1 Getting Started Congratulations on the purchase of your new HP photosmart 120 series digital camera. This easy-to-use digital camera takes high-quality photos, records video clips, and makes it easy for you to share your photos with family and friends. You can select images that you want to print by using the HP Photo Imaging software for Microsoft® Windows® and Macintosh. The images are ready to print as soon as you connect your camera to a computer.
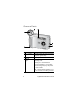
Camera Parts 2 3 1 4 5 6 # Name Description 1 Video button Records a video clip; press once to start and press again to stop 2 Shutter button Takes a picture 3 Video/Self-timer Solid red—indicates that the camera is light recording video Blinking red—indicates that the 10 second self-timer is in use; blinks with increasing frequency until picture or video is taken Off—indicates that the self-timer is not in use and video is not being recorded 8 hp photosmart 120 user’s manual
# Name Description 4 USB connector Allows you to connect the camera to a computer by using a USB cable 5 Power adapter connector Allows you to connect an optional HP AC power adapter to the camera to operate the camera without batteries 6 Battery door Allows access to the batteries 1-Getting Started 9
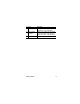
8 9 11 10 7 12 13 19 18 17 16 15 14 # Name Description 7 Optical viewfinder Allows you to frame the subject of the picture 8 Quality button Increases image quality from Good to Better to Best 9 2x/Self-timer button Zoom in on your subject or set the 10 second self-timer 10 Flash button Selects the Flash setting 11 ON/OFF button Turns the camera power on and off 12 Memory card door Allows access to insert or remove the memory card 13 Wrist strap mount 10 Wrist strap attachmen
# Name Description 14 Display button Switch from Preview mode to Playback mode 15 Tripod mount Allows tripod mounting 16 Arrow buttons Move to menu options and navigate through images 17 OK button Switch to Playback mode and select menu options 18 Display Provides menu information to operate the camera; you can also preview the picture before taking it and review it afterward 19 Viewfinder light Solid red—indicates that the camera is recording video Blinking red—indicates that the camera
Setup Attaching the wrist strap Attach the wrist strap as shown in the illustration. back of camera NOTE It is easiest to install the wrist strap by inserting it from the back of the camera. Installing the batteries 1 Open the Battery door on the bottom of the camera. 2 Insert the batteries (supplied) as indicated. NOTE 12 For more information about batteries, refer to Appendix A: Accessories and Battery Management.
Installing a memory card (optional) Your digital camera comes with 4 megabytes (MB) of internal memory so that you can store images and video in your camera. However, you can use an optional CF memory card to expand the camera’s memory so that you can store more images and video. After you unload images to your computer, you can reuse the card. NOTE The CF memory card may need to be purchased separately. 1 With the camera off, open the Memory card door.
Turning on power Slide the ON/OFF button to turn on the camera. When the camera is ready, the viewfinder light is off. NOTE If the viewfinder light is blinking, the camera is not ready to take a picture. If the light continues to blink, another problem may exist. For troubleshooting information, refer to Chapter 5. Choosing the language The first time you turn the camera on, the following screen appears and prompts you to choose a language.
Setting the date and time The camera has a real-time clock that records the date and time at which you take each picture. 1 The screen appears with the date format setting highlighted (M = Month, D = Day, and Y = Year). Press OK until you see the date format that you want, and then press the right Arrow button to highlight the date setting. 2 With the date setting highlighted, press OK. Use the buttons to change the value of the first field, and then press OK to move to the next field.
Installing the software Your digital camera software allows you to unload images from the camera, view or print them, or store them on your computer so that you can send them by using e-mail. Windows 1 Insert the HP Photo Imaging CD into the CD-ROM drive of your computer. The installation window automatically appears. NOTE If the installation window does not appear, click Start, and then click Run. Type X:\Setup.exe, where X is the letter of your CD-ROM drive.
Macintosh Before you can unload images from the camera to a Macintosh computer, you must change the connection setting on the camera. 1 Press the Display button to activate Playback mode. 2 Use the button to scroll to the Setup option, and then press OK. 3 Select USB Configuration from the Setup menu. 4 Select Disk Drive, and then press OK. 5 Insert the HP Photo Imaging CD into the CD-ROM drive of your computer. 6 Double-click the CD icon on the desktop.
hp photosmart 120 user’s manual
2 Taking Pictures Taking a picture You can take a picture almost any time the camera is on, no matter what is showing on the Display. To take a picture: z Frame your subject in the viewfinder, and then press the Shutter button. The camera adjusts exposure, and then takes the picture. If the viewfinder light is blinking, you must wait before taking a picture. This means that the camera is initializing, the flash is charging, or another situation may exist.
After a video clip is recorded, the Display shows the last frame of the clip for several seconds. NOTE To conserve battery power, the Display backlight automatically turns off after 60 seconds if you do not press a button. For more information, refer to Appendix A: Accessories and Battery Management. Recording video clips You can record a video clip for up to 30 seconds by using internal memory. To record a video clip: 1 Frame the subject that you want to record.
When recording a video clip, you can view the time remaining for recording on the Display. The camera automatically stops recording when the timer reaches zero. You can use the digital zoom feature to zoom in on your subject, although you cannot change the zoom setting while you are recording. You can also delay recording video clips for 10 seconds by setting the self-timer. Using the self-timer You can use the self-timer to take a picture of yourself or a posed group.
You can also use the Display to preview a picture. The Display shows a more accurate view of what your picture will look like. This is useful for close-up photos and for instances in which framing your subject is important. To take a picture by using the Display: z Frame your subject in the Display screen, and then press the Shutter button. Using digital zoom You can use digital zoom to make your subject appear closer.
Using the flash When the camera is on, the flash is automatically set to Auto Flash. If you change the flash setting, the camera will remain in that setting until you change it again or turn off the camera. By using the Flash button, you can move through the flash settings in the following order. Mode Description Auto Flash The camera measures light and flashes if necessary. Flash On The camera always flashes.
Mode Good Icon Description and capacity This is the most memory-efficient setting, ideal for taking pictures to send in e-mail or to post to the Internet. Internal memory—up to 54 images 8 MB CF memory card—up to 110 images Better This setting produces high-quality images and requires less memory than Best mode. This is recommended for printing pictures 6 by 13 cm (3 by 5 inches). This is the default quality setting.
3 Reviewing Your Images Playback mode After you have taken some pictures and they are stored in the camera, you can view them in Playback mode. You can also view your video clips, delete or magnify images, and more. To review your images: 1 Press the button to activate Playback mode. 2 You can scroll through your images by using the buttons. The following items appear momentarily on the Display: z The current image number followed by the total number of images, located in the upper-left corner.
z The CF z The Battery battery. NOTE icon (if the CF memory card is installed). icon that indicates the current state of the To preserve battery life, you can connect to an optional HP AC adapter while reviewing your images. HP supports only HP AC adapters and other accessories expressly approved by HP. For more information about accessories for your camera, refer to Appendix A: Accessories and Battery Management.
Playback menu You can use the Playback menu to print, delete, or magnify images. You can also view thumbnails of your images, or use the Setup option to change the settings on your camera. To view the Playback menu, press the OK button. Scroll through the menu options by using the buttons.
Printing your images You can select images to be printed later by using the Print option. To select the current image for printing, press OK. The image is selected for printing when you connect the camera to your computer. For more information about printing your images, refer to Chapter 4, Connecting and Printing. NOTE 28 If you are viewing a video clip, the option is inactive because you cannot print video clips.
Deleting your images You can delete the current image, or all images, by using the Delete option. You can scroll to the selection you want by using the buttons. Highlight your selection, and then press OK. By using the Delete menu, you can select: z This Image - Deletes the current image. z All Images or All Images on CF Card - Deletes all images from internal memory or the CF memory card (if installed).
Viewing thumbnail images You can view up to 9 thumbnail images at a time on the Display by using the Thumbnail option. You can scroll through your thumbnail images by using the buttons. To view an enlarged image, select it, and then press OK. To move to the next page of images, use the buttons.
Magnifying your images You can enlarge your images on the Display by using the Magnify option. Select an image that you want to magnify, and then press OK. A progress bar is visible on the Display as the image is magnified. In the Magnify menu, you can scroll up or down, right or left, magnify more, or exit by using the menu icons provided on the Display.
Using the Setup menu You can use the Setup menu to configure preferences on the camera. Move through the Setup menu by using the buttons, and then press OK to make your selection. Date & Time For information about setting the date and time, refer to Chapter 1, Getting Started. When replacing the batteries in the camera, you may need to reset the date and time. USB Configuration setting This setting determines how the camera appears when connected to a computer.
NOTE If you are connecting to a computer running Windows, you can use either setting. If you are connecting to a Macintosh computer, you must change this setting to Disk Drive. For more information, refer to Chapter 1, Getting Started. Move to CF Card This menu option allows you to move images from the camera’s internal memory to a CF memory card. This option appears only if you have a CF memory card installed, and internal memory contains at least one image.
If your CF memory card is running out of space, you can move only the maximum number of images possible from the camera’s internal memory. Language menu This menu option determines the language of the menus and the text on the Display. For information about how to select a language for your camera, refer to Chapter 1, Getting Started. Exit This menu option exits the Playback menu and returns to Playback mode.
4 Connecting and Printing You can share your pictures with family and friends by printing them, or storing them on your computer to send by e-mail. To transfer images to your computer, connect the camera to the computer by using the USB cable provided. Connecting to a computer Turn the camera on, and then connect the camera directly to a computer by using the USB cable as shown in the illustration. When the camera is connected to your computer, only the button operates.
When the camera is connected to your computer, the viewfinder light will be blinking red, and the Display is blank. The images in the camera are automatically unloaded to your computer. NOTE If you are using a Macintosh computer, you must change the USB Configuration setting to Disk Drive. For more information, refer to Chapter 1, Getting Started. To conserve battery power, use an optional HP AC adapter when unloading images to your computer. The HP AC adapter may be purchased separately.
To create a print order 1 2 3 4 Press the button to activate Playback mode. Press the button to begin reviewing your images. Scroll to the image that you want to print. Press OK to open the Playback menu. The option is selected by default. 5 Press OK again to add the image to the print order. Printing with a CF memory card If your images are stored on a CF memory card, you can insert the memory card directly into most HP photosmart printers.
hp photosmart 120 user’s manual
5 Troubleshooting and Support Problems and Solutions Problem Possible cause Solution The camera The batteries does not turn are not on. functioning correctly. Use only photo-quality AA lithium, alkaline, Ni-Cd, or Ni-MH batteries. Ensure the batteries are inserted correctly. The charge in the batteries can be low or completely drained. Try installing new or recharged batteries. The HP AC adapter is not functioning correctly.
Problem Possible cause Solution The camera does not respond when I press a button. The camera is Turn on the camera. off. The camera does not take a picture when I press the Shutter button. 40 The camera is The camera buttons other than connected to a the button do not computer. respond when the camera is connected to a computer. The batteries are drained. Replace the batteries. The camera has stopped operating. Remove and reinsert the batteries. Replace the batteries if necessary.
Problem Possible cause Solution I replace the camera batteries frequently. Extended Display use and excessive flash use consume a lot of battery power. Use an HP AC adapter to power the camera when you are using the Display for an extended period of time and when you are unloading several images to your computer. Use the flash only when needed. Do not use ordinary alkaline batteries.
Problem Possible cause Solution The wrong date and/or time is shown. The batteries Replace the batteries and reset are dead the date and time by using the or were camera menus. removed from the camera for more than a few minutes. A long delay occurs between the time I press the Shutter button and the camera takes a picture. The camera is still saving the last picture you took. Wait a few seconds for the camera to finish processing the image, and then press the Shutter button.
Problem Possible cause Solution My image is too dark. There was not Wait for natural lighting enough light. conditions to improve or add indirect lighting. My image is too bright. The flash was on, but the subject was too far away. Make sure your subject is within 3 meters (approximately 9 feet) of the camera when you take the picture. A light shone behind the subject. Use the Flash On setting to brighten the subject when there is a bright light such as the sun or a window behind your subject.
Problem Possible cause Solution When I connect the camera to my computer, the software says it cannot find the camera. The camera is Turn on the camera. turned off. When I connect the camera to a Macintosh computer, I do not get a Disk Drive icon on my desktop. The USB Change the USB Configuration Configuration setting to Disk Drive. setting is not set to Disk Drive. 44 The cable is Make sure that the cable is not connected firmly connected at both ends. correctly.
Error Messages You may receive error messages on the camera’s Display, or on your computer screen. Error Messages on the Display Message Possible cause Solution Unsupported card The card in the memory slot is not a memory card or is not a supported memory card. Check and ensure that the card is a CompactFlash (CF) memory card. Battery low Battery power is Either recharge or low and the replace the batteries. camera will shut down soon. No images in camera There are no Take some pictures.
Message Possible cause Solution Card has wrong The card is format formatted for a different device, such as an MP3 player. Replace the card with a properly formatted card or format the current card. Unable to format The card is corrupted. Replace the card. Cannot display image Use the HP Photo Imaging software to edit the images copied on the card. Also, do not remove batteries or the memory card when the camera is turned on.
Error Messages on the Computer Message Possible cause Solution Connection between the imaging device and computer failed The camera might be connected to a computer through a USB hub. Try connecting the camera directly to the computer, or disconnect other devices attached to the hub. Photos are still present on the camera You have not chosen to have the images removed from the camera when you unload them to a computer.
Getting Assistance Finding help on the web HP product support Visit www.hp.com/go/support to find information for your camera model. You can choose information about setting up and using your camera, unloading drivers, solving a problem, ordering, and information about the warranty. HP photosmart website Visit www.hp.com/photosmart for tips on using your camera more effectively and creatively as well as HP digital camera driver updates and software. HP accessibility website Visit www.hp.
Before you call Review troubleshooting tips. Have the following information ready before you call: z serial number (found on the bottom of your camera) z product name z date of purchase Hardware Repair Services If you think your camera needs repair, first call the Customer Support Center, which can help determine if service is required and direct you to a service site. Otherwise, contact the store where you purchased the product. Or, visit www.hp.com/cpso-support/guide/psd/repairhelp.
After 90 days Call (1) (208) 323-2551. A fee of $25.00 per call (U.S.) will be charged to your credit card. Charges begin only when you connect with a support technician. Upgraded warranty options You can select one of the following upgraded warranty options (available in the U.S. only): z Standard Next Day Exchange z Accidental Damage Protection with Next Day Exchange Upgrade your standard factory warranty to three years with the HP SupportPack.
Obtaining support worldwide Telephone support is free for 1 year in Asia and the South Pacific and 30 days in the Middle East and Africa. Please check for the details and conditions of phone support in your country or region by consulting website www.hp.com/cposupport/loc/regional.html. Alternatively, you can ask your dealer or call HP at the phone number indicated in this manual. For English support in Europe, contact +44 (0) 207 512 52 02.
Greece +30 10-60-73-603 Guatemala 1 800 999 5305 Hong Kong +852 3002 8555 Hungary +36 (0)1 382 1111 India 1 600 112267 or +91 11 682 6035 Indonesia +62 (21) 350 3408 Ireland +353 (0)1 662 5525 Israel +972 (0)9 830-4848 Italy +39 02 264 10350 Korea, Republic of +82 (2) 3270 0700 (Seoul) 0-80-999-0700 (outside Seoul) Malaysia 1-800-805-405 Mexico 52 58 9922 (Mexico City) 01-800-472-6684 (outside Mexico City) Middle East/Africa +44 (0) 207 512 52 02 Netherlands +31 (0)20 606 8751 New Zealand +64 (9) 356 66
Slovakia +421-2-68208080 South Africa 086 000 1030 (RSA) +27-11 258 9301 (outside RSA) Spain +34 902 321 123 Sweden +46 (0)8 619 2170 Switzerland +41 (0)848 80 11 11 Taiwan 0 800 01 0055 Thailand +66 (2) 661 4000 Turkey +90 216 579 71 71 Ukraine +7 (380-44) 490-3520 United Arab Emirates 971 4 883 8454 United Kingdom (UK) +44 (0) 207 512 52 02 Venezuela 0 800 4746 8368 Viet Nam +84 (0) 8 823 4530 5-Troubleshooting and Support 53
hp photosmart 120 user’s manual
Appendix A: Accessories and Battery Management Accessories You can purchase additional accessories for your camera from your local retailer or online at www.hpshopping.com. Some accessories for your HP photosmart 120 series digital camera include: z HP AC power adapter (C8875A) z Rechargeable batteries and battery charger z CompactFlash (CF) memory card z Camera bag z Portable tripod Managing Batteries Each time you remove the batteries from the camera, the clock stops.
The following battery levels are displayed during Preview and Playback mode and when the camera is connected to a computer. Level Icon Description Full Batteries have full life remaining Partially full Batteries have approximately 1/2 life remaining Empty Batteries are empty and need to be replaced The camera uses four AA batteries. Acceptable batteries include alkaline, photo-lithium, NiCd, and NiMH. For the best results with your camera, use photo-lithium or NiMH batteries.
Power Conservation To conserve battery power, the camera’s Display backlight shuts off automatically when there is no button activity for 60 seconds. If the camera is in Preview mode, it switches to Playback mode. To turn on the Display backlight and activate the camera, press any button. If no buttons are pressed for 5 minutes, the camera turns off (unless it is connected to a computer). You can also turn off the Display backlight manually by pressing and holding the button for at least 2 seconds.
hp photosmart 120 user’s manual
Appendix B: Reference Camera Specifications Feature Description Sensor 1.0 MP 1/2” Color depth 24 bits (8 bits x 3 colors) Resolution Good 0.25 MP (576 x 432) Better 1.0 MP (1152 x 864) Best 1.0 MP (1152 x 864) Memory type 4 MB flash memory CF memory card optional Memory capacity Lens 128 MB CF memory card (not included) Quality Good Better Best Images 2000 650 425 Target File Size 64 KB 195 KB 300 KB Fixed Focal Length: 9.9mm F-Number: 2.
Feature Description Shutter speed Flash Off: 1/1000 to 1/15 second Auto Flash/Flash On: 1/1000 to 1/30 second Video capture and playback Video clip capture Audio Buzzer only Flash settings Auto Flash, Flash On, Flash Off Focus Fixed focus range: 1.2 meters to infinity ISO (Sensitivity) 100 Metering Average White Balance Automatic Self-Timer 10 second delay Viewfinder Virtual image viewfinder Flash guide number Built-in flash with range up to 3 meters LCD 1.
Feature Description Standards PTP MSDC JPEG Motion JPEG AVI DPOF EXIF DCF Case Material Plastic Tripod mount Yes Dimensions External Body Dimensions: 111mm (L) x 44.
hp photosmart 120 user’s manual
Index Numerics 2x/self-timer button 10 A AA batteries 56 AC power adapter connector 9 not working correctly 39 purchase 55 accessibility assistance 48 accessories 55 accidental damage protection 50 alkaline batteries 41, 56 aperture 59 attach wrist strap 12 audio specifications 60 Auto flash 23 B backlight on display 20, 57 bag for camera 55 batteries conserve power 20, 36, 57 door 9 extend life 41, 56 install 12 low power indicator light 11 need replacement often 41 not working correctly 39 operate camera
effect of installing on internally stored images 33 format 29 full 45 image capacity per quality level 59 insert and remove 10 install 13 memory supported 20 move images to from internal memory to 33 not supported 45 print from 37 purchase 13, 55 remove 13 running out of room 34 saving images to computer 37 use to expand camera memory 13 video recording time available 20 view video time recording available 20 wrong format 46 charge indicator for flash 11 clock effect when batteries removed 15, 55 set on cam
create 36 description 36 print from 36 standards used 61 digital zoom specifications 59 use 10, 22 view effect on subjects 22 dimensions of camera 61 disk drive icon not present on Macintosh computer 44 set camera to be recognized as 32 display button 11 doors battery 9 CF memory card 10 download printer drivers and software 48 DPOF (Digital Print Order Format) files create 36 description 36 print from 36 standards used 61 driver updates 48 E empty batteries 56 enlarge images 31 error messages on computer 4
G Good quality setting description 24 memory capacity 59 resolution 59 H hardware repair services 49 help for problems 48 hotline for support 48 HP Customer Support 48 HP support hotline 48 HP SupportPack 50 I image quality effect of settings on memory 24 increase 10 recommendations 24 view settings 23 images blurry 42 cannot display 46 change quality level 23 delete from CF memory card 29, 37 delete from internal memory 19, 29 effect of connecting camera to computer 36 effect of installing CF memory card 3
image capacity per quality level 24 increase 20 move images to CF memory card 33 move images to computer 36 ISO (sensitivity) 60 J JPEG compression format for files 60 standards used 61 L language choose 14 menu 34 LCD specifications 60 LEDs.
mount camera on tripod 11 MSDC (Mass Storage Device Class) setting for camera 32, 61 N navigate through menus 11 NiCd batteries recharge 56 use 56 NiMH batteries recharge 56 use 56 no images in memory 26 O on/off button 10 optical viewfinder blinking light 11, 14, 19, 36 frame pictures 19 location 10 overview of product 7 P parts of the camera 8 phone support U.S.
purchase accessories 55 CF memory card 13, 55 Q quality button 10 quality levels for images change 23 description 23 image capacity for each 24 image capacity in CF memory card for each 59 increase or decrease 10 recommendations 24 resolution 59 view settings 23 R range flash 43 focus 60 recharge batteries 41, 56 record video clips 8, 20 recycling information 3 remove CF memory card 10, 13 See also delete repair services 49 resolution for quality levels 59 review pictures taken 19 thumbnail images 30 S save
T take pictures 19 video clips 20 technical support 48 telephone support U.S.
W warranty options 50 websites accessibility 48 disposal and recycling 3 HP photosmart 48 HP products 48 purchasing 55 sales and service offices 49 warranty upgrades 50 weight of camera 61 white balance 60 Windows operating systems install bonus software 16 install software 16 worldwide support 51 wrist strap attach 12 mount for attachment 10 Z zoom specifications 59 use 10, 22 view effect on subjects 22 Index 71
Index
www.hp.