HP Photosmart E427 Digital Camera User Guide � �� � �� �� � �� � � � � �� � � � �
Legal and notice information © Copyright 2006 Hewlett-Packard Development Company, L.P. The information contained herein is subject to change without notice. The only warranties for HP products and services are set forth in the express warranty statements accompanying such products and services. Nothing herein should be construed as constituting an additional warranty. HP shall not be liable for technical or editorial errors or omissions contained herein. Windows® is a U.S.
Contents 1 2 3 4 5 6 7 Getting started.......................................................................................................5 Camera top, back, and side....................................................................................5 Camera front, bottom, and side...............................................................................6 Before taking pictures..............................................................................................6 Install the batteries.
A Managing batteries..............................................................................................26 Top points about batteries.....................................................................................26 Extending battery life.............................................................................................26 Safety precautions for using batteries...................................................................26 Power indicators......................................
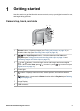
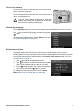
1 Getting started Use this section to get familiar with camera controls, set up your digital camera for use, and begin taking pictures. Camera top, back, and side 1 2 3 4 5 6 8 7 1 Shutter button—Captures images (see Taking still pictures on page 10) or records video clips (see Recording video clips on page 10). 2 Live View/Playback button—Switches between Live View and Playback (see Taking pictures and recording video clips on page 10 and Reviewing images and video clips on page 15).
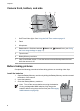
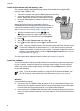
Chapter 1 Camera front, bottom, and side 1 2 3 7 4 6 5 1 Self-Timer/Video light—See Using the Self-Timer mode on page 13. 2 Flash. 3 Microphone. 4 Focus switch—Switches between Macro and the focus range settings on page 11). 5 Tripod mount. 6 Battery/Memory card door. 7 Lens cover/Power switch—Turns the camera on and off and protects the lens while the camera is off.
Turn on the camera To turn on the camera, slide the lens cover open until it clicks, uncovering the lens. To turn off the camera, slide the lens cover closed until it clicks, covering the lens. Caution When sliding the lens cover, keep your fingers clear of the lens. Fingerprints on the lens can impair the quality of the picture. Choose the language The Language setting you choose also determines the default date and time format. Use .
Chapter 1 Install and format an optional memory card This camera supports standard and high speed, HP-branded Secure Digital (SD) memory cards, 16MB to 1GB. 1. 2. 3. Turn off the camera and open the Battery/Memory card door. Insert the optional memory card in the small slot as shown. Make sure the memory card snaps into place. Close the Battery/Memory card door and turn on the camera. Always format new memory cards before first use.
1. 2. 3. Close all programs and temporarily disable any virus protection software. Insert the HP Photosmart Software CD into the CD drive and follow the on-screen instructions. If the installation screen does not appear, click Start, click Run, type D:\Setup.exe, where D is the letter of your CD drive, then click OK. When the software has finished installing, re-enable virus protection software.
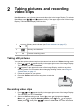
2 Taking pictures and recording video clips Live View allows you to frame pictures and video clips in the Image Display. To activate until appears briefly in the upper right corner of the Image Live View, press Display. The Live View display looks like this: 1 Battery level indicator (see Power indicators on page 27). 2 Memory card indicator. 3 12 Pictures remaining count. Taking still pictures You can take a picture almost any time the camera is on and not in Video shooting mode. 1. 2. 3. 4.
3. 4. 5. about selecting the Video shooting mode, see Using the Capture Menu on page 12. Frame the subject. Press and release the Shutter button. To stop recording video, press and release the Shutter button again. Instant Review After you have taken a still image or recorded a video clip, the camera displays it briefly in Instant Review. If you want to delete the image or video clip, press , select This .
Chapter 2 Using the Capture Menu The Capture Menu allows you to adjust camera settings that affect the characteristics of the images and video clips you capture. 1. 2. 3. 4. While in Live View or Playback, press , then use to highlight . Use to highlight a menu option, then press to display the menu option’s sub-menu. Use to highlight a setting, then press . Press to exit the Capture Menu.
(continued) ● ● 2MP—For printing images up to 13 x 18 cm (5 by 7 in). VGA—For sending images via e-mail or posting them to the Internet. The Image Quality setting remains in effect until you change it, even if you turn off the camera. Date & Time Imprint—Imprints date in lower left corner of image. ● ● ● Off (Default)—No date or time imprinted on the image. Date Only—Date permanently imprinted. Date & Time—Date and time permanently imprinted.
Chapter 2 Note To add audio to images taken with the Self-Timer setting, see Recording audio on page 17. The Self-Timer setting resets to the default Auto shooting mode after the picture is taken. Flash Setting—Red-Eye The red-eye phenomenon is caused when light from the flash reflects off the subjects' eyes, which can make human eyes appear red in the captured image.
3 Reviewing images and video clips You can review and delete images and video clips in Playback as described here. Using Playback 1. 2. Press until appears in the upper right corner of the Image Display. Use to scroll through your images and video clips (video clips play automatically). to stop the clip; press again to go to the When viewing video clips, press Playback Menu. To switch to Live View, press . 3.
Chapter 3 Deleting images To delete a displayed image during Playback: 1. 2. Press . Use to select an option, then press . – Cancel—Returns to Playback without deleting the displayed image. – This Image—Deletes the image or video clip. – All Images (in Memory/on Card)—Deletes all stored images and video clips. – Format (Memory/Card)—Deletes all stored files, then formats the internal memory or memory card. Using the Playback Menu 1. 2. 3. 4. While in Playback, press . Use to highlight an option.
Magnifying images This feature is for viewing purposes only; it does not permanently alter the image. 1. 2. 3. 4. From the Playback Menu, select Magnify. The currently displayed image is magnified 2x. Use and to pan around the magnified image. Press to increase magnification up to 4x. Press again to return to Playback. Selecting images for printing To select an image for printing: 1. 2. 3. 4. 5. While in Playback, use to display an image you want to mark for printing.
4 Transferring and printing images You can transfer images and video clips with or without the HP Photosmart Software that came with your camera. However, the HP Photosmart Software has several features for transferring and managing your images and also guides you through the transfer process. Transferring images with HP Photosmart Software If you have installed the HP Photosmart Software (see Install the software on page 8), use this method to transfer images and video clips to your computer. 1. 2. 3.
Note On Macintosh computers, if you set the camera to Disk Drive and neither Image Capture nor iPhoto starts automatically, look on the desktop for a disk drive icon with the label HP_E427 and copy the images manually. For more information about how to copy files, visit Mac help. Using a memory card reader You can put your camera’s optional memory card into a (separately purchased) memory card reader.
5 Using the Setup Menu The Setup Menu allows you to set preferences for the camera’s behavior. 1. 2. 3. 4. While in Live View or Playback, press , then use to highlight . Use to highlight a menu option, then press to display the menu option’s sub-menu. Use to highlight a setting, then press . To exit the Setup Menu, press . Settings you specify remain until you change them. Display Brightness—Adjusts the brightness of the Image Display. ● ● ● Low—For extending battery life.
6 Troubleshooting Use this section to find information on: ● ● Resetting the camera (see Resetting the camera on page 21) Possible problems and solutions (see Problems and solutions on page 21) Resetting the camera If your camera does not respond when you press buttons, reset the camera. 1. 2. 3. 4. Turn off the camera. Remove the memory card and batteries for at least 5 seconds. Reinsert the batteries and close the Battery/Memory card door.
Chapter 6 The camera does not respond when I press a button. ● Turn on the camera. ● Most of the camera buttons do not respond when the camera is connected to a computer. ● Replace or recharge the batteries. ● Reset the camera (see Resetting the camera on page 21). ● Check to see if the memory card is defective. If so, replace the memory card. ● Format the internal memory and/or the memory card (see Install and format an optional memory card on page 8).
My image is grainy. ● Use a lower ISO Speed setting (see ISO Speed under Using the Capture Menu on page 12). ● Add indirect lighting, use the flash (see Flash Setting under Using the Capture Menu on page 12), or wait for natural lighting conditions to improve. ● You may have zoomed in too far using digital zoom (see Digital zoom on page 11). ● If the camera is warm, the effect will diminish as the camera cools. For best image quality, avoid storing the camera in very hot locations.
Chapter 6 I cannot transfer images from the camera to my computer. ● Either install the HP Photosmart Software (see Install the software on page 8), or see Transferring images without HP Photosmart Software on page 18. ● Set your camera to act as a Disk Drive (see Connecting to the computer on page 18). I get an error message when transferring images to my computer.
7 Product support Use this section to find support information for your digital camera, including links to helpful websites and an overview of the support process. Helpful websites Camera tips, product registration, newsletter subscriptions, driver and software updates, purchase HP supplies and accessories www.hp.com Customers with disabilities www.hp.com/hpinfo/community/accessibility (English only) HP Total Care, driver and software updates, support information www.hp.com/support www.hp.
A Managing batteries Your camera uses two AA batteries, either Alkaline, Photo Lithium, or rechargeable Nickel Metal Hydride (NiMH). Alkaline batteries provide far less battery life than either Photo Lithium or NiMH batteries. Top points about batteries ● ● ● ● ● Fully charge NiMH batteries before using them for the first time. The first several times you recharge NiMH batteries, they may not provide the number of shots per charge that you expect.
Power indicators When the batteries are low, one of the following icons appears in the Image Display. If no battery icon appears in Live View or Playback, the batteries have sufficient power to function normally. Icon Description Battery level is low. Camera will soon power down. Battery is depleted. Camera will power down. Blinking Note If the camera is without batteries for a prolonged period, the clock may be reset and you may be prompted to update it the next time you power on the camera.
Appendix A (continued) Type of Use Alkaline Photo Lithium NiMH Heavy use of flash, frequent pictures Poor Good Good Heavy use of video Poor Good Good Heavy use of Live View Poor Good Good Overall battery life Poor Good Fair Low temperature/winter use Poor Good Fair Infrequent use Fair Good Fair Want to recharge battery No No Good Recharging NiMH batteries You can recharge optional NiMH batteries with an optional HP quick recharger.
B Specifications Resolution Still pictures: ● ● 6.0MP (2848 by 2136) effective pixel count 6.4MP (2934 by 2171) total pixel count Video clips (QVGA): 320 by 240 total pixel count, 30 frames/sec Sensor Diagonal 7.26 mm (1/2.5-inch, 4:3 format) CCD Color depth 30 bit (10 bits by 3 colors). 30 bit images are transformed into an optimized 24 bit image and stored in the JPEG format.
Appendix B (continued) ● ● ● EXIF 2.2 DCF 1.0 DPS External body dimensions Measurements with camera off and lens retracted (width, depth, height): Weight 105 grams (3.7 ounces) without batteries Power Typical power usage: 2.5 Watts (with Image Display on). 5 Watts peak power usage. ● ● 95.6 mm (W) by 24.2 mm (D) by 55.2 mm (H) 3.76 in (W) by .95 in (D) by 2.17 in (H) Power sources include two AA non-rechargeable Alkaline or Photo Lithium batteries or two AA rechargeable NiMH batteries.
Index A Action mode 12 arrow buttons 5 assistance 25 audio clips 17 Auto mode 12 B batteries conserving 26 install 6 performance 27 shots per 27 top points about use 26 battery door 6 blinking lights on camera 5 C camera dimensions 30 parts 5, 6 specifications 29 turn on/off 7 weight 30 Camera Sounds 20 Capture Menu 12 color depth 29 compression format 29 computer, connect to 18 D Date & Time 7, 20 Date & Time Imprint 13 Delete button 5 deleting images 16 digital zoom 11 dimensions 30 direct print 19 Displa
Setup Menu 20 Shutter button 5 shutter speed 29 software install 8 solving problems 21 sounds of camera 20 space remaining in memory 10 specifications 29 storage 29 Sunset mode 12 support process 25 T Thumbnails 16 Time & Date 7, 20 transfer images 18 troubleshooting 21 turn on/off power 7 U USB configuration 18, 20 USB connector 5 V video clips 10 viewing thumbnails 16 W weight 30 White Balance Z zoom 11 32 13, 14