HP Photosmart M527 Digital Camera English
English Legal and notice information © Copyright 2006 Hewlett-Packard Development Company, L.P. The information contained herein is subject to change without notice. The only warranties for HP products and services are set forth in the express warranty statements accompanying such products and services. Nothing herein should be construed as constituting an additional warranty. HP shall not be liable for technical or editorial errors or omissions contained herein. Windows® is a U.S.
Contents 2 3 4 5 6 Getting started.....................................................4 Accessing the electronic User Guide.....................5 Camera top and back ...........................................6 Camera front, side, and bottom.............................8 Camera dock insert...............................................8 Setting up your camera.......................................9 Install the batteries................................................9 Turn on the camera..............
English 1 Getting started This printed Quick Start Guide provides the information you need to get started using the essential features of your camera. For detailed information about camera features, see the electronic User Guide.
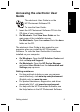
Accessing the electronic User Guide English The electronic User Guide is on the HP Photosmart Software CD. To view the User Guide: 1. Insert the HP Photosmart Software CD into the CD drive of your computer. 2. On Windows: Click View User Guide on the main page of the installation screen. On Macintosh: Open the readme file in the docs folder on the CD. The electronic User Guide is also copied to your computer when you install the HP Photosmart Software.
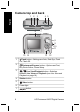
Camera top and back 3 4 5 English 1 2 6 7 8 9 10 11 15 14 13 12 1 Flash button—Settings are Auto, Red-Eye, Flash On, Flash Off. 2 Photosmart Express button—Options are Print, Buy Prints Online, Share Setup. 3 Live View/Playback button—Switches between Live View and Playback (see Live View and Playback on page 19). 4 Shutter button. 5 6 7 6 Video button. Power light. button.
8 Zoom lever (Digital and Optical)—In Live View, press to zoom in or press to zoom out. In Playback, to 9 Wrist strap mount. 10 Mode button—Press to access the Shooting Mode menu while in Live View. Options are Auto Mode, Self-Timer, Fast Shot, Landscape, Portrait, Action, Night Portrait, Beach and Snow, Sunset, Burst, Macro. 11 and images. 12 button—Displays camera menus, selects options, and confirms actions. 13 Delete button—Accesses the Delete function while in Playback. 14 Image Display.
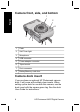
Camera front, side, and bottom English 1 2 3 8 7 6 5 1 Flash. 2 Self-Timer light. 3 Microphone. 4 USB connector. 5 Power adapter connector. 6 Tripod mount. 7 Dock connector. 8 Battery/Memory card door. 4 Camera dock insert If you purchase an optional HP Photosmart camera dock, it will come with multiple clear inserts. When setting up the dock for use with this camera, use the dock insert with the square green tag. See the dock User Guide for instructions.
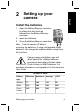
2 English Setting up your camera Install the batteries 1. Open the Battery/Memory card door by sliding the door latch as indicated on the Battery/Memory card door. 2. Insert the batteries. 3. Close the Battery/Memory card door. Note Turn the camera off before removing the batteries. If using rechargeable NiMH batteries, fully charge the batteries before using them the first time. Camera usage and battery type will affect battery life.
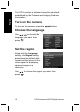
English The CIPA number is obtained using the standards established by the Camera and Imaging Products Association. Turn on the camera To turn on the camera, press the button. Choose the language Use to choose the language you want, then . press Set the region Along with the Language setting, the Region setting determines the default date format and the format of the video signal for displaying camera images on a television. Use press 10 to choose the region you want, then .
Set the date and time English 1. Use to adjust the highlighted value. 2. Use to move to the other selections and repeat Step 1 until the date and time are set correctly. 3. Press when the date, time, and format again to settings are correct, then press confirm. Install and format an optional memory card 1. Turn off the camera and open the Battery/ Memory card door. 2. Insert the optional memory card in the smaller slot as shown. Make sure the memory card snaps into place. 3.
English 3. Use to select Format Card from the Delete sub-menu, then press . 4. Use to select Yes, then press to format the card. Once you install a memory card, all new images and video clips are stored on the card, rather than in internal memory. To use internal memory and view images stored there, remove the memory card.
English 2. Insert the HP Photosmart Software CD into the CD drive and follow the on-screen instructions. If the installation window does not appear, click Start, click Run, type D:\Setup.exe, where D is the letter of your CD drive, then click OK. 3. When the software has finished installing, reenable virus protection software. Macintosh 1. Insert the HP Photosmart Software CD into the CD drive. 2. Double-click the CD icon on the computer desktop. 3.
English 3 Taking pictures and recording video clips Live View allows you to frame pictures and video clips in the Image Display. Take a still picture 1. Press until appears briefly in the upper right corner of the Image Display. This indicates you are in Live View. 2. Frame the subject for your picture. 3. Press the Shutter button halfway down to measure and lock the focus and exposure. The focus brackets in the Image Display turn solid green when focus is locked. 4.
Record a video clip Taking pictures and recording video clips English 1. Press until appears briefly in the upper right corner of the Image Display. This indicates you are in Live View. 2. Frame the subject. 3. Press and release the Video button. 4. To stop recording video, press and release the Video button again.
English 4 Reviewing and deleting images and video clips Review images and video clips You can review and work with images and video clips in Playback. 1. Press until appears briefly in the upper right corner of the Image Display. This indicates you are in Playback. 2. Use to scroll through your images and video clips (video clips play automatically). Delete an image You can delete individual images during Playback: 1. Press until appears briefly in the upper right corner of the Image Display.
5 English Transferring and printing images Transfer images If you have installed the HP Photosmart Software, use this method to transfer images and video clips to your computer. If you have not installed the HP Photosmart Software, see the electronic User Guide for an alternate method. Tip You can also perform this task using an optional HP Photosmart camera dock (see the dock User Guide). 1. Connect the camera and computer using the USB cable that came with your camera. 2.
English Print images from the camera You can connect the camera to any PictBridge-certified printer to print still images. 1. Check that the printer is turned on, there is paper in the printer, and there are no printer error messages. 2. Connect the camera and printer using the USB cable that came with your camera, then turn on the camera. 3. When the camera is connected to the printer, the Print Setup Menu displays on the camera.
6 Use this chapter as a quick reference to camera features. To learn more about these camera features, refer to the electronic User Guide. Live View and Playback ● Live View allows you to frame pictures and video clips in the Image Display. To activate Live View, press until appears briefly in the upper right corner of the Image Display. ● Playback allows you review and work with images and video clips. To activate Playback, press until appears briefly in the upper right corner of the Image Display.
English Menus and options are: Menu Options Capture allows you to adjust camera settings that affect the characteristics of future images and video clips you capture with your camera. ● ● ● ● ● ● Shooting Modes (Auto Mode, Self-Timer, Fast Shot, Landscape, Portrait, Action, Night Portrait, Beach and Snow, Sunset, Burst, Macro). Image Quality Date & Time Imprint Exposure Compensation White Balance ISO Speed Design Gallery allows you to enhance the images you have captured.
Menu Options ● ● ● ● ● ● Sharing Images Printing Images Recording Audio Clips Recording Video Clips Reviewing Images and Videos Deleting Images Transferring Images Managing Batteries Getting Assistance Camera Shortcuts About... English ● ● ● ● ● When you press from either Live View or Playback, you see the Photosmart Express menu. Menu Options Photosmart Express allows you to share your photos with friends and relatives.
English 22 HP Photosmart M527 Digital Camera
Appareil photo numérique HP Photosmart M527 Français
Informations légales Français © Copyright 2006 Hewlett-Packard Development Company, L.P. Les informations contenues dans le présent document sont susceptibles d'être modifiées sans notification préalable. Les garanties applicables aux produits et services HP sont décrites dans les documents de garantie accompagnant ces produits et services. Aucun élément de ce document ne saurait être considéré comme constituant une garantie supplémentaire.
Sommaire 1 2 4 5 6 3 Français 3 Mise en route.......................................................4 Consultation du Guide de l'utilisateur électronique...........................................................5 Dessus et arrière de l'appareil photo.....................7 Avant, côté et dessous de l'appareil photo............9 Kit d'adaptation de la station d'accueil à l'appareil photo......................................................9 Installation de l'appareil photo.........................
1 Mise en route Français Ce Guide de démarrage rapide imprimé contient toutes les informations dont vous avez besoin pour être prêt à utiliser les principales fonctions de votre appareil photo. Pour plus d'informations sur les fonctions de cet appareil, reportez-vous au Guide de l'utilisateur électronique.
● Des informations sur les piles, y compris : – ● ● Consultation du Guide de l'utilisateur électronique Le Guide de l'utilisateur électronique est disponible sur le CD du logiciel HP Photosmart. Pour afficher le Guide de l'utilisateur : 1. Insérez le CD du logiciel HP Photosmart dans le lecteur CD de votre ordinateur. 2. Windows : cliquez sur Consulter le Guide de l'utilisateur sur la page principale de l'écran d'installation. Macintosh : ouvrez le fichier readme contenu dans le dossier docs du CD.
Le Guide de l'utilisateur électronique est également copié sur votre ordinateur lors de l'installation du logiciel HP Photosmart. Pour le consulter après son installation sur l'ordinateur : ● Français ● Windows : ouvrez le Centre de solutions HP et cliquez sur Aide et support. Macintosh : ouvrez le Gestionnaire de périphériques HP et sélectionnez Guide de l'utilisateur dans le menu contextuel Informations et réglage.
Dessus et arrière de l'appareil photo 1 2 3 6 4 5 7 Français 8 9 10 11 15 14 13 12 1 Bouton Flash : les réglages possibles sont Flash auto, Anti-yeux rouges, Flash activé et Flash désactivé. 2 Bouton Photosmart Express : les options possibles sont Imprimer, Commander des tirages en ligne et Config Partage. 3 Bouton Prévisualisation/Lecture : bascule entre les modes Prévisualisation et Lecture (reportezvous à la section Prévisualisation et Lecture, page 22). 4 Bouton Déclencheur.
8 Bouton Zoom (numérique et optique) : en mode Prévisualisation, appuyez respectivement sur ou Français pour faire un zoom avant ou un zoom arrière. En mode Lecture, appuyez sur le bouton pour agrandir l'image sélectionnée, ou sur le bouton des vues miniatures de vos images. pour afficher 9 Attache-sangle. 10 Bouton Mode : appuyez sur la touche pour accéder au menu Mode de prise de vue à partir du mode Prévisualisation.
Avant, côté et dessous de l'appareil photo 1 2 3 7 Français 8 6 5 4 1 Flash. 2 Voyant du retardateur. 3 Micro. 4 Connecteur USB. 5 Connecteur pour adaptateur secteur. 6 Filetage pour trépied. 7 Connecteur pour station d'accueil. 8 Volet du compartiment des piles/de la carte mémoire.
Kit d'adaptation de la station d'accueil à l'appareil photo Français Toute station d'accueil pour appareil photo HP Photosmart achetée en option est fournie avec plusieurs kits d'adaptation. Pour installer la station d'accueil sur cet appareil photo, utilisez le kit d'adaptation comportant l'étiquette verte carrée. Reportez-vous au Guide de l'utilisateur de la station d'accueil pour obtenir des instructions.
2 Installation de l'appareil photo Installation des piles Français 1. Ouvrez le volet du compartiment des piles/de la carte mémoire en faisant glisser le loquet correspondant, comme indiqué sur le volet. 2. Insérez les piles. 3. Refermez le volet du compartiment des piles/de la carte mémoire. Remarque Mettez l'appareil photo hors tension avant d'enlever les piles. Si vous utilisez des piles rechargeables NiMH, chargez-les complètement avant de les utiliser pour la première fois.
NiMH 215 380 290 205 Photo lithium 365 600 485 423 Les normes établies par la Camera and Imaging Products Association (CIPA) permettent de déterminer le numéro CIPA. Français Mise sous tension de l'appareil photo Pour mettre l'appareil photo sous tension, appuyez sur . le bouton Sélection de la langue Utilisez les touches et pour sélectionner la langue, puis appuyez sur le bouton .
Utilisez les touches pour sélectionner la région, puis appuyez sur le bouton . Réglage de la date et de l'heure Français 1. Utilisez les touches pour régler la valeur sélectionnée. 2. Utilisez les touches pour passer aux autres sélections et répétez l'étape 1 jusqu'à ce que la date et l'heure soient correctes. 3. Appuyez sur le bouton une fois que la date, l'heure et le format sont corrects, puis à nouveau pour valider l'opération. sur le bouton Installation et formatage d'une carte mémoire en option 1.
Français Formatez toujours les cartes mémoire avant leur première utilisation. 1. Après avoir mis l'appareil photo sous tension, jusqu'à ce que le appuyez sur le bouton bouton apparaisse dans le coin supérieur droit de l'écran. 2. Appuyez sur le bouton . 3. Utilisez les touches pour sélectionner l'option Formater la carte du sous-menu Supprimer, puis appuyez sur le bouton . 4. Utilisez les touches pour sélectionner Oui, puis appuyez sur le bouton pour formater la carte.
Windows Si votre ordinateur Windows ne répond pas aux critères de configuration requis, comme indiqué sur l'emballage de votre appareil photo, le programme installe HP Photosmart Essential au lieu de la version complète HP Photosmart Premier. Macintosh 1. Insérez le CD du logiciel HP Photosmart dans votre lecteur CD. 2. Double-cliquez sur l'icône du CD située sur le bureau. 3. Double-cliquez sur l'icône du programme d'installation et suivez les instructions qui s'affichent à l'écran.
3 Prise de photos et enregistrement de clips vidéo Le mode Prévisualisation permet de cadrer vos photos et vos clips vidéo à l'écran. Français Prise de photos 1. Appuyez sur le bouton jusqu'à ce que l'icône apparaisse brièvement dans le coin supérieur droit de l'écran. Cela indique que vous êtes en mode Prévisualisation. 2. Cadrez le sujet de votre photo. 3. Appuyez sur le bouton Déclencheur jusqu'à micourse pour effectuer et verrouiller la mise au point et l'exposition.
Enregistrement de clips vidéo Prise de photos et enregistrement de clips vidéo 17 Français 1. Appuyez sur le bouton jusqu'à ce que l'icône apparaisse brièvement dans le coin supérieur droit de l'écran. Cela indique que vous êtes en mode Prévisualisation. 2. Cadrez le sujet. 3. Appuyez sur le bouton Vidéo , puis relâchez-le. 4. Pour arrêter l'enregistrement vidéo, appuyez , puis une nouvelle fois sur le bouton Vidéo relâchez-le.
4 Visualisation et suppression d'images et de clips vidéo Français Visualisation d'images et de clips vidéo Vous pouvez revoir et travailler sur vos images et clips vidéo en mode Lecture. 1. Appuyez sur le bouton jusqu'à ce que apparaisse brièvement dans le coin l'icône supérieur droit de l'écran. Cela indique que vous êtes en mode Lecture. 2. Utilisez les touches pour parcourir vos photos et clips vidéo (ceux-ci étant lus automatiquement).
Suppression d'une image Vous pouvez supprimer des images données en mode Lecture : Visualisation et suppression d'images et de clips vidéo 19 Français 1. Appuyez sur le bouton jusqu'à ce que apparaisse brièvement dans le coin l'icône supérieur droit de l'écran. Cela indique que vous êtes en mode Lecture. 2. Utilisez les touches pour sélectionner une image ou un clip vidéo. 3. Appuyez sur le bouton . 4. Utilisez les touches pour sélectionner l'option Cette image du sous-menu Supprimer, puis .
5 Transfert et impression d'images Français Transfert d'images Si vous avez installé le logiciel HP Photosmart, utilisez-le pour transférer vos images et vos clips vidéo vers votre ordinateur. Si ce n'est pas le cas, reportez-vous au Guide de l'utilisateur électronique pour choisir une autre méthode. Conseil Vous pouvez également exécuter cette opération en utilisant une station d'accueil pour appareil photo HP Photosmart en option (reportezvous au Guide de l'utilisateur de la station d'accueil). 1.
Impression d'images à partir de l'appareil photo Vous pouvez connecter l'appareil photo à une imprimante compatible PictBridge pour imprimer des photos. Transfert et impression d'images 21 Français 1. Vérifiez que l'imprimante est sous tension, qu'elle contient du papier et qu'aucun message d'erreur ne s'affiche. 2. Connectez l'appareil photo à l'imprimante à l'aide du câble USB livré avec votre appareil photo, puis mettez l'appareil photo sous tension. 3.
6 Aide-mémoire de l'appareil photo Français Utilisez ce chapitre comme un aide-mémoire des fonctions de l'appareil photo. Pour en savoir plus sur ces fonctions, reportez-vous au Guide de l'utilisateur électronique. Prévisualisation et Lecture ● Le mode Prévisualisation permet de cadrer vos photos et clips vidéo à l'écran. Pour l'activer, appuyez sur le bouton jusqu'à ce que apparaisse brièvement dans le coin l'icône supérieur droit de l'écran.
Pour quitter ce menu, appuyez sur le bouton tout moment. à Les menus et options disponibles sont les suivants : Options Le menu Capture permet de régler les paramètres de l'appareil photo qui affectent les caractéristiques des futures photos et clips vidéo pris avec votre appareil photo. ● ● ● ● ● ● Le menu Galerie créative permet d'améliorer les images capturées.
Français Menu Options Le menu Configuration permet de modifier le comportement de l'appareil photo. ● ● ● ● ● ● Luminosité écran Sons de l'appareil Date et heure Configuration USB Configuration TV Langue Le menu Aide décrit les fonctions de l'appareil photo et fournit des conseils sur la prise de vue. ● ● ● ● ● 10 conseils Accessoires de l'appareil Boutons de l'appareil Modes de prise de vue Utilisation de la Galerie créative Partage d'images Impression d'images Enreg. comment. audio Enreg.
Fotocamera digitale HP Photosmart M527 Italiano
Informazioni legali e di avviso © Copyright 2006 Hewlett-Packard Development Company, L.P. Le informazioni contenute in questo documento sono soggette a modifica senza preavviso. Le uniche garanzie per i prodotti e i servizi HP sono definite nelle dichiarazioni di garanzia esplicita che accompagnano tali prodotti e servizi. Nulla di quanto dichiarato nel presente documento costituisce una garanzia aggiuntiva.
Sommario 1 2 3 5 6 3 Italiano 4 Informazioni preliminari......................................4 Apertura della Guida d'uso elettronica...................5 Vista posteriore e dall'alto della fotocamera..........6 Viste anteriore, laterale e inferiore della fotocamera............................................................8 Inserto dell'alloggiamento della fotocamera...........8 Configurazione della fotocamera.....................10 Installazione delle batterie...................................
1 Informazioni preliminari La copia cartacea di questa Guida rapida fornisce le informazioni necessarie per iniziare a utilizzare le funzioni essenziali della fotocamera. Per informazioni dettagliate sulle funzioni della fotocamera, vedere la Guida d'uso elettronica della fotocamera.
Apertura della Guida d'uso elettronica La Guida d'uso elettronica si trova sul CD del software HP Photosmart. Per visualizzare la Guida d'uso: 1. Inserire il CD del software HP Photosmart nell'unità CD del computer. 2. In Windows: Fare clic su View User Guide (Visualizza la Guida d'uso) nella pagina principale della schermata di installazione. In Macintosh: Aprire il file Readme nella cartella docs del CD.
● Per assistenza con il software HP Photosmart, vedere la funzione della guida nel software stesso. Vista posteriore e dall'alto della fotocamera 1 2 3 6 4 5 7 Italiano 8 9 10 11 15 14 13 12 1 Pulsante Flash: le impostazioni sono Auto Flash, Occhi rossi, Flash On, Flash Off. 2 Pulsante Photosmart Express: le opzioni sono Stampa, Acquisto stampe online, Config. Condividi.
6 Spia di accensione. 7 Pulsante 8 . Leva Zoom (digitale e ottico): in modalità Vista dal vivo, premere per ingrandire o per rimpicciolire. In modalità Riproduzione, premere il pulsante per ingrandire l'immagine selezionata oppure premere il pulsante immagini. per visualizzare le anteprime delle 9 Attacco della cinghietta da polso. 10 Pulsante Modalità: premere il pulsante per accedere al menu Mod. scatto mentre si è in modalità Vista dal vivo. Le opzioni sono Mod.
Viste anteriore, laterale e inferiore della fotocamera 1 2 3 8 7 6 Italiano 5 4 1 Flash. 2 Spia dell'autoscatto. 3 Microfono. 4 Connettore USB. 5 Connettore dell'adattatore di corrente. 6 Attacco treppiede. 7 Connettore alloggiamento. 8 Sportello del vano batteria/scheda di memoria.
Inserto dell'alloggiamento della fotocamera Se si acquista un alloggiamento opzionale della fotocamera HP Photosmart, saranno forniti anche più inserti trasparenti. Quando si configura l'alloggiamento per l'uso con questa fotocamera, utilizzare l'inserto dell'alloggiamento con la linguetta verde quadrata. Per istruzioni, vedere la Guida d'uso dell'alloggiamento.
2 Configurazione della fotocamera Installazione delle batterie 1. Aprire lo sportello del vano batteria/ scheda di memoria facendo scorrere il fermo dello sportello, come indicato sullo sportello stesso. 2. Inserire le batterie. 3. Chiudere lo sportello del vano batteria/scheda di memoria. Italiano Nota Spegnere la fotocamera prima di rimuovere le batterie. Se si utilizzano batterie ricaricabili al nichel (NiMH), caricarle completamente prima di utilizzarle per la prima volta.
Nichel (NiMH) 215 380 290 205 Fotogra365 fiche al litio 600 485 423 Il numero CIPA si ottiene utilizzando gli standard definiti dalla Camera and Imaging Products Association. Accensione della fotocamera Per accendere la fotocamera, premere il pulsante . Scelta della lingua Per scegliere la lingua desiderata, utilizzare i pulsanti , quindi .
Per scegliere la regione desiderata, premere i pulsanti , quindi premere il pulsante . Configurazione della data e dell'ora 1. Per regolare il valore evidenziato, utilizzare i . pulsanti 2. Per spostarsi sulle altre selezioni, utilizzare i e ripetere il pulsanti passaggio 1 fino a quando la data e l'ora configurate sono corrette. 3. Quando le impostazioni di data, ora e formato sono corrette, premere il pulsante , quindi per premere nuovamente il pulsante confermare.
Formattare sempre le schede di memoria prima del primo utilizzo. 1. Con la fotocamera accesa, premere il pulsante fino a quando il pulsante viene visualizzato nell'angolo in alto a destra del display LDC. 2. Premere il pulsante . 3. Per selezionare Formatta scheda dal sottomenu , quindi premere Elimina, utilizzare i pulsanti . il pulsante 4. Per selezionare Sì, utilizzare i pulsanti , per formattare la quindi premere il pulsante scheda.
In caso di problemi durante l'installazione o l'uso del software HP Photosmart, visitare il sito Web per l'assistenza clienti HP per ottenere ulteriori informazioni: www.hp.com/support. Windows Italiano Se il computer Windows non soddisfa i requisiti di sistema indicati sulla confezione della fotocamera, viene installato HP Photosmart Essential invece della versione completa HP Photosmart Premier. 1. Chiudere tutti i programmi e disattivare temporaneamente il software antivirus. 2.
3 Foto e videoclip La modalità Vista dal vivo consente di inquadrare foto e videoclip nel display LCD. Scatto di una foto Foto e videoclip 15 Italiano 1. Premere il pulsante fino viene a quando l'icona visualizzata brevemente nell'angolo in alto a destra del display LCD. Ciò indica che è attiva la modalità Vista dal vivo. 2. Inquadrare il soggetto della foto. 3. Premere a metà il pulsante Otturatore per misurare e bloccare la messa a fuoco e l'esposizione.
Registrazione di un videoclip Italiano 1. Premere il pulsante fino viene a quando l'icona visualizzata brevemente nell'angolo in alto a destra del display LCD. Ciò indica che è attiva la modalità Vista dal vivo. 2. Inquadrare il soggetto. 3. Premere e rilasciare il pulsante Video . 4. Per interrompere la registrazione del video, premere e rilasciare nuovamente il pulsante Video .
4 Revisione ed eliminazione di immagini e videoclip Revisione di immagini e videoclip In modalità Riproduzione è possibile rivedere e lavorare con le immagini e i videoclip. 1. Premere il pulsante fino a quando l'icona viene visualizzata brevemente nell'angolo in alto a destra del display LCD. Ciò indica che è attiva la modalità Riproduzione. 2. Per scorrere tra le immagini e i videoclip, utilizzare i pulsanti (i videoclip vengono riprodotti automaticamente).
5 Trasferimento e stampa di immagini Trasferimento di immagini Se si è installato il software HP Photosmart, utilizzare questo metodo per trasferire le immagini e i videoclip nel computer. Se non si è installato il software HP Photosmart, consultare la Guida d'uso elettronica per individuare un metodo alternativo. Italiano Suggerimento Questa operazione può essere eseguita anche utilizzando un alloggiamento opzionale della fotocamera HP Photosmart (vedere la Guida d'uso dell'alloggiamento). 1.
Stampa di immagini dalla fotocamera Per stampare foto, è possibile collegare la fotocamera a qualsiasi stampante certificata PictBridge. Trasferimento e stampa di immagini 19 Italiano 1. Controllare che la stampante sia accesa, che contenga carta e che non siano presenti messaggi di errore. 2. Collegare la fotocamera e la stampante utilizzando il cavo USB in dotazione con la fotocamera, quindi accendere la fotocamera. 3.
6 Riferimento rapido della fotocamera Italiano Questo capitolo fornisce un riferimento rapido per le funzioni della fotocamera. Per ulteriori informazioni su queste funzioni della fotocamera, consultare la Guida d'uso elettronica. Vista dal vivo e Riproduzione ● La modalità Vista dal vivo consente di inquadrare foto e videoclip nel display LCD. Per attivare la modalità Vista dal vivo, premere il pulsante fino a quando l'icona viene visualizzata brevemente nell'angolo in alto a destra del display LCD.
Per spostarsi al menu desiderato, utilizzare i pulsanti . All'interno di un menu, utilizzare i pulsanti per spostarsi sulle voci desiderate. Per uscire dal menu, premere il pulsante qualsiasi momento. in Menu e opzioni: Menu Opzioni Cattura consente di regolare le impostazioni della fotocamera che influiscono sulle caratteristiche delle immagini e dei videoclip che si acquisiranno in futuro con la fotocamera. ● Galleria effetti consente di migliorare le immagini acquisite.
Menu Opzioni ? fornisce le descrizioni delle funzioni della fotocamera e suggerimenti per scattare le foto. ● ● ● Configurazione USB Configurazione TV Lingua ● ● ● ● 10 utili suggerimenti Accessori Pulsanti fotocamera Uso delle modalità di scatto Utilizzo della galleria degli effetti Condivisione immagini Stampa immagini Registrazione clip audio Registrazione videoclip Revisione immagini e video Cancellazione immagini Trasferimento immagini Manutenzione batterie Assistenza Accesso rapido Info su...
HP Photosmart M527-Digitalkamera Deutsch
Rechtliche Hinweise © Copyright 2006 Hewlett-Packard Development Company, L.P. Die Informationen in diesem Dokument können ohne vorherige Ankündigung geändert werden. Für HP Produkte und Dienste gelten nur die Gewährleistungen, die in den ausdrücklichen Gewährleistungserklärungen des jeweiligen Produkts bzw. Dienstes aufgeführt sind. Dieses Dokument gibt keine weiteren Gewährleistungen. HP haftet nicht für technische oder redaktionelle Fehler oder Auslassungen in diesem Dokument.
Inhalt 1 2 3 4 5 3 Deutsch 6 Erste Schritte.......................................................4 Anzeigen des elektronischen Benutzerhandbuchs............................................... 5 Ober- und Rückseite der Kamera..........................6 Vorderseite, Seite und Unterseite der Kamera..................................................................8 Docking-Einsatz für die Kamera............................8 Einrichten der Kamera......................................
1 Erste Schritte Diese gedruckte Kurzübersicht enthält die Informationen, die Sie für die ersten Schritte bei der Verwendung der Grundfunktionen Ihrer Kamera benötigen. Ausführliche Informationen zu den Kamerafunktionen finden Sie im elektronischen Benutzerhandbuch.
● ● ● Unterstützung durch HP Fehlerbehebung Kameraspezifikationen Anzeigen des elektronischen Benutzerhandbuchs Das elektronische Benutzerhandbuch befindet sich auf der CD mit der HP Photosmart-Software. Anzeigen des Benutzerhandbuchs: 1. Legen Sie die CD mit der HP PhotosmartSoftware in das CD-Laufwerk Ihres Computers ein. 2. Windows: Klicken Sie auf der Hauptseite des Installationsbildschirms auf Benutzerhandbuch anzeigen. Macintosh: Öffnen Sie auf der CD im Ordner docs die Datei readme.
Unterstützung ● Tipps und Tools zur effizienten Nutzung Ihrer Kamera finden Sie unter www.hp.com/ photosmart (nur in englischer Sprache verfügbar) oder unter www.hp.com. ● Produktunterstützung, Diagnosen und Treiberdownloads finden Sie täglich 24 Stunden lang unter www.hp.com/support. ● Hilfe zur HP Photosmart-Software finden Sie in der Hilfefunktion der HP Photosmart-Software.
2 Taste Photosmart Express – Mögliche Optionen sind: Drucken, Abzüge online erwerben, „Share“ einrichten. 3 Taste Vorschau/Wiedergabe – Wechselt zwischen Vorschau und Wiedergabe (siehe „Vorschau und Wiedergabe“ auf Seite 21). 4 Taste Auslöser 5 Taste Video 6 Betriebskontrollleuchte 7 Taste 8 Zoom-Hebel (digital und optisch) – Drücken Sie in der Vorschau die Taste , um den Bildausschnitt zu vergrößern, oder drücken Sie die Taste , um den Bildausschnitt zu verkleinern.
14 Bildanzeige 15 Kontrollleuchte für Batterieladezustand Vorderseite, Seite und Unterseite der Kamera 1 2 3 8 7 6 Deutsch 5 4 1 Blitz 2 Kontrollleuchte für Selbstauslöser 3 Mikrofon 4 USB-Anschluss 5 Anschluss für Netzteil 6 Stativhalterung 7 Anschluss für Dockingstation 8 Klappe des Batterie-/Speicherkartenfachs 8 HP Photosmart M527-Digitalkamera
Docking-Einsatz für die Kamera Wenn Sie eine optionale HP Photosmart-KameraDockingstation erwerben, wird diese mit mehreren leeren Einsätzen geliefert. Wenn Sie die Dockingstation für diese Kamera einrichten, verwenden Sie den Docking-Einsatz mit der grünen quadratischen Kennzeichnung. Anweisungen finden Sie im Benutzerhandbuch für die Dockingstation.
2 Einrichten der Kamera Einsetzen der Batterien 1. Öffnen Sie die Klappe des Batterie-/ Speicherkartenfachs, indem Sie die Verriegelung der Klappe wie abgebildet lösen. 2. Setzen Sie die Batterien ein. 3. Schließen Sie die Klappe des Batterie-/Speicherkartenfachs. Hinweis Schalten Sie die Kamera aus, bevor Sie die Batterien entnehmen. Wenn Sie wiederaufladbare NiMH-Batterien verwenden, laden Sie die Batterien vor dem ersten Einsetzen vollständig auf.
NiMH 215 380 290 205 FotoLithium 365 600 485 423 Die Spalte „CIPA“ enthält die Anzahl von Aufnahmen, die mit Hilfe des von der Camera and Imaging Products Association entwickelten Standards ermittelt wurde. Einschalten der Kamera Zum Einschalten der Kamera drücken Sie die Taste . Auswählen der Sprache Stellen Sie mit den Tasten die gewünschte Sprache ein, und drücken Sie dann die Taste .
Stellen Sie mit den Tasten die gewünschte Region ein, und drücken Sie dann die Taste . Einstellen von Datum und Uhrzeit 1. Wählen Sie mit den den Tasten markierten Wert aus. 2. Wechseln Sie mit den Tasten zu den anderen Optionen, und wiederholen Sie Schritt 1, bis Datum und Uhrzeit richtig eingestellt sind. 3. Drücken Sie die Taste , wenn die Einstellungen für Datum, Uhrzeit und Format richtig sind, und drücken Sie dann die Taste zur Bestätigung erneut.
Formatieren Sie Speicherkarten stets vor dem ersten Einsatz. 1. Drücken Sie bei eingeschalteter Kamera die Taste , bis in der oberen rechten Ecke der Bildanzeige erscheint. 2. Drücken Sie die Taste . 3. Wählen Sie mit den Tasten im Untermenü Löschen die Option Speicherk. formatieren aus, und drücken Sie dann die Taste . 4. Wählen Sie mit den Tasten die Option Ja , um die aus, und drücken Sie dann die Taste Karte zu formatieren.
HP Kundenunterstützung unter: www.hp.com/ support. Windows Wenn Ihr Windows-Computer die auf der Verpackung der Kamera angegebenen Systemvoraussetzungen nicht erfüllt, wird HP Photosmart Essential anstelle der Vollversion HP Photosmart Premier installiert. 1. Schließen Sie alle Programme, und deaktivieren Sie ggf. vorübergehend die Virenschutzsoftware. 2. Legen Sie die CD mit der HP PhotosmartSoftware in das CD-Laufwerk ein, und befolgen Sie die Anweisungen auf dem Bildschirm.
3 Aufnehmen von Bildern und Videoclips Die Vorschau ermöglicht das Erfassen von Motiven für Bilder und Videoclips in der Bildanzeige. Aufnehmen von Einzelbildern 1. Drücken Sie die Taste , bis das Symbol kurz in der oberen rechten Ecke der Bildanzeige erscheint. Dadurch wird angezeigt, dass Sie sich in der Vorschau befinden. 2. Erfassen Sie das Motiv für das Bild. 3. Drücken Sie den Auslöser halb herunter, um den Fokus und die Belichtungszeit zu ermitteln und zu sperren.
Aufnehmen eines Videoclips Deutsch 1. Drücken Sie die Taste , kurz in der bis das Symbol oberen rechten Ecke der Bildanzeige erscheint. Dadurch wird angezeigt, dass Sie sich in der Vorschau befinden. 2. Erfassen Sie das Motiv. 3. Drücken Sie die Taste Video , und lassen Sie sie wieder los. 4. Zum Beenden der Videoaufnahme drücken Sie erneut die Taste Video , und lassen Sie sie wieder los.
4 Anzeigen und Löschen von Bildern und Videoclips Anzeigen von Bildern und Videoclips In der Wiedergabe können Sie Bilder und Videoclips anzeigen und bearbeiten. 1. Drücken Sie die Taste , bis das Symbol kurz in der oberen rechten Ecke der Bildanzeige erscheint. Dadurch wird angezeigt, dass Sie sich in der Wiedergabe befinden. 2. Blättern Sie mit den Tasten durch Ihre Bilder und Videoclips (Videoclips werden automatisch abgespielt).
Löschen von Bildern Während der Wiedergabe können Sie einzelne Bilder löschen: Deutsch 1. Drücken Sie die Taste , bis das Symbol kurz in der oberen rechten Ecke der Bildanzeige erscheint. Dadurch wird angezeigt, dass Sie sich in der Wiedergabe befinden. 2. Wählen Sie mit den Tasten ein Bild oder einen Videoclip aus. 3. Drücken Sie die Taste . 4. Wählen Sie mit den Tasten im Untermenü Löschen die Option Dieses Bild aus, und drücken Sie dann die Taste .
5 Übertragen und Drucken von Bildern Übertragen von Bildern Übertragen und Drucken von Bildern 19 Deutsch Wenn Sie die HP Photosmart-Software installiert haben, übertragen Sie Bilder und Videoclips wie im Folgenden beschrieben auf Ihren Computer. Wenn Sie die HP Photosmart-Software nicht installiert haben, finden Sie im elektronischen Benutzerhandbuch eine weitere Möglichkeit zur Übertragung.
Drucken von Bildern über die Kamera Sie können die Kamera zum Drucken von Einzelbildern an einen beliebigen PictBridge-kompatiblen Drucker anschließen. Deutsch 1. Überprüfen Sie, ob der Drucker eingeschaltet ist, ob Papier eingelegt wurde und keine Fehlermeldungen vorliegen. 2. Schließen Sie die Kamera über das im Lieferumfang der Kamera enthaltene USB-Kabel an den Drucker an, und schalten Sie die Kamera ein. 3.
6 Kurzreferenz zur Kamera Verwenden Sie dieses Kapitel als Kurzreferenz für die Kamerafunktionen. Weitere Informationen zu den aufgeführten Kamerafunktionen finden Sie im elektronischen Benutzerhandbuch. Vorschau und Wiedergabe ● Die Vorschau ermöglicht das Erfassen von Motiven für Bilder und Videoclips in der Bildanzeige. Drücken Sie zum Aktivieren der Vorschau die Taste , bis das Symbol kurz in der oberen rechten Ecke der Bildanzeige erscheint.
Wechseln Sie mit den Tasten zum gewünschten Menü. Innerhalb eines Menüs können Sie mit den zur gewünschten Option wechseln. Tasten Wenn Sie das Menü verlassen möchten, können Sie jederzeit die Taste drücken. Die folgenden Menüs und Optionen sind verfügbar: Menü Optionen Deutsch ● Aufnahme – Hier können Sie Kameraeinstellungen vornehmen, die sich auf die Bilder und Videoclips auswirken, die Sie in Zukunft mit Ihrer Kamera aufnehmen. ● ● ● ● ● Aufnahmemodi (Autom.
Menü Hilfe – Enthält Beschreibungen der Kamerafunktionen und Tipps zum Aufnehmen von Bildern.
Deutsch 24 HP Photosmart M527-Digitalkamera
Cámara digital HP Photosmart M527 Español
Español Avisos legales © Copyright 2006 Hewlett-Packard Development Company, L.P. La información que aparece en este documento está sujeta a cambios sin previo aviso. Las únicas garantías de los productos y servicios de HP se detallan en las declaraciones de garantía expresa que acompañan a dichos productos y servicios. Nada de lo que contenga este documento se considerará como garantía adicional. HP no se hará responsable de los errores u omisiones técnicos o editoriales aquí contenidos.
Para futuras consultas, introduzca la siguiente información: ● Número de modelo (parte frontal): __________ Número de serie (parte inferior de la cámara): __________ Fecha de adquisición: __________ Español ● ●
Español Contenido 1 6 Introducción.........................................................5 Acceso a la Guía de usuario electrónica...............6 Parte superior y trasera de la cámara...................7 Partes frontal, lateral e inferior de la cámara.........9 Ranura de la base de acoplamiento de la cámara..................................................................9 Configuración de la cámara..............................11 Colocación de las pilas........................................
1 Introducción Español Esta guía impresa de inicio rápido ofrece la información necesaria para comenzar a utilizar las funciones básicas de la cámara. Para obtener información detallada sobre las funciones de la cámara, consulte la Guía de usuario electrónica. Guía de inicio rápido Guía de usuario electrónica Esta guía impresa le ayudará a: La Guía de usuario electrónica incluye: ● ● ● ● Comenzar a utilizar la cámara rápidamente. Instalar el software HP Photosmart.
Español ● Especificaciones de la cámara. Acceso a la Guía de usuario electrónica La Guía de usuario electrónica se encuentra en el CD del software HP Photosmart. Para acceder a la Guía de usuario: 1. Introduzca el CD del software HP Photosmart en la unidad de CD del equipo. 2. En Windows: haga clic en View User Guide (Ver guía de usuario) en la página principal de la pantalla de instalación. En Macintosh: abra el archivo readme (léame) de la carpeta docs del CD.
● Parte superior y trasera de la cámara 1 2 3 6 4 5 7 8 9 10 11 15 14 13 12 1 Botón Flash: los ajustes son Automático, Ojos rojos, Flash encendido y Flash apagado. 2 Botón Photosmart Express: las opciones son Imprimir, Comprar copias en línea y Conf. Compartir. Introducción 7 Español ● Si desea obtener asistencia para el producto, diagnósticos y descargas de controladores en cualquier momento del día, los siete días de la semana, visite www.hp.com/support.
Español 3 Botón Vista en directo/Reproducción: alterna entre Vista en directo y Reproducción (consulte el apartado Vista en directo y reproducción en la página 22). 4 Botón del Disparador. 5 Botón Vídeo. 6 Indicador luminoso de Encendido. 7 Botón 8 Palanca de zoom (digital y óptico): en Vista en (Encendido/Apagado). directo, presione para acercar el zoom o alejarlo. En Reproducción, presione la imagen seleccionada, o las imágenes.
Partes frontal, lateral e inferior de la cámara Español 1 2 3 8 7 6 5 4 1 Flash. 2 Indicador luminoso de Temporizador automático. 3 Micrófono. 4 Conector USB. 5 Conector de adaptador de alimentación. 6 Soporte de trípode. 7 Conector de la base de acoplamiento. 8 Puerta de las pilas/tarjeta de memoria.
Español Ranura de la base de acoplamiento de la cámara Al adquirir una base de acoplamiento opcional de la cámara HP Photosmart, ésta viene provista de varias ranuras vacías. Cuando configure una base opcional para utilizarla con esta cámara, utilice la ranura de la base con la etiqueta verde cuadrada. Para obtener instrucciones, consulte el apartado de la base de acoplamiento de la Guía de usuario.
2 Español Configuración de la cámara Colocación de las pilas 1. Abra la puerta de las pilas o de la tarjeta de memoria; para ello, deslice la lengüeta correspondiente, como se indica en dicha puerta. 2. Inserte las pilas. 3. Cierre la puerta de las pilas o de la tarjeta de memoria. Nota Apague la cámara antes de extraer las pilas. Si emplea pilas NiMH recargables, cárguelas por completo antes de utilizarlas por primera vez. El uso de la cámara y el tipo de pila afectarán a la duración de éstas.
Español El número de CIPA se obtiene mediante las normas establecidas por la asociación CIPA (del inglés, Camera and Imaging Products Association). Encendido de la cámara Para encender la cámara, presione el botón (Encendido/Apagado). Selección del idioma Utilice para seleccionar el idioma que desee y, a continuación, presione .
Ajuste de la fecha y la hora Instalación y formateo de una tarjeta de memoria opcional 1. Apague la cámara y abra la puerta de las pilas o de la tarjeta de memoria. 2. Inserte la tarjeta de memoria opcional en la ranura más pequeña, como se muestra en la ilustración. Asegúrese de que encaja en su sitio. 3. Cierre la puerta de las pilas o de la tarjeta de memoria y encienda la cámara. De formato a las tarjetas de memoria antes de utilizarlas por primera vez. 1.
Español 2. Presione . 3. Utilice para seleccionar Formatear tarjeta en el submenú Eliminar. A continuación, presione . 4. Utilice para seleccionar Sí y presione para formatear la tarjeta. Una vez que se ha colocado una tarjeta de memoria, todas las imágenes y los videoclips nuevos se almacenarán en la tarjeta, en lugar de en la memoria interna. Para utilizar la memoria interna y ver las imágenes almacenadas en ella, extraiga la tarjeta de memoria.
Windows Español Si el equipo Windows no cumple los requisitos del sistema establecidos en el envoltorio de la cámara, será HP Photosmart Essential el software que se instalará en el equipo, y no la versión completa de HP Photosmart Premier. 1. Cierre todos los programas y desactive temporalmente el software antivirus. 2. Inserte el CD del software HP Photosmart en la unidad de CD y siga las instrucciones que aparecen en pantalla.
Español 3 Captura de fotografías y grabación de videoclips La función Vista en directo le permite encuadrar fotografías y videoclips en la Pantalla de imagen. Captura de fotografías fijas 1. Presione hasta que aparezca un instante en la esquina superior derecha de la Pantalla de imagen. Esto le indica que se encuentra en la opción Vista en directo. 2. Encuadre el sujeto de la fotografía. 3. Presione el botón del Disparador hasta la mitad de su recorrido para medir y bloquear el enfoque y la exposición.
Grabación de un videoclip Captura de fotografías y grabación de videoclips Español 1. Presione hasta que aparezca un instante en la esquina superior derecha de la Pantalla de imagen. Esto le indica que se encuentra en la opción Vista en directo. 2. Encuadre el sujeto. 3. Presione un instante el botón Vídeo . 4. Para detener la grabación vuelva a presionar un instante el botón Vídeo .
Español 4 Revisión y eliminación de imágenes y videoclips Revisión de imágenes y videoclips La opción Reproducción le permite revisar y trabajar con imágenes y videoclips. 1. Presione hasta que aparezca un instante en la esquina superior derecha de la Pantalla de imagen. Esto le indica que se encuentra en la opción Reproducción. 2. Utilice para desplazarse por las imágenes y los videoclips (los videoclips se reproducen de forma automática).
Eliminación de una imagen 1. Presione hasta que aparezca un instante en la esquina superior derecha de la Pantalla de imagen. Esto le indica que se encuentra en la opción Reproducción. 2. Utilice para seleccionar una imagen o un videoclip. 3. Presione . 4. Utilice para seleccionar Esta imagen en el .
Español 5 Transferencia e impresión de imágenes Transferencia de imágenes Si tiene instalado el software HP Photosmart, siga este procedimiento para transferir imágenes y videoclips al equipo. Si no tiene instalado el software HP Photosmart, busque un procedimiento alternativo en la Guía de usuario electrónica. Sugerencia También puede llevar a cabo esta tarea con una base de acoplamiento opcional de la cámara HP Photosmart (consulte la Guía de usuario de la base de acoplamiento). 1.
Impresión de imágenes desde la cámara Español Puede conectar la cámara a cualquier impresora con certificación PictBridge para imprimir imágenes fijas. 1. Compruebe que la impresora está encendida, que tiene papel y que no aparecen mensajes de error. 2. Conecte la cámara y la impresora al equipo con el cable USB que se incluye con la cámara, y enciéndala. 3. Cuando la cámara se conecta a la impresora, se abre el menú Configurar impresión en la cámara.
Español 6 Referencia rápida de la cámara Utilice este capítulo como una referencia rápida a las funciones de la cámara. Para conocer a fondo estas funciones, consulte la Guía de usuario electrónica. Vista en directo y reproducción ● La función Vista en directo le permite encuadrar fotografías y videoclips en la Pantalla de imagen. Para activar la opción Vista en directo, presione hasta que aparezca un instante en la esquina superior derecha de la Pantalla de imagen.
Para salir del menú, presione momento. en cualquier Menú Opciones Captura le permite ajustar la configuración de las características de las imágenes y videoclips que tomará en un futuro con la cámara. ● ● ● Modos de fotografía (Modo automático, Temporizador automático, Disparo rápido, Paisaje, Retrato, Acción, Retrato nocturno, Playa y nieve, Puesta de sol, Ráfaga y Macro).
Español Menú Opciones La ficha Configurar le permite cambiar el comportamiento de la cámara. ● ● ● ● ● ● Brillo de pantalla Sonidos de cámara Fecha y hora Configuración USB Configuración TV Idioma La ficha Ayuda le ofrece descripciones de las funciones de la cámara y sugerencias para tomar fotografías.
Al presionar en las opciones Vista en directo o Reproducción, se abre el menú Photosmart Express. Opciones El botón Photosmart Express le permite compartir fotografías con familiares y amigos. ● ● ● Referencia rápida de la cámara Imprimir Comprar copias en línea Conf. menú Compartir...
Español 26 Cámara digital HP Photosmart M527
HP Photosmart M527 Digitale camera Nederlands
Kennisgevingen en handelsmerken Nederlands © Copyright 2006 Hewlett-Packard Development Company, L.P. De informatie in dit document kan zonder voorafgaande kennisgeving worden gewijzigd. De enige garanties voor HP producten en services zijn vastgelegd in de garantieverklaringen bij de betreffende producten en services. Niets in dit document mag worden opgevat als een aanvullende garantiebepaling. HP is niet aansprakelijk voor hierin vervatte technische of redactionele fouten of weglatingen.
Inhoudsopgave 1 3 4 5 6 3 Nederlands 2 Beginnen..............................................................4 De elektronische Gebruikershandleiding openen..................................................................5 Bovenkant en achterkant van de camera..............6 Voorkant, zijkant en onderkant van de camera..................................................................8 Inzetstuk cameradock............................................ 8 De camera gereedmaken voor gebruik............
1 Beginnen Dit gedrukte Introductieboekje bevat de informatie die u nodig hebt om de basisfuncties van de camera te kunnen gebruiken. Raadpleeg de elektronische Gebruikershandleiding voor gedetailleerde informatie over de camerafuncties.
● ● ● Het krijgen van ondersteuning van HP Het oplossen van problemen Cameraspecificaties De elektronische Gebruikershandleiding openen Nederlands De elektronische Gebruikershandleiding bevindt zich op de cd met de HP Photosmart software. U opent de Gebruikershandleiding als volgt: 1. Plaats de cd met de HP Photosmart software in het cd-station van uw computer. 2. In Windows: Klik op Gebruikershandleiding weergeven op de hoofdpagina van het installatiescherm.
Nederlands Wanneer u hulp nodig hebt ● Op www.hp.com/photosmart (alleen in het Engels) of www.hp.com vindt u tips en hulpmiddelen voor een effectiever gebruik van de camera. ● Voor hulp bij producten, diagnostische gegevens en het driverdownloads bezoekt u www.hp.com/ support. ● Raadpleeg de Help bij de HP Photosmart software voor hulp bij het gebruik van deze software.
2 Photosmart Express-knop—Opties zijn Afdrukken, Afdrukken on line kopen, Delen instellen. 3 Liveweergave/Weergave-knop—Schakelt tussen Liveweergave en Weergave (zie Liveweergave en Weergave op pagina 20). 4 Sluiter-knop. 5 Video-knop. 6 Voedingslampje. 7 Nederlands 8 -knop. In-/uitzoomen-knop (digitaal en optisch)—In Liveweergave drukt u op om in te zoomen en om uit te zoomen. In Weergave drukt u op om de geselecteerde opname te vergroten of op miniaturen van uw foto's weer te geven.
Voorkant, zijkant en onderkant van de camera 1 2 Nederlands 3 8 7 6 5 4 1 Flitser. 2 Lampje van de zelfontspanner. 3 Microfoon. 4 USB-aansluiting. 5 Aansluiting voor netvoedingsadapter. 6 Statiefbevestigingspunt. 7 Dockaansluiting. 8 Klepje van de batterij/geheugenkaartsleuf.
Inzetstuk cameradock Wanneer u een HP Photosmart cameradock aanschaft, wordt dit geleverd met meerdere doorzichtige inzetstukken. Wanneer u het dock gereedmaakt voor gebruik met deze camera, gebruikt u het inzetstuk met het vierkante groene lipje. Raadpleeg de Gebruikershandleiding bij het dock voor instructies.
2 De camera gereedmaken voor gebruik Nederlands De batterijen plaatsen 1. Open het klepje van de batterij/ geheugenkaartsleuf door het klepje te verschuiven, zoals op het klepje is aangegeven. 2. Plaats de batterijen. 3. Sluit het klepje van de batterij/ geheugenkaartsleuf. Opmerking Schakel de camera uit voordat u de batterijen verwijdert. Als u oplaadbare NiMH-batterijen gebruikt, laadt u deze volledig op voordat u ze voor de eerste keer gebruikt.
NiMH 215 380 290 205 Foto Lithium 365 600 485 423 Het CIPA-aantal is verkregen op basis van de normen die zijn vastgesteld door de "Camera and Imaging Products Association". De camera inschakelen U zet de camera aan door op de knop drukken. te Nederlands De taal kiezen Gebruik de om de gewenste taal te kiezen en druk vervolgens op .
Nederlands De datum en tijd instellen 1. Gebruik om de markering te verplaatsen. 2. Gebruik om naar de andere keuzemogelijkheden te gaan en herhaal stap 1 tot u de datum en tijd correct hebt ingesteld. 3. Druk op wanneer u de instellingen voor datum, tijd en notatie hebt opgegeven en druk nogmaals op om dit te bevestigen. Een geheugenkaart plaatsen en formatteren (optioneel) 1. Schakel de camera uit en open het klepje van de batterij/geheugenkaartsleuf. 2.
2. Druk op . 3. Gebruik om Kaart formatteren te markeren in het submenu Verwijderen en druk vervolgens op . 4. Gebruik om Ja te selecteren en druk om de kaart te formatteren. vervolgens op Wanneer u een geheugenkaart hebt geplaatst, worden alle nieuwe foto's en videoclips op de kaart en niet in het interne geheugen opgeslagen.
Windows Nederlands Als uw Windows-computer niet voldoet aan de systeemvereisten, zoals vermeld op de verpakking van de camera, wordt HP Photosmart Essential geïnstalleerd, in plaats van de volledige versie HP Photosmart Premier. 1. Sluit alle programma's en schakel ook eventuele antivirussoftware tijdelijk uit. 2. Plaats de cd met de HP Photosmart software in het cd-station van de computer en volg de instructies op het scherm.
3 Foto's maken en videoclips opnemen U kunt in Liveweergave het onderwerp voor uw foto of videoclip bepalen. Een foto nemen Foto's maken en videoclips opnemen 15 Nederlands 1. Druk op tot kort in de rechter bovenhoek van het LCD-scherm verschijnt. Dit geeft aan dat Liveweergave actief is. 2. Bepaal het onderwerp voor de foto. 3. Druk de knop Sluiter half in om de brandpuntsafstand en de benodigde belichtingstijd te vergrendelen.
Nederlands Een videoclip opnemen 1. Druk op tot kort in de rechter bovenhoek van het LCD-scherm verschijnt. Dit geeft aan dat Liveweergave actief is. 2. Bepaal het onderwerp van de foto. 3. Druk op de knop Video en laat deze weer los. 4. Als u de opname van een videoclip wilt stoppen, drukt u nogmaals op de knop Video en laat u deze weer los.
4 Foto's en videoclips bekijken en verwijderen Foto's en videoclips bekijken U kunt in Weergave foto's en videoclips bekijken en bewerken. Een opname verwijderen U kunt in Weergave afzonderlijke foto's verwijderen: 1. Druk op tot kort in de rechter bovenhoek van het LCD-scherm verschijnt. Dit geeft aan dat Weergave actief is. 2. Gebruik om een foto of videoclip te selecteren. 3. Druk op . 4. Gebruik om Deze opname te markeren in het submenu Verwijderen en druk vervolgens op .
5 Opnames overbrengen en afdrukken Nederlands Opnames overbrengen Als u de HP Photosmart software hebt geïnstalleerd, gebruikt u deze methode om foto's en videoclips naar uw computer over te brengen. Als u de HP Photosmart software niet hebt geïnstalleerd, raadpleegt u de elektronische Gebruikershandleiding voor een alternatieve methode. Tip U kunt deze taak ook uitvoeren met gebruikmaking van een HP Photosmart cameradock, die apart verkrijgbaar is (zie de Gebruikershandleiding bij het dock). 1.
Opnames vanaf de camera afdrukken U kunt vanaf uw camera foto's direct afdrukken op een met PictBridge compatibele printer. Opnames overbrengen en afdrukken 19 Nederlands 1. Controleer of de printer aan staat, papier bevat en of er geen foutberichten op de printer worden weergegeven. 2. Sluit de camera op de printer aan met gebruikmaking van de USB-kabel die bij de camera is geleverd. Zet vervolgens de camera aan. 3.
6 Beknopt overzicht van camerafuncties Nederlands Dit hoofdstuk bevat een beknopt overzicht van de camerafuncties. Raadpleeg de elektronische Gebruikershandleiding voor meer informatie over deze camerafuncties. Liveweergave en Weergave ● U kunt in Liveweergave het onderwerp voor uw foto of videoclip bepalen. U activeert Liveweergave door op te drukken tot kort in de rechter bovenhoek van het LCD-scherm verschijnt. ● U kunt in Weergave foto's en videoclips bekijken en bewerken.
De menu's en opties zijn: Menu Opties ● Opname biedt u de mogelijkheid om de camerainstellingen aan te passen voor foto's en videoclips die u met de camera gaat maken. ● ● ● ● ● Rode ogen verwijderen Artistieke effecten toepassen Kleur wijzigen Randen toevoegen Draaien Geluid opnemen Opnames naar kaart Instellen biedt u de mogelijkheid om het gedrag van de camera aan te passen.
Menu Opties camerafuncties en tips voor het nemen van foto's. ● ● Nederlands ● ● ● ● ● ● ● ● ● ● ● Opnamemodi gebruiken Ontwerpgalerie gebruiken Opnames delen Foto's afdrukken Audioclips opnemen Videoclips opnemen Foto's en video bekijken Opnames verwijderen Opnames overbrengen Batterijbeheer Hulp en ondersteuning Camerasneltoetsen Info... Wanneer u op in Liveweergave of Weergave drukt, verschijnt het menu Photosmart Express.
Câmera digital HP Photosmart M527 Português
Informações e avisos legais © Copyright 2006 Hewlett-Packard Development Company, L.P. As informações aqui contidas estão sujeitas a alterações sem aviso prévio. As únicas garantias para produtos e serviços HP são dispostas nas declarações de garantia expressa que acompanham cada produto e serviço. Nenhuma informação aqui contida pode ser interpretada como uma garantia adicional. A HP não será responsabilizada por erros técnicos ou editorais, nem por omissões aqui contidas.
Conteúdo 1 2 4 5 6 3 Português 3 Introdução............................................................4 Acessar a versão eletrônica do Guia do Usuário..................................................................5 Partes superior e traseira da câmera....................6 Partes frontal, lateral e inferior da câmera.............8 Acessório da estação de acoplamento da câmera..................................................................8 Configurar a câmera....................................
1 Introdução Este Guia de Início Rápido fornece as informações necessárias para começar a usar os recursos básicos da câmera. Para obter informações detalhadas sobre os recursos da câmera, consulte a versão eletrônica do Guia do Usuário.
Acessar a versão eletrônica do Guia do Usuário A versão eletrônica do Guia do Usuário encontra-se no CD do software HP Photosmart. Para exibir o Guia do Usuário: 1. Insira o CD do software HP Photosmart na unidade de CD do computador. 2. No Windows: Clique em Exibir Guia do Usuário na página principal da tela de instalação. No Macintosh: Abra o arquivo readme (leiame), que se encontra na pasta docs no CD.
● Para obter ajuda sobre o software HP Photosmart, consulte o recurso de Ajuda no software HP Photosmart. Partes superior e traseira da câmera 1 2 3 6 4 5 7 Português 8 9 10 11 15 14 13 12 1 Botão Flash — As opções são Flash automático, Olho vermelho, Flash ligado e Flash desligado. 2 Botão Photosmart Express — As opções são Imprimir, Encomendar impressões online, Config. Compartilhar.
5 Botão Vídeo. 6 Luz de alimentação. 7 8 . Acionador de Zoom (Digital e óptico) — Em Exibição ao vivo, pressione para ampliar ou pressione para reduzir. No modo Reproduzir, pressione ampliar a imagem selecionada ou pressione exibir miniaturas das imagens. para para 9 Base da alça de pulso. 10 Botão Modo — Pressione para acessar o menu Modo Fotografia durante a Exibição ao vivo.
Partes frontal, lateral e inferior da câmera 1 2 3 8 7 6 Português 5 4 1 Flash. 2 Luz do timer interno. 3 Microfone. 4 Conector USB. 5 Conector do adaptador de energia. 6 Base do tripé. 7 Conector de estação de acoplamento. 8 Compartimento de pilha/cartão de memória.
Acessório da estação de acoplamento da câmera Se você adquirir uma estação opcional de acoplamento da câmera HP Photosmart, ela virá acompanhada de vários acessórios. Ao preparar a estação de acoplamento para uso com esta câmera, use o acessório da estação com a etiqueta quadrada verde. Consulte o Guia do Usuário da estação para obter instruções.
2 Configurar a câmera Instalar as pilhas 1. Abra a porta do compartimento de pilha/cartão de memória deslizando a trava da porta conforme indicado na mesma. 2. Coloque as pilhas. 3. Feche o compartimento de pilha/ cartão de memória. Português Nota Desligue a câmera antes de remover as pilhas. Se estiver utilizando pilhas recarregáveis NiMH, carregue-as completamente antes de utilizá-las pela primeira vez. O uso da câmera e o tipo da pilha influenciam a duração das pilhas.
O número CIPA é obtido por meio dos padrões estabelecidos pela Camera and Imaging Products Association. Ligar a câmera Para ligar a câmera, pressione o botão . Escolher o idioma Use os botões para selecionar o idioma desejado e pressione . Definir a região Português Junto com a configuração do Idioma, a configuração de Região determina o formato padrão para data e o formato do sinal de vídeo para exibição das imagens da câmera em televisores. Use para escolher a região desejada e pressione .
Definir data e hora 1. Use para ajustar o valor destacado. 2. Use para passar às outras seleções e repita a Etapa 1 até que a data e a hora tenham sido definidas corretamente. 3. Pressione quando as informações de data, hora e formato estiverem corretas e pressione novamente para confirmar. Português Instalar e formatar um cartão de memória opcional 1. Desligue a câmera e abra o compartimento de pilha/cartão de memória. 2. Insira o cartão de memória opcional no slot menor, conforme mostrado.
3. Use para selecionar Formatar cartão no submenu Excluir e pressione . 4. Use para selecionar Sim e pressione para formatar o cartão. Após instalar um cartão de memória, todas as novas imagens e clipes de vídeo ficarão armazenados no cartão, em vez da memória interna. Para usar a memória interna e exibir imagens lá armazenadas, remova o cartão de memória.
2. Insira o CD do software HP Photosmart na unidade de CD e siga as instruções na tela. Se a tela de instalação não for exibida, clique em Iniciar, clique em Executar, digite D:\Setup.exe, onde D é a letra da sua unidade de CD, e clique em OK. 3. Quando a instalação do software for concluída, reative o programa antivírus. Macintosh Português 1. Insira o CD do software HP Photosmart na unidade de CD. 2. Na área de trabalho, clique duas vezes no ícone do CD. 3.
3 Fotografar e gravar clipes de vídeo A Exibição ao vivo permite enquadrar fotos e clipes de vídeo no Visor de imagens. Capturar uma imagem estática Fotografar e gravar clipes de vídeo 15 Português 1. Pressione até que seja exibido rapidamente no canto superior direito do Visor de imagens. Isso indica que você está no modo Exibição ao vivo. 2. Enquadre o objeto da foto no visor. 3. Pressione o botão Obturador até a metade para travar o foco e a exposição.
Gravar um clipe de vídeo . novamente. Português 1. Pressione até que seja exibido rapidamente no canto superior direito do Visor de imagens. Isso indica que você está no modo Exibição ao vivo. 2. Enquadre o objeto da foto. 3. Pressione e solte o botão Vídeo 4.
4 Examinar e excluir imagens e clipes de vídeo Examinar imagens e clipes de vídeo É possível examinar e manipular imagens e clipes de vídeo em Reproduzir. 1. Pressione até que seja exibido rapidamente no canto superior direito do Visor de imagens. Isso indica que você está no modo Reproduzir. 2. Use para percorrer as imagens e os clipes de vídeo (os clipes de vídeo são reproduzidos automaticamente). Você pode excluir imagens individualmente durante o modo Reproduzir: 1.
5 Transferir e imprimir imagens Transferir imagens Se você tiver instalado o software HP Photosmart, use este método para transferir imagens e clipes de vídeo para o computador. Se você não tiver instalado o software HP Photosmart, consulte a versão eletrônica do Guia do Usuário para encontrar um método alternativo. Português Dica Você também pode realizar essa tarefa usando uma estação opcional de acoplamento da câmera HP Photosmart (consulte o Guia do Usuário da estação). 1.
Imprimir imagens da câmera Você pode conectar a câmera a qualquer impressora certificada pela PictBridge para imprimir imagens estáticas. Transferir e imprimir imagens 19 Português 1. Verifique se a impressora está ligada, se há papel e se não há mensagens de erro na impressora. 2. Conecte a câmera e o computador usando o cabo USB que acompanha a câmera e ligue-a. 3. Quando a câmera estiver conectada à impressora, o menu Configurar impressão será exibido na câmera.
6 Consulta rápida da câmera Português Use este capítulo como um guia de consulta rápida dos recursos da câmera. Para saber mais sobre os recursos da câmera, consulte a versão eletrônica do Guia do Usuário. Exibição ao vivo e Reproduzir ● A Exibição ao vivo permite enquadrar fotos e clipes de vídeo no Visor de imagens. Para ativar a Exibição ao vivo, pressione até que seja exibido rapidamente no canto superior direito do Visor de imagens.
Os menus e as opções são: Menu Opções Capturar permite ajustar as configurações da câmera que afetam as características das futuras imagens e clipes de vídeo que você capturar com a câmera. ● ● ● ● ● ● Modos de fotografia (Modo automático, Timer interno, Foto rápida, Paisagem, Retrato, Ação, Retrato noturno, Praia e neve, Pôr-do-sol, Disparo e Macro).
Menu Opções ● ● ● ● ● ● ● ● Português ● ● ● ● ● ● Botões da câmera Usar os modos de fotografia Usar a Galeria de projetos Compartilhar imagens Imprimir imagens Gravar clipes de áudio Gravar clipes de vídeo Examinar imagens e vídeos Excluir imagens Transferir imagens Gerenciar pilhas Obter assistência Atalhos da câmera Sobre... Quando você pressionar no modo Exibição ao vivo ou Reproduzir, será exibido o menu Photosmart Express.
התפריט האפשרויות ● ● Camera Shortcuts )קיצורי דרך של המצלמה( ) About...אודות(... במצב ) Live Viewתצוגה חיה( או במצב לחיצה על לחצן ) Playbackהקרנה חוזרת( ,תגרום להופעת תפריט .Photosmart Express התפריט ● ● ● ) Printהדפסה( Buy Prints Online )רכישת תדפיסים במקוון( הגדרת תפריט שיתוף עברית Photosmart תפריט Expressיאפשר לך לחלוק את התצלומים שלך עם חברים וקרובים.
התפריט האפשרויות ● ) Top Ten Tipsעשרת העצות החשובות( Camera Accessories )אבזרי המצלמה( Camera Buttons )לחצני המצלמה( Using Shooting Modes )שימוש במצבי הצילום( Using Design Gallery )שימוש בגלריית העיצוב( ) Sharing Imagesשיתוף תמונות( ) Printing Imagesהדפסת תמונות( Recording Audio Clips )הקלטת קטעי שמע( Recording Video Clips )הקלטת סרטוני וידאו( Reviewing Images and ) Videosסקירת תמונות וסרטוני וידאו( Deleting Images )מחיקת תמונות(
להלן רשימת התפריטים והאפשרויות: התפריט ) Captureצילום( תפריט מאפשר לך לקבוע את הגדרות המצלמה המשפיעות על מאפייני התמונות וסרטוני הווידאו הבאים שתצלם במצלמה שלך.
6 מדריך ההפעלה המהיר היעזר בפרק זה כחומר עיון מהיר בנוגע למאפייני המצלמה .כדי ללמוד פרטים נוספים על המאפיינים הללו ,עיין במדריך למשתמש במתכונתו האלקטרונית. מצבי Live Viewו) Playback-תצוגה חיה והקרנה חוזרת( ● מצב ) Live Viewתצוגה חיה( מאפשר לך למסגר תמונות וסרטוני וידאו בצג התמונות .כדי להפעיל מצב ,Live View לחץ על יופיע לזמן קצר בפינה עד שהסמל הימנית העליונה של צג התמונות.
עברית .2חבר בין המצלמה והמדפסת באמצעות כבל ה USB-שסופק עם המצלמה ,ולאחר מכן הדלק את המצלמה. .3כאשר המצלמה מחוברת למדפסת ,מופיע תפריט ) Print Setupהגדרות הדפסה( במסך המצלמה .כדי לשנות הגדרות ,השתמש בלחצנים כדי לבחור אפשרות תפריט ,ולאחר מכן כדי לשנות הגדרת הדפסה מסוימת. השתמש בלחצנים .4לחץ על )תפריט/אישור( כדי להתחיל בהדפסה.
5 העברה והדפסה של תמונות העברת תמונות אם התקנת את תוכנת ,HP Photosmartהשתמש בשיטה הבאה כדי להעביר תמונות וסרטוני וידאו מהמצלמה למחשב. אם לא התקנת את תוכנת ,HP Photosmartעיין במדריך למשתמש במתכונתו האלקטרונית כדי ללמוד את השיטה החלופית. עצה באפשרותך לבצע פעולה זו גם בעזרת תושבת עגינה אופציונלית ) HP Photosmartעיין בסעיפים על התושבת במדריך למשתמש(. .1חבר בין המצלמה והמחשב באמצעות כבל ה USB-שסופק עם המצלמה. .
4 סקירה ומחיקה של תמונות ושל סרטוני וידאו סקירת תמונות וסרטוני וידאו באפשרותך לסקור תמונות וסרטוני וידאו ולבצע בהם פעולות שונות במצב ) Playbackהקרנה חוזרת(. .1לחץ על לחצן )תצוגה חיה/הקרנה חוזרת( עד אשר יופיע לזמן קצר בפינה הימנית העליונה של צג הסמל התמונות .הדבר מציין כי אתה נמצא במצב Playback )הקרנה חוזרת(. .2השתמש בלחצנים כדי לגלול את התמונות וסרטוני הווידאו שלך )סרטוני וידאו מופעלים אוטומטית(.
3 צילום תמונות וסרטוני וידאו מצב ) Live Viewתצוגה חיה( מאפשר לך למסגר תמונות וסרטוני וידאו בצג התמונות. צילום תמונה .1 .2 .3 .4 .5 לחץ על עד שהסמל יופיע לזמן קצר בפינה הימנית העליונה של צג התמונות .הדבר מציין כי עברת למצב ) Live Viewתצוגה חיה(. מסגר את נושא התמונה. לחץ לחיצה חלקית על לחצן התריס כדי למדוד ולנעול את המיקוד והחשיפה .תוחמי המיקוד בצג התמונות מופיעים בצבע ירוק יציב כאשר המיקוד ננעל.
מאוחסנות )הסרת עיניים אדומות ,סיבוב ,חיתוך ,שינוי גודל, כוונון איכות תמונה ,הוספת צבעים ואפקטים מיוחדים ,ועוד(. אם אירעה בעיה בהתקנה של תוכנת HP Photosmartאו בשימוש בה ,תוכל לקבל מידע נוסף באתר שירות הלקוחות .www.hp.com/support :HP Customer Care מערכת Windows אם המחשב ומערכת Windowsשברשותך אינם עונים על דרישות המערכת כפי שפורטו על אריזת המצלמה ,תותקן במחשב גירסת HP Photosmart Essentialבמקום הגירסה המלאה .HP Photosmart Premier - .
הכנסה ואתחול של כרטיס זיכרון אופציונלי .1כבה את המצלמה ופתח את דלתית תא הסוללות /כרטיס הזיכרון. .2הכנס את כרטיס הזיכרון האופציונלי לחריץ הקטן יותר ,כמו באיור .ודא כי כרטיס הזיכרון נכנס למקומו בנקישה. .3סגור את דלתית תא הסוללות /כרטיס הזיכרון והדלק את המצלמה. הקפד תמיד לאתחל כרטיסי זיכרון לפני הפעלתם הראשונה. .1 .2 .3 .
הדלקת המצלמה כדי להפעיל את המצלמה ,לחץ על לחצן )הדלקה/כיבוי(. בחירת השפה כדי השתמש בלחצנים לבחור בשפה הרצויה ,ולאחר מכן )תפריט/אישור(. לחץ על הגדרת האזור ההגדרות ) Languageשפה( ו) Region-אזור( קובעות את ברירות המחדל לתבנית התאריך ואת תבנית אות הווידאו הדרושה להצגת תמונות המצלמה בטלוויזיה. השתמש בלחצנים כדי לבחור באזור הרצוי ,ולאחר מכן לחץ על )תפריט/אישור(. הגדרת תאריך ושעה .1השתמש בלחצנים לכוונן את הערך המסומן. כדי .
2 התקנת המצלמה הכנסת הסוללות .1פתח את דלתית הסוללות/כרטיס הזיכרון על ידי החלקת תפס הדלת ,כפי שמצוין עליה. .2הכנס את הסוללות. .3סגור את דלתית תא הסוללות /כרטיס הזיכרון. הערה כבה את המצלמה לפני הוצאת הסוללות .אם אתה משתמש בסוללות NiMH נטענות ,הקפד לטעון את הסוללות באופן מלא לפני השימוש הראשון. מידת השימוש במצלמה וסוג הסוללות ישפיעו על אורך הפעולה של הסוללות .סוללות אלקליות מניבות חיי סוללה קצרים בהרבה מאשר סוללות ליתיום או סוללות .
המצלמה במבט קדמי ,צדי ותחתי 1 2 3 8 6 4 1 מבזק. 2 נורית קוצב זמן עצמי. 7 5 3 מיקרופון. 4 מחבר .USB 5 מחבר ספק כוח. 6 סמך חצובה. 7 מחבר מעגן. 8 דלתית תא סוללות /כרטיס זיכרון. עברית מתאם מעגן המצלמה אם רכשת תושבת HP Photosmartלמצלמה ,התושבת נמכרת עם מספר תושבות שקופות .כאשר אתה מתקין את התושבת כדי להציב בתוכה את המצלמה ,השתמש בתושבת העגינה עם התגית הירוקה הרבועה .
7 לחצן 8 מתג זום )דיגיטלי ואופטי( -במצב ) Live Viewתצוגה חיה(, )הדלקה/כיבוי(. לחץ על )התקרבות( כדי להגדיל תמונה ,או על )התרחקות( כדי להקטין את התמונה .במצב ) Playbackהקרנה חוזרת( ,לחץ על )הגדלה( כדי להגדיל את התמונה הנבחרת או על )תמונות ממוזערות( כדי לעבור לתצוגת תמונות ממוזערות. 9 אוזן לרצועת נשיאה. 10 כדי להיכנס לתפריט לחצן ) Modeמצב( – לחץ על ) Shooting Modeמצב צילום( במהלך תצוגה חיה.
המצלמה במבט עילי ואחורי 4 5 3 7 1 2 6 8 9 10 11 עברית 12 13 15 14 1 לחצן ) Flashמבזק( -המצבים האפשריים הם ,Auto ) Flash Off ,Flash On ,Red-Eyeבהתאמה ,אוטומטי ,עיניים אדומות ,מבזק מופעל ,מבזק מושבת(. 2 לחצן - Photosmart Expressהאפשרויות הן Buy ,Print ) Share Setup ,Prints Onlineבהתאמה ,הדפסה ,רכישת תדפיסים במקוון ,הגדרת שיתוף(.
גישה למדריך למשתמש במתכונתו האלקטרונית המדריך למשתמש במתכונתו האלקטרונית עומד לרשותך בתקליטור של תוכנת .HP Photosmart כדי להציג את המדריך למשתמש: .1הכנס את התקליטור עם תוכנת HP Photosmartלכונן התקליטורים של המחשב. .2במערכת :Windowsלחץ על ) View User Guideהצג את המדריך למשתמש( בדף הראשי של מסך ההתקנה. במערכת :Macintoshפתח את קובץ הreadme- בתיקייה docsשבתקליטור. המדריך למשתמש במתכונתו האלקטרונית יועתק למחשבך כאשר אתה מתקין את תוכנת .
1 הכנות להפעלה 'מדריך ההפעלה המהירה' בדפוס מכיל את המידע הדרוש לך כדי להתחיל בעבודה ולהשתמש במאפיינים החשובים ביותר במצלמה .לקבלת מידע מפורט על מאפייני המצלמה ,עיין במדריך למשתמש במתכונתו האלקטרונית.
תוכן עניינים 1 2 3 4 5 6 הכנות להפעלה4......................................................... גישה למדריך למשתמש במתכונתו האלקטרונית5.............. המצלמה במבט עילי ואחורי6......................................... המצלמה במבט קדמי ,צדי ותחתי 8................................. מתאם מעגן המצלמה8................................................. התקנת המצלמה9...................................................... הכנסת הסוללות9........................
הבהרות משפטיות © Copyright 2006 Hewlett-Packard Development Company, L.P. המידע הכלול במסמך זה נתון לשינויים ללא הודעה מוקדמת .האחריות הבלעדית בגין מוצרים ושירותים של HPמפורטת בכתב האחריות הישירה הנלווה למוצרים ושירותים כאלה .אין לפרש דבר מן האמור במסמך זה כיוצר אחריות נוספת .חברת HPלא תישא באחריות לשגיאות או להשמטות מסיבות טכניות או עריכתיות במסמך זה. ® Windowsהוא סימן מסחרי רשום של Microsoft Corporation בארה"ב. הסמליל SDהוא סימן מסחרי של בעליו.
מצלמה דיגיטלית HP Photosmart M527 עברית