HP Photosmart R-series dock User's Manual
HP Photosmart R-series dock User’s Manual 3
Trademark and copyright information © 2004 Copyright Hewlett-Packard Development Company, LP Reproduction, adaptation, or translation without prior written permission is prohibited, except as allowed under copyright laws. The information contained in this document is subject to change without notice. Hewlett-Packard shall not be liable for errors contained herein or for consequential damages in connection with the furnishing, performance, or use of this material. Microsoft® and Windows® are U.S.
Table of Contents Getting Started . . . . . . . . . . . . . . . . . . . . . . . . . . . . 6 Setting Up the Dock . . . . . . . . . . . . . . . . . . . . . . 6 Charging a Spare Battery . . . . . . . . . . . . . . . . . 8 Dock Lights and Buttons . . . . . . . . . . . . . . . . . . . 9 Transferring Images to a Computer Using the Dock . . 10 Printing Images Using the Dock . . . . . . . . . . . . . . . . 11 Displaying Images on a TV Using the Dock . . . . . . . 12 Using the Remote . . . . . . . . . . . . . . . .
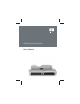
Getting Started The HP Photosmart R-series camera dock allows you to easily download images to your computer, print images directly to a printer, recharge the camera battery and a spare battery at the same time, and display images on a television (TV). You can use the dock remote control just as you would use a TV remote control, with the added ability to rotate, magnify, and print images (if the dock is connected to a printer).
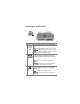
2 Connect the TV, AC power adapter, and USB cables to the right-hand side of the dock. 1 2 3 # Icon Description 1 Connect the dock to a TV using the audio/video cable with the part number C6324-61601. Connect the yellow connector to the video input, and the red connector to the audio input on your TV, VCR, or DVD player. 2 Connect the AC power adapter to the DC IN connector on the dock, plug the power cord into the AC power adapter, and plug the power cord into a wall outlet.
3 Remove any cables that may be attached to your camera. Then, insert the camera into the camera dock as shown here. The back of the camera must point toward the edge of the dock with the two buttons. Charging a Spare Battery Insert a spare rechargeable lithium ion battery into the dock recharging bay door with the arrows on the top of the battery (1) pointing toward the door, as shown in the picture. Push the battery into the recharging bay until the slide knob (2) snaps down.
Dock Lights and Buttons 1 2 # 1 Name 3 4 Description Spare Shows the power/battery charging status. If this battery light is: charging ! On - the spare battery in the dock is fully charged light ! Blinking - the spare battery in the dock is charging ! Off - there is no spare battery in the dock, or the battery has been inserted incorrectly 2 Activates the connection to the computer or the printer, depending on which of those devices is Save/Print attached to the dock.
# Name Description 4 Power light Shows the power/camera battery charging status.
3 Press the Save/Print button on the dock. The HP Image Transfer software will launch on your computer. If you have set the software to automatically transfer the images from the camera, the images will automatically transfer to the computer. Otherwise, in the Welcome screen, click Start Transfer. If there were any images on the camera that had been selected for printing or e-mail, those actions are started after the images have been transferred to the computer.
3 Press the Save/Print button on the camera dock to start the print dialog. The Print Setup menu displays on the camera. If you already selected images to print in the camera, the number of images selected will be shown in the Print Setup menu. Otherwise, Images: ALL will be displayed. 4 If all the settings in the Print Setup menu look correct, press the Menu/OK button on the camera or on the dock remote control to begin printing.
TIP If you cannot locate video and audio input jacks on your TV to fit the connectors on the audio/video cable, you should be able to use the video and audio input jacks on a video cassette recorder (VCR) or DVD player connected to your TV. 2 Your camera is set to send either an NTSC or a PAL video signal to a TV, depending on the language you selected when you set up your camera. The NTSC format is used primarily in North America and Japan, and the PAL format is used primarily in Europe.
Using the Remote You can use the dock remote control to pause the slideshow, magnify an image, rotate an image, select an image for HP Instant Share, or mark an image for printing. Before you can use the remote, you need to install the remote control battery. Remove the battery door on the back of the dock remote control and slide the round non-rechargeable CR 2025 battery into the remote, + (positive) side up, until it clicks into place, as shown in the picture. Then replace the battery door.
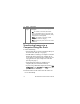
Dock Remote Control Buttons 1 7 8 9 # Button 1 4 5 6 Description TV button Activates the TV connection and displays the first image in the camera on the TV (same as the TV button on the dock). Play/Pause button Starts and pauses the slideshow of images on the TV. To resume the slideshow, press this button again. 2 3 2 3 and These buttons work just like the arrow buttons buttons to buttons on your camera. Use the manually navigate through the slideshow.
# Button 5 Magnify button Description Magnifies the image just as you can with the Zoom lever on your camera. Pressing it again goes to the next magnification level. Use the arrow buttons to pan around the magnified image. To return to 1x, press the Thumbnail View button. (Magnification has no effect on printing.) 6 Displays a thumbnail view of all images stored in the camera, or returns a magnified image to Thumbnail 1x.
Technical Support Please refer to your camera User's Manual for support procedures and contact information. Troubleshooting NOTE For additional troubleshooting information, please see the Troubleshooting section in your camera User’s Manual. Problem Possible cause The camera batteries will not charge, and the camera charging light is on. Batteries in the Install a rechargeable lithium ion camera are not battery. Disposable Duracell® CP-1 rechargeable. batteries are not rechargeable.
Problem Possible cause Solution The camera batteries will not charge, and the camera charging light is off. The camera is not securely in the dock. Make sure the camera is inserted completely into the dock. The camera dock does not have electrical power. Confirm that the power cord is plugged into the dock. Check that the dock power light blinks when the camera is in the dock. The camera is not recognized by the computer when it is in the dock.
Problem Possible cause Solution The camera is not recognized by the computer when it is in the dock. There is a functional problem with the dock. Run the dock functionality test by unplugging the power cord from the dock, then holding down the two buttons on the front of the dock while you plug the power cord back into the dock, and continue holding the buttons down. If the dock lights come on in 5 seconds (blinking or solid), then the dock is fully functional.
Battery Charge Times Where Battery is Charged Average Charge Time* Signal When Charging Has Completed In camera while 4 to 7 hours (depending on camera model) Power light on dock turns On In dock charging bay 2.5 to 3.5 hours Spare battery light on dock turns On camera is in dock *Charging may take a shorter or longer period of time depending on condition and state of discharge of the battery. Battery Safety Precautions Using Lithium Ion Batteries ! Do not disassemble or modify the battery.
! Do not connect the positive terminal and the negative terminal of the battery to each other with any metal object (such as wire). ! Do not carry or store the battery together with necklaces, hairpins, or other metal objects. ! Do not pierce the battery with nails, strike the battery with a hammer, step on the battery, or otherwise subject it to strong impacts or shocks. ! Do not solder directly onto the battery.
! Do not disassemble the camera or the dock. ! Unplug the HP AC power adapter from the electrical outlet before cleaning. ! After extensive use, the lithium ion battery may begin to swell. If it becomes difficult to insert the battery into or remove the battery from the camera or the dock, discontinue use of the battery and replace it with a new one. Please recycle the old battery. Purchasing Camera Accessories For information about purchasing accessories, go to: ! www.hp.
! HP Photosmart 3.3V AC power adapter for HP Photosmart R-series cameras—C8912B (Not available in Latin America) ! HP Photosmart SD Memory cards • HP Photosmart 64 MB SD memory card—C8896A • HP Photosmart 128 MB SD memory card—C8897A • HP Photosmart 256 MB SD memory card—L1813A • HP Photosmart 512 MB SD memory card—L1814A NOTE HP Memory cards are not available in Asia Pacific and Latin America. NOTE The 64 MB HP memory cards are available in North America only.