HP Photosmart R927 Digital Camera User Guide � �� � �� �� � �� � � � � �� � � � �
Legal and notice information © Copyright 2006 Hewlett-Packard Development Company, L.P. The information contained herein is subject to change without notice. The only warranties for HP products and services are set forth in the express warranty statements accompanying such products and services. Nothing herein should be construed as constituting an additional warranty. HP shall not be liable for technical or editorial errors or omissions contained herein. Windows® is a U.S.
Contents 1 2 3 Getting started.......................................................................................................5 Camera top and back .............................................................................................5 Camera front and bottom.........................................................................................6 Camera dock and insert..........................................................................................6 Before taking pictures.........
Viewing thumbnails........................................................................................27 Magnifying images.........................................................................................27 Using the Playback Menu......................................................................................27 Deleting images..............................................................................................28 Viewing image information.............................................
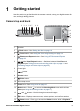
1 Getting started Use this section to get familiar with the camera controls, set up your digital camera for use, and begin taking pictures. Camera top and back 2 3 4 5 67 8 9 10 11 12 13 10 1 14 17 1 2 16 15 Speaker. Flash button—See Setting the flash on page 16. 3 Focus button—See Using the focus range settings on page 14. 4 Photosmart Express button—See Using HP Photosmart Express on page 38. 5 Live View/Playback button.
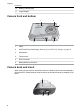
Chapter 1 (continued) 16 Battery Charging light. 17 Image Display. Camera front and bottom 1 2 3 6 5 4 1 Flash. 2 Self-Timer/Focus Assist light—See Using the Self-Timer settings on page 23. 3 Microphone. 4 Tripod mount. 5 Dock connector. 6 Battery/Memory card door. Camera dock and insert When setting up the dock for use with this camera, install the dock insert that shipped in the camera box. Attach the dock insert to the top of the camera dock by snapping it into place.
1 Camera/dock connector. 2 USB connector. 3 Power adapter connector. Before taking pictures Complete the following procedures before taking pictures or recording video clips. Install the battery 1. 2. 3. Open the Battery/Memory card door by sliding the door latch as indicated on the Battery/ Memory card door. Insert the battery in the larger slot, pushing the battery in until the latch catches. Close the Battery/Memory card door. Note Turn the camera off before removing the battery.
Chapter 1 Choose the language Use press to choose the language you want, then . To change the language later, use the Setup menu (see Using the Setup Menu on page 41). Set the region Along with the Language setting, the Region setting determines the default date format and the format of the video signal for displaying camera images on a television when connected through an optional HP Photosmart Premium dock or wireless dock base (see Using the Setup Menu on page 41). Use .
Note Once you install a memory card, all new images and video clips are stored on the card, rather than in internal memory. To use internal memory and view images stored there, remove the memory card. To transfer images from internal memory to an optional memory card, see Move Images to Card under Using the Playback Menu on page 27. For information about supported memory cards, see Storage under Specifications on page 54.
Chapter 1 About the HP Photosmart Software The CD that came with your camera contains the following versions of HP Photosmart Software: ● ● ● HP Photosmart Premier Software (for Windows XP and XP x64 systems with at least 128 MB of RAM). This version of the software includes some extra features that let you: – Use the Share feature to e-mail images to addresses you specify, create online albums, and automatically print selected images when you connect your camera to your computer.
2 Taking pictures and recording video clips Live View allows you to frame pictures and video clips in the Image Display. To activate until appears briefly in the upper right corner of the Image Live View, press Display. The Live View display looks like this: 1 Shooting mode indicator. 2 Memory card indicator. 3 Battery level indicator (see Power indicators on page 51). 4 5 12 Pictures remaining count. Focus brackets (see Auto focus and exposure on page 12).
Chapter 2 Recording video clips 1. 2. 3. 4. Press until appears briefly in the upper right corner of the Image Display. This indicates you are in Live View. Frame the subject. Press and release the Video button. To stop recording video, press and release the Video button again. Instant Review After you have taken a still image or recorded a video clip, the camera displays it in Instant Review. If you want to delete the image or video clip, press , select This Image from the Delete sub-menu, then press .
When you press the Shutter button halfway down, the camera focuses from the closest distance, then examines other focus regions, displaying those in focus as green brackets. The sample image shows focus in regions one, two, and five. If the camera keeps focusing on something other than your subject, set Auto Focus Area to Spot (see Auto Focus Area under Using the Capture Menu on page 20), then use Focus Lock (see Using Focus Lock on page 13).
Chapter 2 1. 2. 3. 4. Frame the subject for your picture within the focus brackets. In low light or low contrast situations, frame a brighter or higher contrast object. Press the Shutter button halfway down. Hold the Shutter button halfway down and reframe. Press the Shutter button all the way down to take the picture. Optimizing exposure When you press the Shutter button halfway down, the camera also measures the light level to set the proper exposure.
Normal Focus (Default)—Use when taking pictures of subjects greater than 500 mm (20 in) away. Macro—Use when taking close-up pictures of subjects between 100 mm and 1 m (4.7 to 39.4 in) away. Auto Macro—Use when you are not sure if the subject is in the Macro or Normal focus range. Infinity—Use when taking pictures of distant objects and landscapes. Manual Focus—Allows you to step manually through the full focus range (see Using Manual Focus on page 15).
Chapter 2 In Live View, use the buttons on the Zoom lever to control zoom. to zoom out. Press to zoom in and Digital zoom In digital zoom, the Image Display shows a yellow frame around the scene. 1. 2. 3. In Live View, press on the Zoom lever to optically zoom to the maximum level, then release the lever. Press and hold until the image you want to capture fills the yellow frame. If you . zoom in too far, press To return to optical zoom, press until digital zooming stops. Release , then press it again.
Red eye The red-eye phenomenon is caused when light from the flash reflects off the subjects' eyes, which can make human eyes appear red in the captured image. If you turn on Red-Eye Removal (see Red-Eye Removal under Using the Capture Menu on page 20), the camera examines the image after taking it. If the camera detects red eyes, it then processes the image to remove them. This examination and processing takes additional time.
Chapter 2 (continued) Snow—For capturing scenes in snow. Sunset—For capturing outdoor scenes at sunset. Document—For capturing flat, textual, or graphical pieces. Aperture Priority—For specifying the aperture setting. This mode lets you , while the camera selects select the F-number (aperture) setting using the best shutter speed. If the image will be over- or under-exposed more than 0.5 stops, the F-number and shutter speed turn red. Adjust the F-number until these items turn white.
3. 4. 5. Position the camera to take the second picture. Use the transparent overlay of the first image superimposed on one third of the Live View screen to align your second picture with the first. Press the Shutter button to take the second picture. Continue adding more pictures to the panorama, or press to end the panoramic sequence. During Instant Review (see Instant Review on page 12), each image in the panoramic sequence is displayed.
Chapter 2 Selecting and saving preferred settings in My Mode 1. While in Live View, press , use to My Mode, then press twice to highlight display the My Mode Capture Menu. 2. Use to highlight My Shooting Mode, press , use to select a shooting mode to to return to the use in My Mode, then press My Mode Capture Menu. 3. Use to highlight another menu option, press , use to highlight a setting, then press to select that setting and return to the My Mode Capture Menu. 4.
(continued) Self-Timer—For capturing images or recording video after a 10-second delay (see Using the Self-Timer settings on page 23). ● ● ● Off (Default)—Disables Self-Timer. On—For taking one delayed shot or video clip. On - 2 Shots—For taking two delayed shots or one video clip. Red-Eye Removal—For automatically removing red eyes when flash is set to Auto or Flash On and the camera detects red eyes. For information about red eyes, see Red eye on page 17.
Chapter 2 (continued) Video Quality—Sets resolution and compression for video clips. The fewer stars, the greater the compression. ● ● ● Normal (VGA ) (Default)—For outdoor action video clips or printing individual video frames up to 10.2 by 15.2 cm (4 by 6 in). VGA —For indoor video clips or printing individual video frames up to 7.6 by 12.7 cm (3 by 5 in). QVGA —For capturing longer video clips or e-mailing shorter clips.
(continued) ● ● ISO 200—For lower light conditions. ISO 400—For lower light conditions and/or action when short shutter speeds are desired. Saturation—Controls the saturation of colors in your pictures. ● ● ● Low—Mutes colors to give a softer, more natural look to the subject. Medium (Default)—Leaves colors normally saturated. High—Emphasizes more vivid colors. Sharpness—Controls how sharp the fine detail is in your images. ● ● ● Low—For taking portrait pictures with softer, more natural edges.
Chapter 2 Tip If you want to include yourself in the picture, press the Shutter button all the way down, then place the camera on a tripod or stable surface. The camera locks focus and exposure just before the end of the countdown, allowing you time to place yourself in the scene. Note To add audio to images taken with the Self-Timer setting, see Recording audio on page 30. The Self-Timer setting resets to the default Off setting after the picture or video clip is taken.
Adaptive Lighting can brighten areas that a flash wouldn’t reach.
3 Reviewing images and video clips You can review and manipulate images and video clips in Playback as described here. For information about enhancing images, see Using the Playback Menu on page 27 and Using the Design Gallery Menu on page 31. Using Playback 1. 2. Press until appears briefly in the upper right corner of the Image Display. Use to scroll through your images and video clips (video clips play automatically).
Saving frames from video clips If you want to print a frame from a video clip, you can save an individual frame as a still image. 1. 2. 3. 4. During video playback, press to pause the video. Use to scroll one frame at a time. Press to save the displayed frame. Press to resume playing the video clip. Viewing thumbnails 1. 2. 3. While in Playback, press Thumbnails (same on the Zoom lever) to view as Zoom Out thumbnails. Use and to scroll through the thumbnails.
Chapter 3 (continued) Stitch Panorama—See Stitching panoramas on page 29. Record Audio—See Recording audio on page 30. Move Images to Card—Moves images from internal memory to memory card. Available only if there are images in internal memory and a memory card is inserted. To move images, select this option and follow the on-screen prompts. Deleting images To delete an image using the 1. 2. 3.
(continued) 3 Non-default shooting mode (see Using the shooting modes on page 17), Flash (see Setting the flash on page 16), and Focus setting (see Using the focus range settings on page 14). 4 All non-default Capture Menu settings except Self-Timer and Burst. 5 Histogram displaying, left to right, the distribution of dark, mid-range, and light pixels in the captured image. 6 Memory card indicator. 7 File name of the image. 8 File size of the image. 9 Date and time image was captured.
Chapter 3 3. You can use to magnify the stitched panorama, and image and examine the stitching. Press to save the stitched panoramic image; press stitching. to pan around the to cancel panorama When you stitch a panorama, individual images in the panoramic sequence are retained. Recording audio Record Audio allows you to record an audio clip and attach it to an existing image or panoramic sequence. 1. 2. Select Record Audio to immediately start recording.
4 Using the Design Gallery Menu You can use the Design Gallery features to enhance your captured images. 1. 2. 3. While in Playback, use to scroll to an image, then press . Use to highlight the Design Gallery Menu tab. Use to highlight an option, then press and follow the on-screen instructions. Apply Artistic Effects—See Applying artistic effects on page 31. Modify Color—See Modifying colors on page 32. Add Borders—See Adding borders on page 32. Remove Red Eyes—See Removing red eyes on page 33.
Chapter 4 3. 4. – Kaleidoscope—Mirrors the image in four directions. – Solarize—Creates a partial reversal of tones and emphasizes outlines. Press to select the artistic effect and display the creative sub-menu. Follow the on-screen instructions to adjust the artistic effect. Press to save a copy of the image with the artistic effect and return to the Design to exit without saving and return to the Apply Artistic Gallery Menu. Press Effects sub-menu.
4. Follow the on-screen instructions to adjust the border. Press to save a copy of the image with the specified border and return to the to exit without saving and return to the Add Design Gallery Menu. Press Borders sub-menu. Removing red eyes When you select Remove Red Eyes, the camera processes the current still image to remove red eyes from the subjects. Note To prevent red eyes in images, see Red-Eye under Setting the flash on page 16.
Chapter 4 3. 34 When you print, the normal aspect ratios get cropped on the top and bottom (landscape) or on the sides (portrait). Cropping helps ensure that the content you want gets printed. Press to save a copy of the cropped image and return to the Design Gallery Menu. Press to exit without saving and return to the Crop sub-menu.
5 Transferring and printing images You can transfer images and video clips with or without the HP Photosmart Software that came with your camera. However, the HP Photosmart Software has several features for transferring and managing your images and also guides you through the transfer process. Transferring images with HP Photosmart Software If you have installed the HP Photosmart Software (see Install the software on page 9), use this method to transfer images and video clips to your computer.
Chapter 5 Connecting to the computer 1. 2. Turn off the camera, connect the dock to your computer and place the camera in the dock. – On Windows computers, the camera appears as a device in Explorer, allowing you to copy images from the camera to the computer. – On Macintosh computers, either Image Capture or iPhoto starts automatically, allowing you to transfer images to the computer. When you have finished transferring images, remove the camera from the dock.
on page 37. 1. 2. 3. 4. 5. 6. Check that the printer is turned on, there is paper in the printer, and there are no printer error messages. Verify that the camera's USB Configuration is set to Digital Camera (see USB Configuration under Using the Setup Menu on page 41). Connect the dock and printer using the USB cable that came with your camera. Place the camera in the dock and turn on the camera. When the camera is connected to the printer, the Print Setup Menu displays on the camera.
6 Using HP Photosmart Express With HP Photosmart Express, you can select still images in your camera to print automatically (see Selecting individual images for printing on page 39) or to purchase online (see Buying prints online on page 40) the next time you connect the camera to your computer or printer. You can also customize the Photosmart Express Menu to include e-mail addresses, group distribution lists, online albums, or other online services that you specify.
3. 4. Highlight Share Menu Setup..., then press . Connect the camera to your computer via the dock. Follow the instructions in the Share dialog box to set up destinations in your camera. Disconnect the camera from the computer, then press to verify that the new destinations are now in the camera. Sending individual images to online destinations 1. 2. 3. 4. 5. 6. Turn on the camera, then press . Use to highlight the first destination.
Chapter 6 Sending all images to a printer or online destinations 1. 2. 3. 4. 5. 6. Turn on the camera, then press . Use to highlight Share All Images..., then press . Use to highlight the destination to which you want to send all the images, then press . a. If you selected Print, the Print All Images sub-menu appears. Use to . To deselect Print, select specify the number of copies to print, then press Print again in the Share All Images sub-menu, set the number of copies to 0, then press . b.
7 Using the Setup Menu The Setup Menu allows you to set preferences for the camera’s behavior. 1. 2. 3. 4. While in Live View or Playback, press , then use to highlight . Use to highlight a menu option, then press to display the menu option’s sub-menu. Use to highlight a setting, then press . To exit the Setup Menu, press . Settings you specify remain until you change them. Display Brightness—Adjusts the brightness of the Image Display. ● ● ● Low—For extending battery life.
Chapter 7 (continued) TV Configuration—Sets the video signal format for displaying camera images on a TV. ● ● NTSC—Used primarily in North America, parts of South America, Japan, Korea, and Taiwan. PAL—Used primarily in Europe, Uruguay, Paraguay, Argentina, and parts of Asia. (Language)—Sets the language. See Choose the language on page 8. Reset Settings—Resets camera to the factory default settings. ● ● 42 Cancel—Exits the menu without resetting any of the settings.
8 Troubleshooting Use this section to find information on: ● ● Resetting the camera (see Resetting the camera on page 43) Possible problems and solutions (see Problems and solutions on page 43) Resetting the camera If your camera does not respond when you press buttons, reset the camera. 1. 2. 3. 4. 5. Turn off the camera. Remove the memory card and battery.
Chapter 8 I have to recharge the Lithium Ion battery frequently. ● See Extending battery life on page 50. ● A battery that is new or has not been charged recently must be recharged to reach full capacity. ● If you have not used the battery for two months or longer, recharge it. The Lithium Ion battery will not charge. ● Try charging it again after it has drained awhile. ● Use only the approved HP AC power adapter.
● ● ● Set the camera to Macro, Auto Macro, Normal, or Infinity focus and try taking the picture again (see Using the focus range settings on page 14). Set the flash to Auto Flash or Flash On and set the shooting mode to Action. Check Image Advice for specific tips (see Image Advice under Using the Playback Menu on page 27). My image is too bright. ● Turn the flash off (see Setting the flash on page 16). ● Move back from the subject and use zoom.
Chapter 8 The camera responds sluggishly when trying to review images. See Storage on page 55 and Memory capacity on page 56 for tips about memory cards. Video recording terminates abruptly. The video is saved successfully, but it is shorter than expected. ● Choose a lower resolution/compression combination for the video (see Video Quality under Using the Capture Menu on page 20). ● Replace your memory card with a faster card. Look for cards marked High Performance, Pro, Ultra, or High Speed.
I am having a problem installing or using the HP Photosmart Software. ● Make sure your computer meets the minimum system requirements as listed on your camera packaging. ● Refer to the HP Customer Care website: www.hp.com/support. How can I get professional-quality prints if I don’t have a photo printer? Use the Buy Prints Online feature on the Photosmart Express Menu (see Buying prints online on page 40).
9 Product support Use this section to find support information for your digital camera, including links to helpful websites and an overview of the support process. Helpful websites Camera tips, product registration, newsletter subscriptions, driver and software updates, purchase HP supplies and accessories www.hp.com Customers with disabilities www.hp.com/hpinfo/community/accessibility (English only) HP Customer Care, driver and software updates, support information www.hp.com/support www.hp.
5. 6. Extending or upgrading your warranty. If you would like to extend or upgrade your camera's warranty, please contact the store where you bought the camera or check the HP Care Pack offers at www.hp.com/support. If you already purchased an HP Care Pack Service, please check the support conditions on your contract.
A Managing batteries Your camera uses a rechargeable HP Photosmart R07 Lithium Ion battery (L1812A/L1812B). Top points about batteries Always insert the battery in the camera correctly (see Install the battery on page 7). If the battery is inserted improperly, the compartment door may close but the camera will not operate. ● ● ● ● ● ● New rechargeable Lithium Ion batteries are shipped partially charged. Fully charge them before first use.
● ● Immediately discontinue use of the battery if, while using, charging, or storing the battery, the battery emits an unusual smell, feels excessively hot (note that it is normal for the battery to feel warm), changes color or shape, or appears abnormal in any other way. In the event the battery leaks and the fluid gets into one’s eye, do not rub the eye. Rinse well with water and immediately seek medical care. If left untreated, the battery fluid could cause damage to the eye.
Appendix A For Minimum, Maximum, and Average numbers, four pictures are taken per session with at least a 5 minute break between sessions. In addition: ● ● ● ● The minimum number of shots is obtained with extensive use of Live View (30 seconds per picture), Playback (15 seconds per picture), and Flash On. Optical zoom (both directions) is used on 75% of the shots. The maximum number of shots is obtained with minimal use of Live View (10 seconds per picture) and Playback (4 seconds per picture).
● ● ● ● Do not operate the camera, dock, or quick recharger if the Lithium Ion battery appears damaged. Do not disassemble the camera, dock, or quick recharger. Unplug the HP AC power adapter or quick recharger from the electrical outlet before cleaning the power adapter or quick recharger. After extensive use, the Lithium Ion battery may begin to swell.
B Specifications Resolution Still pictures: ● ● 8.2MP (3312 by 2496) total pixel count 8.1MP (3296 by 2480) effective pixel count Video clips (VGA—640 by 480 total pixel count; QVGA—320 by 240 total pixel count): ● ● ● VGA VGA QVGA (Default)—24 frames/sec —24 frames/sec —24 frames/sec Sensor Diagonal 9.1 mm (1/1.8-type, 4:3 format) CCD Color depth 42 bit (14 bits by 3 colors). 42 bit images are transformed into an optimized 24 bit image and stored in the JPEG format.
(continued) Flash working range ● ● ● Zoom Position Wide—Maximum with ISO Speed set to Auto ISO: 4.75 m (15.6 ft) Zoom Position Telephoto—Maximum with ISO Speed set to Auto ISO: 4.75 m (15.6 ft) Uniformity—Corner intensity > 55% of Center intensity (Lux Seconds) Image Display 7.62 cm (3.0 in) color LTPS TFT LCD with backlight; 230,400 pixels (960 by 240) total pixel count Storage ● ● ● ● ● 32MB internal flash memory. Slot for memory card.
Appendix B Storage –30° to 65° C (–22° to 149° F) at 15% to 90% relative humidity Memory capacity Not all 32MB of internal memory is available for storing images, because some memory is used for internal camera operations. The actual file sizes and number of still images that can be stored in internal memory or on a memory card will vary depending on the content of each still image and the length of any associated audio clip.
Index A Action mode 17 Adaptive Lighting 21, 24 adding borders 32 AE Metering 22 Aperture Priority mode 18 apply artistic effects 31 arrow buttons 5 artistic effects 31 assistance 48 audio clips 11, 30 Auto Focus Area 22 Auto Macro setting 15 Auto mode 17 B battery charge 7 conserving 50 door 6 install 7 shots per 51 top points about use 50 Beach mode 17 blinking lights on camera 5, 6 borders 32 Bracketing 21 Burst setting 22, 24 C camera dimensions 55 parts 5, 6 reset 43 specifications 54 turn on/off 7 wei
Setup 41 microphone 6 modifying colors 32 Move Images to Card 28 My Mode 18, 19, 20 N Night Portrait mode 17 Night Scenery mode 17 Normal Focus 13, 15 number of pictures remaining 11 still images 56 O on/off 7 ON/OFF button 5 online destinations 38 print buying 40 optical zoom 15 P Panorama mode 17, 18, 29 parts of camera 5, 6 Photosmart Express Menu 38, 38, 39, 40 pictures 11, 23 Playback 26 Playback Menu 27 Portrait mode 17 power indicators 51 light 5 ON/OFF button 5 usage 55 preview Panorama 29 print ima