R 3Com ExecutiveAssistant Getting Started Guide http://www.3com.
3Com Corporation, 350 Campus Drive, Marlborough, MA 01752-3064 Copyright C 2008, 3Com Corporation. All Rights Reserved. No part of this documentation may be reproduced in any form or any means or used to make any derivative work (such as translation, transformation or adaptation) without written permission from 3Com Corporation.
CONTENTS INTRODUCTION ............................................................. 4 SERVER, NBX, AND NETWORK CONFIGURATION REQUIREMENTS ........................................................... 5 DEPLOYING EXECUTIVEASSISTANT................................ 7 Pre-Install Configuration.............................................................................................................. 7 Media Driver Installation and Configuration....................................................................
INTRODUCTION This document details the process involved with installing a 3Com ExecutiveAssistant in conjunction with a 3Com NBX System Software in an IP Telephony environment. After reading and following the steps in this document completely, the reader shall be comfortable with: 1. 2. 3. 4. 5. NetSet configurations required to make ExecutiveAssistant work. Media Driver – Overview and installation Installation of ExecutiveAssistant. Dial Plan configurations for ExecutiveAssistant features.
SERVER, NBX, AND NETWORK CONFIGURATION REQUIREMENTS • The 3Com ExecutiveAssistant should be plugged into the exact same switch as the 3Com phone system to minimize network related delays or other issues. For the system to function properly, nothing can be in the network that blocks, delays, re-orders or otherwise impedes the communications between the 3Com ExecutiveAssistant and the 3Com phone system.
• Ensure that no other software is running on the server that can even temporarily fully utilize the CPU, NIC, or hard-drive controller. It is highly recommended that the Media Drivers and the ExecutiveAssistant are the only software programs (besides the core Windows itself) running on the server. • Windows must be logged in with a local or domain administrator account in order to install the Media Drivers and the ExecutiveAssistant on the server.
DEPLOYING EXECUTIVEASSISTANT Pre-Install Configuration Media Driver Installation and Configuration What are Media Drivers? The 3Com Media Driver allows Windows applications to send and receive audio with a NBX system. The Media Driver itself creates one or more Media Phones on the NBX system which act like virtual phones. The NBXTSP, installed with the 3Com Media Driver, allows applications to control the Media Phones to perform functions like answering a phone call.
2. Ensure that your physical phones have been discovered by the NBX system. 3. Deselect the Require passwords for TAPI clients checkbox in the NBX NetSet by clicking Virtual Connections > TAPI Settings.
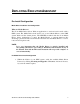
4. To enable Auto Disovery of Telephones during Media Driver Installation, click on System-Wide Settings > Auto Discovery Settings within NBX NetSet and check the Auto Discover Telephones checkbox. Media Driver Installation 1. Read and follow each step carefully to install and configure the 3Com Media Driver for use with the 3Com ExecutiveAssistant.
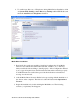
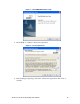
Figure 1 – 3Com NBX Media Driver Setup 4. Click “Next” to continue to the license agreement. Figure 2 – License Agreement 5. After reading and agreeing to the terms of the license agreement, click “Yes” to continue.
Figure 3 – Pre-Installation Steps 6. After verifying that you have identified the correct IP address for the NBX system, press “Yes” to continue. Figure 4 – Yes/No to print Pre-Installation 7. Click “Yes or No” for printing the Pre-Installation steps to continue.
Figure 5 – Input the NetSet IP Address 8. Change the default value of “255.255.255.255” to the actual IP Address of the NBX system as verified in step #6 of this manual. This manual will use 192.168.1.110 as an example. Figure 6 – Updated NetSet IP Address 9. Click “Next” to continue.
Figure 7 - Option to run the NBX Media Driver Wizard 10. Keep the “Yes” checkbox ticked so that the 3Com NBX Media Driver Configuration Wizard will automatically start after the next reboot. Click “Next” to continue. Figure 8 - Support for NetMerge (TM) CCSS 3.0 11. Some now-obsolete software add-on packages had included the option to install support for Intel NetMerge CCSS. Do not check this checkbox. Do not install support for Intel NetMerge CCSS. Click “Next” to continue.
Figure 9 - Media Driver Destination Folder 12. It is recommended to accept the default location for the installation. The installation and application files for the 3Com Media Driver do not consume a large amount of disk space, so for most installations there is no need to change the destination folder. It is required that the system have write-access to this folder at all times, regardless of who might be logged into Windows (due to log files being written there). Click “Next” to continue.
be installed. If the 3Com NBX TSP has not already been installed, then the following message box will appear: Figure 11 - 3Com NBX TSP not found 14. Click the “OK” button to allow the installation of the 3Com NBX TSP. Figure 12 - 3Com NBX TAPI Service Provider Setup 15. The InstallShield Wizard for the 3Com NBX TAPI Service Provider will appear. Click the “Next” button to continue.
Figure 13 - 3Com TSP License Agreement 16. After reading and agreeing to the terms of the license agreement, click “Yes” to continue. Figure 14 - 3Com TSP Destination Folder 17. It is recommended to accept the default location for the installation. The installation and application files for the 3Com NBX TSP do not consume a large amount of disk space, so for most installations there is no need to change the destination folder.
Figure 15 - Input Telephone Extension 18. Once the TSP files have been added to the computer, the install wizard will prompt for your telephone extension. IMPORTANT: DO NOT ADD YOUR TELEPHONE EXTENSION AT THIS TIME. For client-level applications that only use the TSP, it is useful to add the extension of the person installing the TSP, but do NOT follow this instruction for server-based application such as the 3Com ExecutiveAssistant.
Figure 16 - Input Telephone Password 19. Accept the default password of "1111" and click “Next” to continue. Figure 17 - NBX TSP Configuration 20. The NBXTSP configuration dialog appears. Do not make any changes. Click “OK” to continue.
Figure 18 - TAPI Service Installation Complete 21. The TSP installation complete dialog appears. Click “Finish” to continue. Figure 19 - Continue Anyway Instruction 22. If you are using Windows XP or 2003, you will receive the message box below. If you are using Windows 2000, you will receive a similar message that instructs you to click "Yes" instead of the "Continue Anyway" button. In either case, click “OK” to continue.
23. Click “Continue Anyway” to continue. If you are using Windows 2000, click “Yes” to continue. Figure 21 - Media Driver Installation Complete 24. Installation is complete. Click “Finish” to restart the computer and prepare to configure the drivers.
25. After the computer has restarted, the 3Com Media Driver Configuration Wizard will automatically start. It is very important to read the information contained on each tab of the configuration wizard to help prevent errors during this process. It will ultimately save you time to read and understand the information compared to proceeding without reading and experiencing errors. Figure 22 - Media Driver Configuration Wizard Introduction 26.
Figure 23 - Media Driver Configuration Wizard Network 27. There are two tests on the Network tab. Click the ”Connect” button to perform the first test. The second test is performed by pressing the “Test” button. Both tests must pass in order to continue. If the lower test indicates that 2 or more Network adapters are installed, carefully make sure that the correct physical adapter was selected.
Figure 24 - Media Driver Configuration Wizard NBX Wave Driver 28. Click the "Detect" button and verify that the test detected 250 devices. Click “Next” to continue. If zero devices were detected, then Do Not proceed until the problem is resolved. This most commonly occurs when using Terminal Services or Remote Desktop. This error occurs because Windows is trying to use audio drivers from the local computer instead of the remote computer in this case.
the value and press the Start button to continue. Please note that the discovery process can halt other operations of the 3Com phone system. It is recommended to discover the ports when halting other operations will not affect normal business operations. If the discover process must be done during normal business hours, it is recommended to discover the devices in small batches to minimize the load on the phone system. This is done by discovering 2 devices, then 4 devices, then 6 devices and so on.
• • • • • • • Anti-virus - Try disabling all anti-virus and spyware detection programs. Real-time anti-virus scanning is not supported due to CPU issues. Most applications that use the Media Drivers depend on available CPU cycles and expect no delays in the information supplied by the Media Drivers. Realtime anti-virus scanning can steal CPU cycles from applications and delay the information the applications depend on.
Figure 26 - Media Driver Configuration Wizard NBX Wave Phones 32. The NBX TSP Configuration window appears. Click Modify button to continue. Figure 27 - NBX TSP Configuration 33. Change the default extension of 200 to your first Media Driver port extension. The example below demonstrates changing the extension to 300. If you do anything other than modify (remove and then add or add other extensions to the TSP), then you will need to reboot before proceeding with the wizard. Click OK button to continue.
Figure 28 - Add/Modify Extensions 34. Do not add any other addition extensions at this time otherwise you will need to reboot the computer before you can proceed with the Configuration Wizard. Click OK button to continue. Figure 29 - NBX TSP Configuration 35. Do not reboot at this time. Usually, you will need to reboot when you receive this message but you will first want to try to finish the Media Driver Configuration wizard in this case. Click OK button to continue. Figure 30 - NBX TAPI Reboot 36.
Figure 31 - Media Driver Configuration Wizard NBX Wave Phones 37. Find the extension number of a physical telephone extension that you can answer for this test. Enter the extension where it is asking you to enter a "physical NBX phone" extension as shown in Figure 32. This documentation shows the example of using extension 100. Click Dial button to continue and be prepared to answer the physical phone.
If you receive this message, it is indicating that the extension value that was entered under the NBX Wave Phone tab of the configuration wizard is not the first Media Driver port extension or it does not match the extension listed in the NBX TSP Configuration.
4. Absolutely confirm that the PC running the drivers is plugged into the same switch, using the same subnet, as the NBX. 5. Verify there is nothing blocking communications between the computer and the 3Com phone system on port 20485 such as a firewall. 6. Go through each test again of the 3Com NBX Media Driver configuration wizard. The wizard can be accessed by clicking on Start > Programs > 3Com NBX > NBX Media Driver – Configuration Wizard.
Figure 36 - Media Driver Configuration Wizard Wave Driver + TSP 40. Upon pressing the Play button, you should hear a test message played over the physical telephone extension. If you heard audio, hang up and click Close button to continue. If you did not hear audio, this indicates a problem with the wave portion of the Media Driver. Click the Failed Test button for possible solutions. If the possible solutions do not resolve the issue, contact 3Com technical support. Figure 37 - TSP Dialer 41.
Figure 38 - Media Driver Configuration Wizard Wave Driver + TSP 42. Verify the results. All boxes should have a checkmark and indicate the tests passed as shown in Figure 39. Continue only if all tests have passed. Figure 39 - Media Driver Configuration Wizard Finish 43. The next step is to add additional Media Driver ports to the NBX TSP if you discovered more than one port during the discovery process. The documentation example demonstrated discovery of 20 ports starting at extension 300.
now show how to add the additional 19 ports to the NBX TSP. Open the NBX TSP Configuration by clicking the button with two green monitors and a yellow telephone located towards the bottom left of the wizard or by going to the Windows Control Panel > Phones and Modems > Advanced tab then highlight the "NBX TAPI Service Provider" and press the configure button. Figure 40 - Media Driver Configuration Wizard Finish 44.
45. Also include all of the phone extensions if (1) You will be using the Call Recording, Monitor/Whisper/Barge-in, Hot-desking or Personal Audio On-hold features of ExecutiveAssistant, or (2) the Inbound Call Recording, Emergency Notification, or Intercom features of Education Module. In this case, you must also put all the extension phones in the TAPI Service Provider. The Media Port extensions should be first, followed by all the physical phone extensions of the system.
Figure 42 - Media Driver Configuration Wizard Finish You should now restore the original “Extensions Start at” value on the NBX under NetSet – Tab To It > System Settings > System Wide Post Media Driver Install Configuration Installing ExecutiveAssistant NOTE: It is highly recommended that you install ExecutiveAssistant on a stand alone server and that the ExecutiveAssistant server not be used as a DNS or a mail server. To install the ExecutiveAssistant 1. Run setup.
4. Register your copy of ExecutiveAssistant by entering the Activation Key obtained from 3Com.
Check whether 3Com ExecutiveAssistant is online and also check whether all the Media phones are online in 3Com ExecutiveAssistant. If you have discovered 10 media phones then there should be 10 (=ÎOnline) icons. This ensures that all your Media phones are functional and online. Configuring ExecutiveAssistant Post Media Driver Install Configuration NOTE: ExecutiveAssistant requires separate Hunt Groups and different WAV phones for each of the features listed below.
1. Within NBX NetSet, click Call Distribution Groups > Hunt Groups > Add, Create a Hunt Group with an extension number (ex: 4001) and a hunt group name (ex: “EA_Autoattendant”) as illustrated in the screen shot below. 2. Select the Media Phone extensions that you will you use as a member of this Hunt Group 3. Ensure Logout if no answer checkbox is not checked. 4.
Adding Telephone Extension Users All the telephone extension users that would need use ExecutiveAssistant features are to be added into 3Com ExecutiveAssistant User/Departments/Groups list as explained below: 1. From the ExecutiveAssistant main window, Click on Settings > User configuration (by default, it has no password) 2. Click on the Add Button and the “Setup/Edit of User, Department, or Group” Dialog window appears as shown below 3.
5. If desired, to allow callers to ask for a user by name instead of dialing an extension number, select the Pronunciations Button. The “Nicknames/Pronunciation” Dialog window appears as shown below. Otherwise, Click the OK Button on the “Setup/Edit of User, Department or Group” window.
Setting up Nicknames/Pronunciation 1. Enter the First name and the Last name of the user in the appropriate fields within “Nicknames/Pronunciation” pop-up window. 2. Click the Test Pronunciation Button to test 3.
CONFIGURING EXECUTIVEASSISTANT FEATURES Hot Desking What is Hot Desking? A user can log in to his / her extension from other phones using ExecutiveAssistant. Once logged in, the user can make and receive calls or access Voicemail. Enabling Hot Desking 1. Create an ExecutiveAssistant Hot Desking hunt group in NBX system. For detailed steps refer to the section Post Media Driver Install Configuration 2.
4. The Find Me Follow Me Preferences Tab appears as shown below.
The above preferences window will show you what are the away rules and call coverage rules you can configure. The 3Com ExecutiveAssistant will route the calls based on these above configured rules. 5. From Find Me Follow Me Tab, select the Edit Away States Pull-Down Menu. From the menu select the appropriate Away State action or create a new Away State Option.
6. The Away State dialog window appears as shown below.
Away State Figure 2 7. Fill in the appropriate Option Name and Forward to Phone number details (see Figure 1 for internal phone numbers and Figure 2 for external phone numbers). 8. Fill-in the appropriate user settings, if necessary, and click the OK Button 9. Now ExecutiveAssistant will be in Away state as shown below. NOTE: To remove the Away settings please click the Accept Calls Button.
Call Recording & Monitoring The Call Recording module allows you to record any inbound, outbound and extensionto-extension call. You can record every call automatically or you can record a call on demand. The ExecutiveAssistant Call Log offers user the ability to see which calls have been recorded and gives the user the ability to play them back at the touch of a button. NBX Dial Plan Configuration To support ExecutiveAssistant’s call recording, one must modify the dial plan of your NBX system first.
Internal (Extension-to-Extension) Calls To allow ExecutiveAssistant to record internal calls between extensions, you must create a new pre-translator in the NBX system dial plan to route these calls to the ExecutiveAssistant Auto-Attendant. 1. Using NetSet, create a hunt group for the ExecutiveAssistant Auto-Attendant, if you did not create one earlier. Refer to Post Media Driver Install Configuration, earlier in this guide. 2. In NBX NetSet, select Dial Plan > Configure.
pre-translator (“EA Internal Ext-to-Ext”) has been created and three user extensions (1000, 1002, 1004) have been added to it. Note: Do not change the default NBX pre-translator table. The NBX system will not function properly if the default table is changed. 4. Add PreTranslatorOperation lines to dial plan to route calls from the extensions you wish to have calls recorded for, routing them to the hunt group for the ExecutiveAssistant Auto-Attendant, as shown in the screenshot below.
10. Click the OK button to save these configuration changes to your NBX system. When you save these changes, the NBX system will route internal calls to those extensions through the new pre-translator. Outbound External Calls To allow ExecutiveAssistant to record outbound external calls, you must first create a new hunt group on the NBX system for Record Outbound and then create a new dial plan table that routes those outbound calls to the new hunt group. 1.
Note: You may wish to save your current NBX system dial plan before making any changes. To save the current dial plan, select the Operations tab, click the Export button, then save the text that appears to a file. 3. Create a new dial plan table for outbound calls. In the screenshot below, we add dial plan table 4, called “Outbound Record” for this purpose and duplicate the default Internal dial plan table. In each TableEntry line, the “Id” entry is changed from 1 to 4, as shown in the screenshot below.
Below is the complete dial plan table used in this example.
TableEntry Create TableEntry Create TableEntry Create 4 4 4 44 45 46 8911 8411 8* 4 4 4 4 Emergency 4 Operator 4 COCode 0 0 0 8 8 8 5. Add a DestinationRoute line to the dial plan for the new destination route that we entered in the new dial plan. In this example, the new route number is 9 and the name of the new route is “Outbound Record”. The additional line in the dial plan would appear like this: / Route Description / ----- ----------DestinationRoute Create 9 Outbound Record 6.
12. Finally, in NBX NetSet, select Dial Plan > Tables. In the Tables screen that appears, select the new dial plan table. (In this example, “Outbound Record”). 13. In the Devices Using screen that appears, select the extensions whose outbound calls you want to have ExecutiveAssistant record. In the screenshot below, three extensions (1000, 1002, 1004) are shown as using the new dial plan table for outbound recording.
Click the OK button to save these configuration changes to the NBX system. When you save these changes, the NBX system will interpret calls from the selected extensions using the new dial plan table, which routes outbound calls to the ExecutiveAssistant Record Outbound hunt group Configuring ExecutiveAssistant Call Recording and Monitoring 1 Create a ExecutiveAssistant Auto-Attendant hunt group in NBX system.
Johnson, Tim Johnson, Tim Simms, Mark Tyne, Sally 3Com ExecutiveAssistant Getting Started Guide 1000 1003 1001 56
4 5 6 7 Click the OK button From the ExecutiveAssistant main window, click Record Calls. Highlight the appropriate user and specify whether the call is to record Always or On Demand.