
ProCurve 6.9/7.7dBi Dual Band Directional Antenna (J8999A) Guide 2010-01

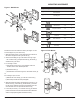

Key Desc Size Qty
1 Wall / Mast Mount 1
2 Articulating Arm 1
3 Antenna Mount 1
4 SS / Nylon Hex Nut 1/4” 4
5 Machine Screw
1/4”-20 x
1-1/4”
2
6 SS Split Lock Washer 1/4” 2
7 Flat Washer 1/4” 2
8 SS Hex Nut 1/4”-20 2
9 Plastic Wall Anchor #8 4
10 SS Machine Screw #8-18 x 3/4” 4
11 Hose Clamp 2
Assemble and mount the antenna as follows. (See Figure 1 for wall
mount and Figure 2 for pole / mast mount.)
1. Attach the antenna mount (3) to the exposed studs on the back of
the antenna using the four SS / nylon hex nuts (4).
2. Secure the articulating arm (2) to the antenna mount (3) using a
1-1/4” machine screw (5), SS split lock washer (6), at washer (7),
and SS hex nut (8) as shown.
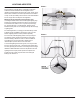
3. For mounting on a wall:
a) Using the wall / mast mount (1) as a template to mark hole
locations, drill four 3/16” diameter pilot holes.
b) Install wall anchors (9).
c) Install the wall / mast mount using four ¾” SS machine screws (10).
Or,
For mounting on a pole or mast:
a) Attach the two hose clamps (11) to the wall / mast mount (1).
b) Encircle the pole with each clamp and tighten.
4. Attach the antenna assembly to the wall/mast mount using a 1-1/4”
machine screw (5), lock washer (6), and at washer (7) as shown.
Use the screw to attach the free end of the articulating arm to the
mount and then secure it in place with an SS hex nut (8).
5. Loosen the pivot screws (1-1/4” machine screws (5)) as needed to
position the antenna for desired azimuth and elevation. When the
antenna is fully adjusted, tighten all hardware securely.
F
HP ProCurve Networking 2 HP ProCurve 6.9/7.7dBi Dual Band Directional Antenna (J8999A) Guide
MOUNTING HARDWARE