
3Com Switch 7750 Configuration Guide Guide


Super VLAN Configuration Example 119
[SW7750-vlan10] quit
[SW7750] interface Vlan-interface 10
[SW7750-Vlan-interface10] ip address 10.110.1.1 255.255.255.0
n
By default, the ARP proxy function is enabled on the VLAN interface of the super
VLAN, and cannot be disabled.
Super VLAN Supporting
DHCP Relay Example
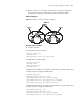
Network requirements
■ Create VLAN 6 as a super VLAN, and create VLAN 2 and VLAN 3 as the sub
VLANs which map VLAN 6.
■ Configure the IP address of the VLAN 6 as 10.1.1.1, and the sub network mask
as 255.255.255.0.
■ Enable the DHCP relay function on the VLAN interface of VLAN 6, and establish
the mapping between VLAN 6 and the remote DHCP server group 2 to make
the hosts in VLAN 2 and VLAN 3 being able to dynamically obtain IP addresses
from the DHCP server group 2.
Configuration Procedure
# Create VLAN 6, and configure it as a super VLAN.
<SW7750> system-view
[SW7750] vlan 6
[SW7750-vlan6] supervlan
# Create VLAN 2 and VLAN 3 and establish the mapping between them and VLAN
6.
[SW7750-vlan6] quit
[SW7750] vlan 2
[SW7750-vlan2] quit
[SW7750] vlan 3
[SW7750-vlan3] quit
[SW7750] vlan 6
[SW7750-vlan6] subvlan 2 3
# Create the VLAN interface of VLAN 6, and configure an IP address for it.
[SW7750-vlan6] quit
[SW7750] interface Vlan-interface 6
[SW7750-Vlan-interface6] ip address 10.1.1.1 255.255.255.0
# Enable the DHCP relay function on the VLAN 6 interface, that is, establish the
mapping between the interface and the DHCP server group 2.
[SW7750-Vlan-interface6] dhcp-server 2