
3Com Switch 7750 Configuration Guide Guide

OSPF Network Type Configuration 297
Configuring OSPF Area
Attributes
n
■ You must use the stub command on all the routers connected to a stub area to
configure the area with the stub attribute.
■ You must use the nssa command on all the routers connected to an NSSA area
to configure the area with the NSSA attribute.
OSPF Network Type
Configuration
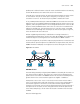
OSPF divides networks into four types by link layer protocol. See “OSPF Network
Type”. An NBMA network must be fully connected. That is, any two routers in the
network must be directly reachable to each other through a virtual circuit.
However, in many cases, this cannot be implemented and you need to use a
command to change the network type forcibly.
Configure the interface type as P2MP if not all the routers are directly accessible
on an NBMA network. Change the interface type to P2P if the router has only one
peer on the NBMA network.
In addition, when configuring a broadcast network or NBMA network, you can
also specify DR priority for each interface to control the DR/BDR selection in the
network. Thus, the router with higher performance and reliability can be selected
as a DR or BDR.
Configuration
Prerequisites
Before configuring the network type of an OSPF interface, perform the following
tasks:
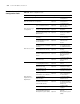
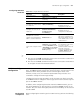
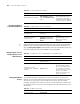
Table 214 Configure OSPF area attributes
Operation Command Description
Enter system view system-view -
Enter OSPF view
ospf [ process-id [ router-id
router-id ] ]
-
Enter OSPF area view area area-id -
Configure the current area to
be a stub area
stub [ no-summary ]
Optional
By default, no area is
configured as a stub area.
Configure an area to be an
NSSA area
nssa [
default-route-advertise |
no-import-route |
no-summary ]*
Optional
By default, no area is
configured as an NSSA area.
Configure the cost of the
default route transmitted by
OSPF to a stub or NSSA area
default-cost cost
Optional
This can be configured on an
ABR only. By default, the cost
of the default route to a stub
or NSSA area is 1.
Create and configure a virtual
link
vlink-peer router-id [ hello
seconds | retransmit seconds
| trans-delay seconds | dead
seconds | simple password |
md5 keyid key ]*
Optional
For a virtual link to take effect,
you need to use this
command at both ends of the
virtual link and ensure
consistent configurations of
the hello, dead, and other
parameters at both ends.